User Guide
Everything Temporeum can do
Temporeum turns the moments that matter — milestones, projects, goals, memories — into one clear visual timeline. This guide is organised as eight short parts, each answering one question: what is it, where is everything on screen, what can you place on a timeline, how do you keep it organized, how do you work faster, how do you share it, and how do you make it yours — plus a quick-reference part with every keyboard shortcut and the answers to common hiccups. Read top to bottom, or jump straight to what you need.
Welcome
What Temporeum is, and how to begin.
Welcome · 1
What is Temporeum
Temporeum is a visual timeline and a LifeOS in one place. Instead of burying plans and memories in lists, you place what matters on a single time axis and see how it all connects — the past you have lived and the future you are shaping, side by side.
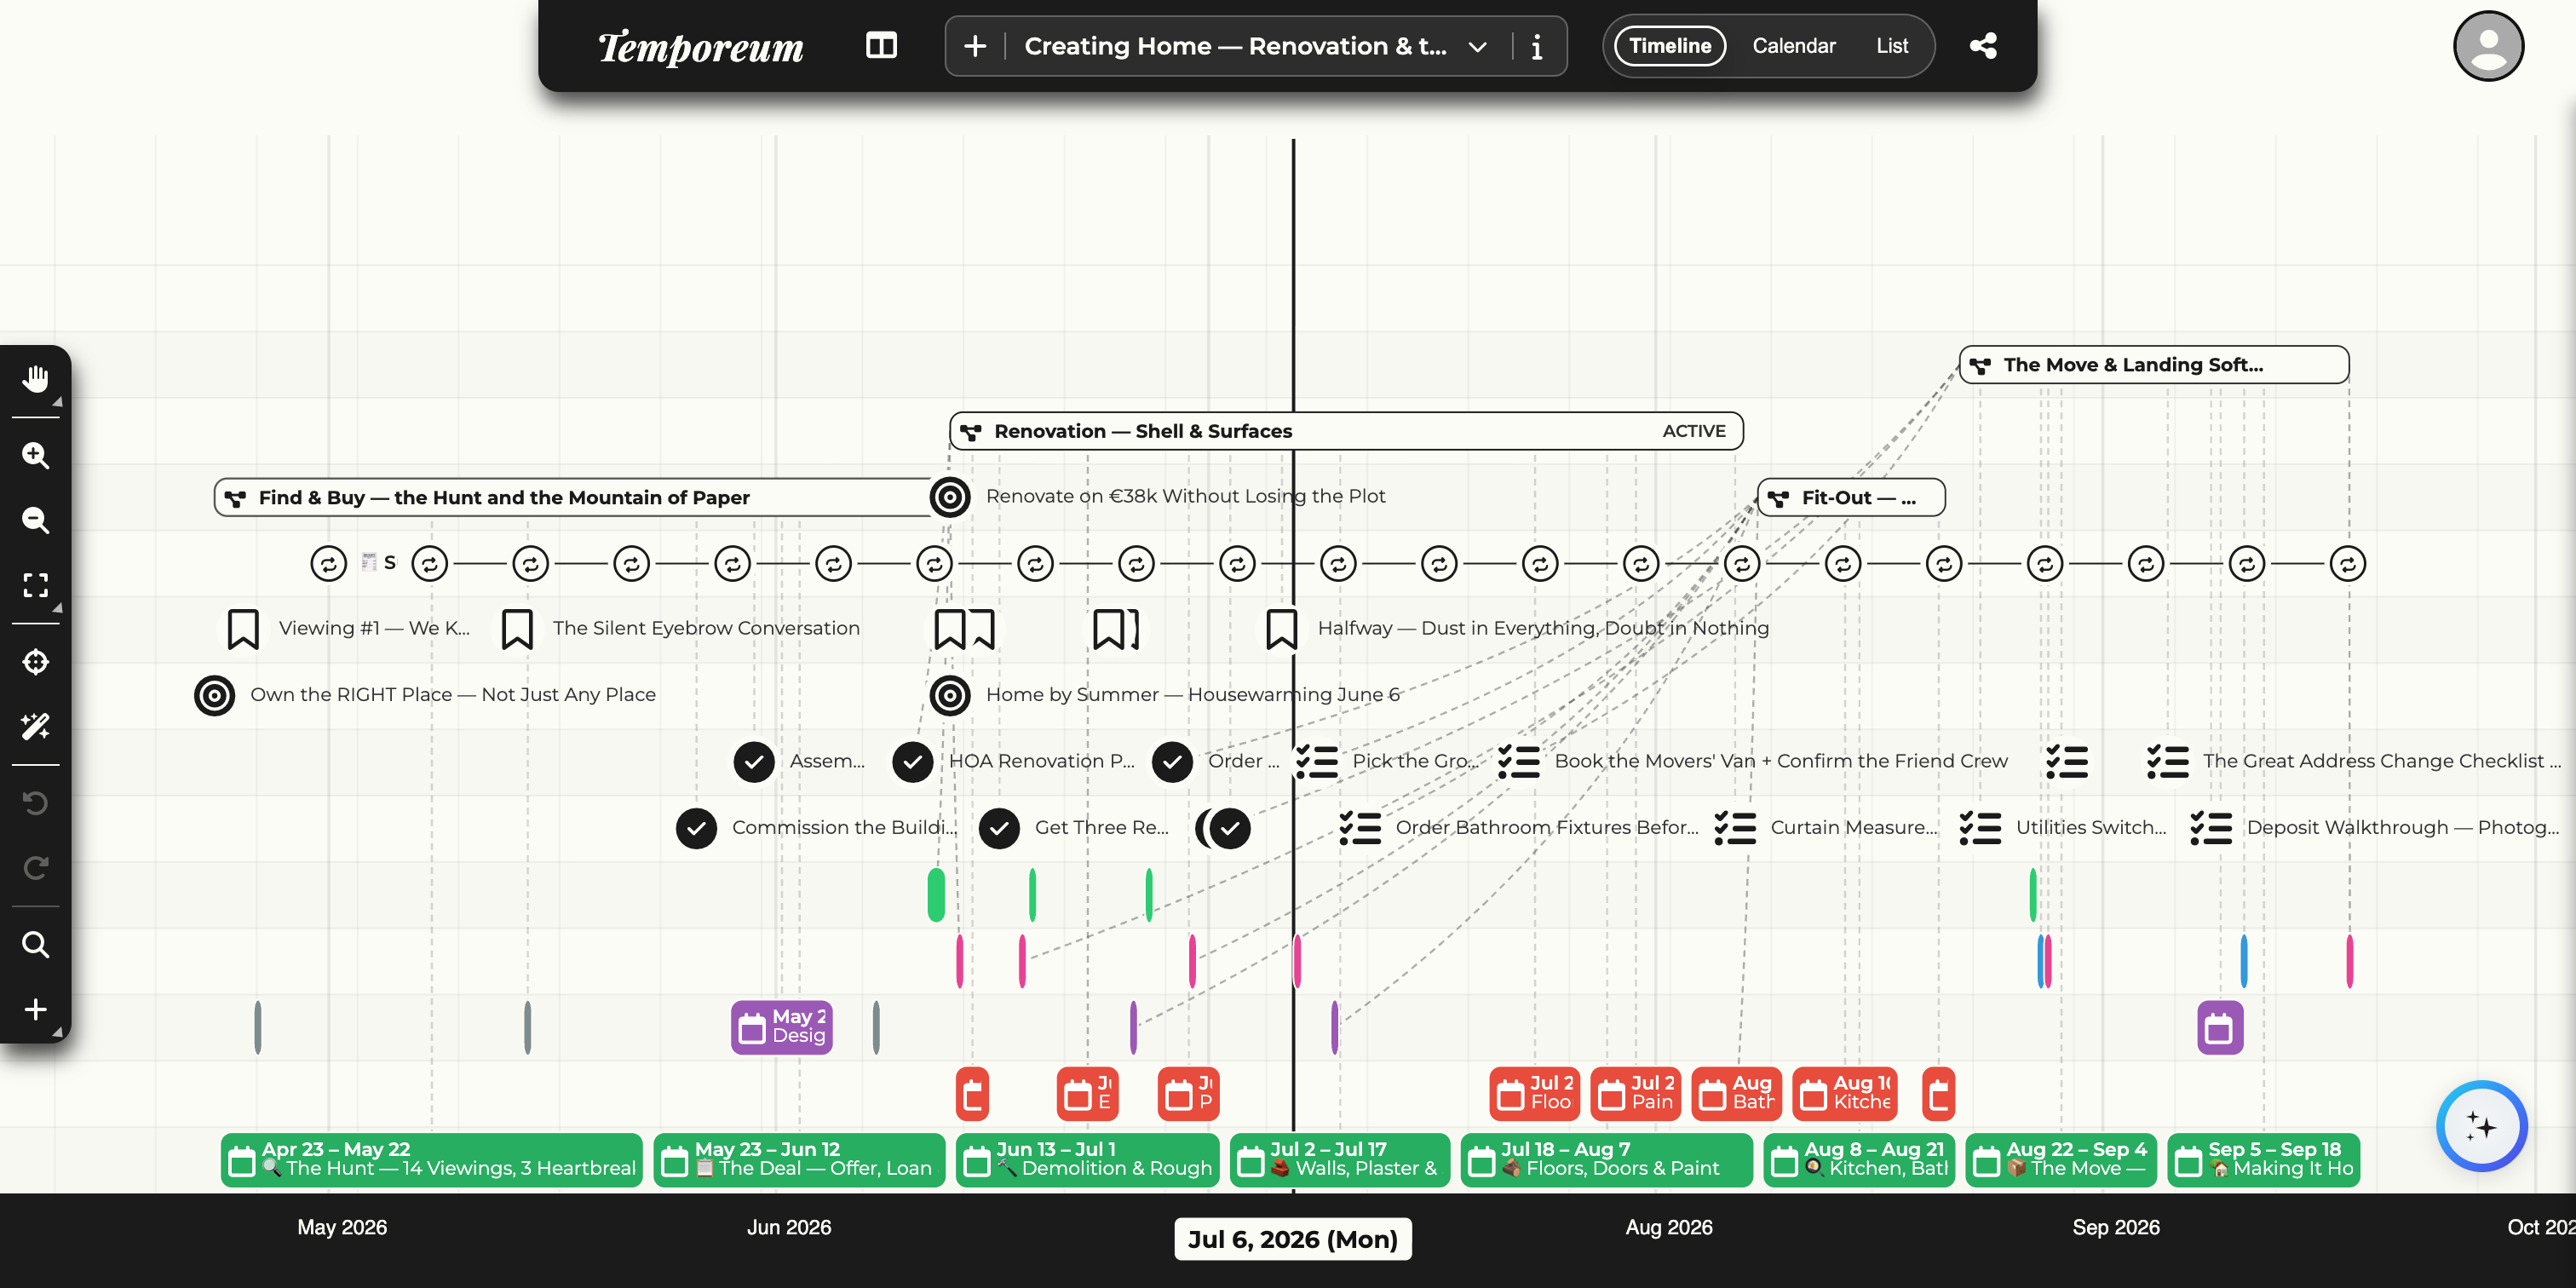
Everything is built from a few simple pieces, layered from the timeline outward:
- TimelinesA canvas for a theme — your whole life, a single project, a trip. You can keep as many as you like and switch between them.
- EventsThe moments on a timeline, each with a date, a category, notes, links, images and tasks.
- Categories & tagsColour-code and cross-label events so patterns and themes jump out at a glance.
- LifeOSA richer layer on top — goals, projects, habits, journals and resources — for actively running your life, not just recording it (Section 7).
- Three viewsSee the same data as a Timeline, a Calendar or a List, whichever fits the task.
- Sharing & AIShare a timeline publicly or collaboratively, and turn a paragraph of plain text into events with the built-in AI.
Welcome · 2
Getting started
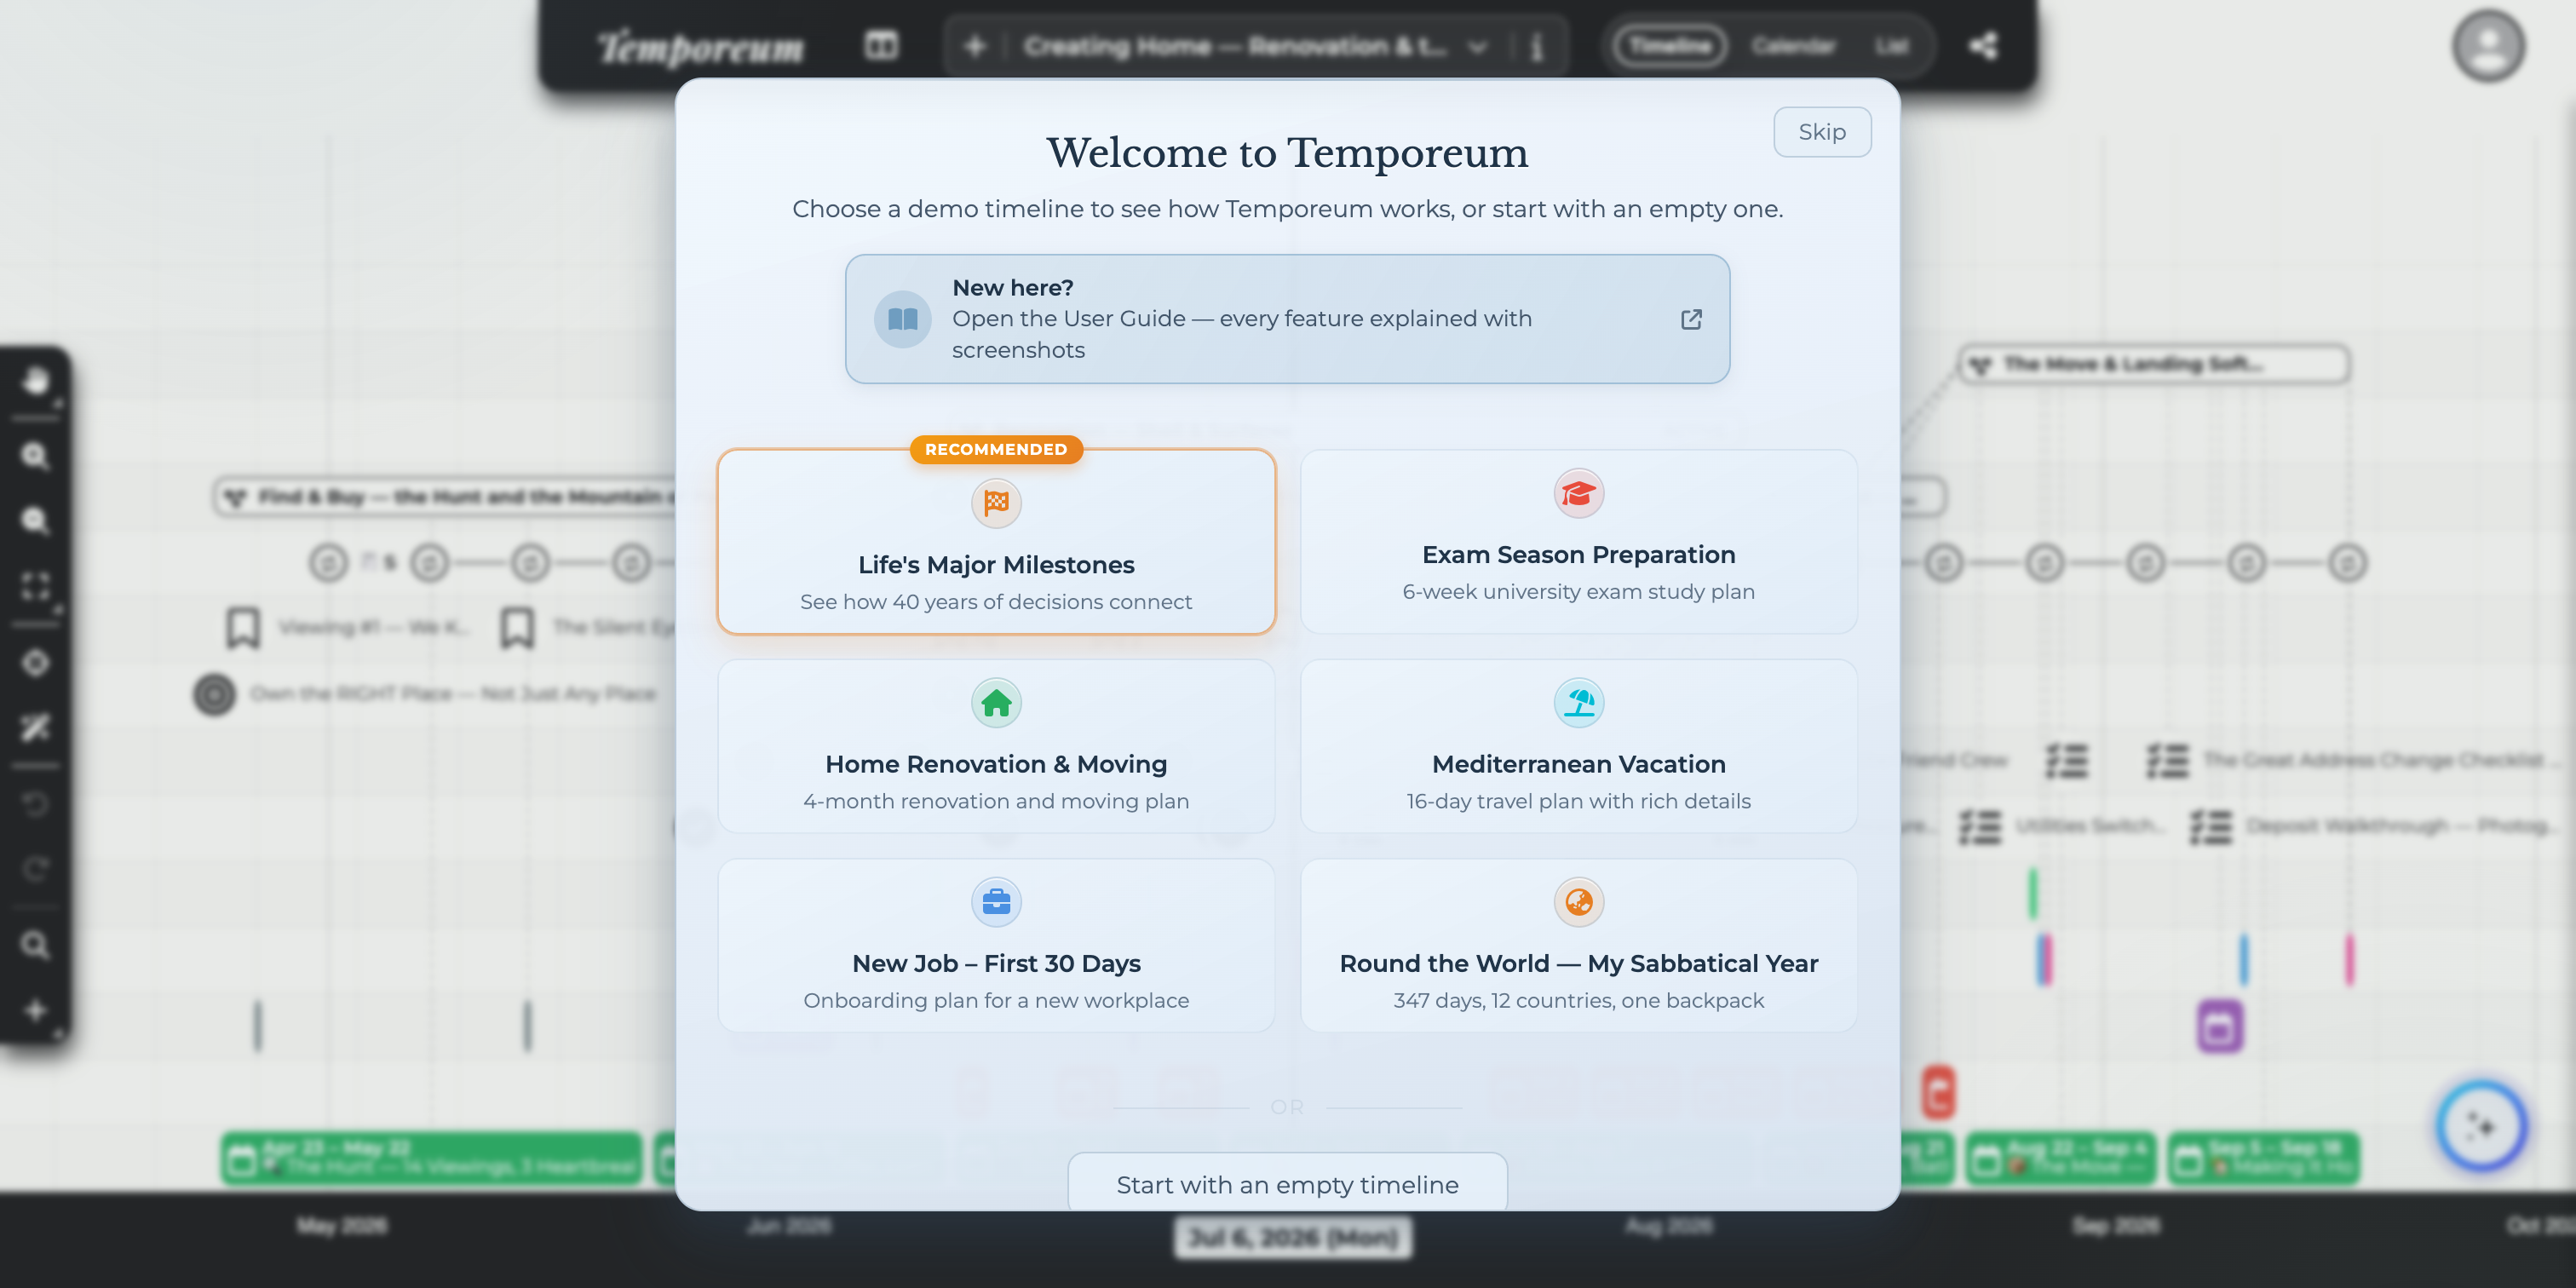
Create an account with an email and password, or sign in with Google or Facebook. The very first time you sign in, a short intro explains the idea, and then Temporeum offers to set you up with a demo timeline so you have something real to explore straight away.
 1
2
3
4
1
2
3
4
- Recommended demo“Life’s Major Milestones” — four decades of a life, the richest example of what a timeline can hold.
- Other demosSmaller, focused examples: an exam plan, a house move, a holiday, a new job, a side project. Great for seeing different use-cases.
- Start emptySkip the samples and begin with a blank timeline of your own.
- SkipClose the welcome screen entirely — you can always add demos or timelines later.
Loading a demo also starts a guided tour — a few short bubbles that point out the canvas, zooming and adding your own events. You can leave it at any time with Skip tour.
Your first timeline in five steps
The rest of this guide explains every screen in detail, but the whole loop fits in five steps:
- 1 · Create a timelineClick the + in the top bar and name it — your life, a project, a plan (Section 6).
- 2 · Drop in the first eventsQuick add → Event: a few milestones you remember and a few that are coming up (Section 8).
- 3 · Colour themGive the events categories so patterns show up at a glance (Section 16).
- 4 · Add the structureA project band for the chapter you are in, a goal lane for where it is heading (Sections 10–11).
- 5 · Come backTick off habits, jot a journal entry, and check the List view’s Today filter — the timeline starts working for you the moment you return to it (Sections 12–13, 5).
The interface
Where everything lives on screen.
The interface · 3
The timeline canvas
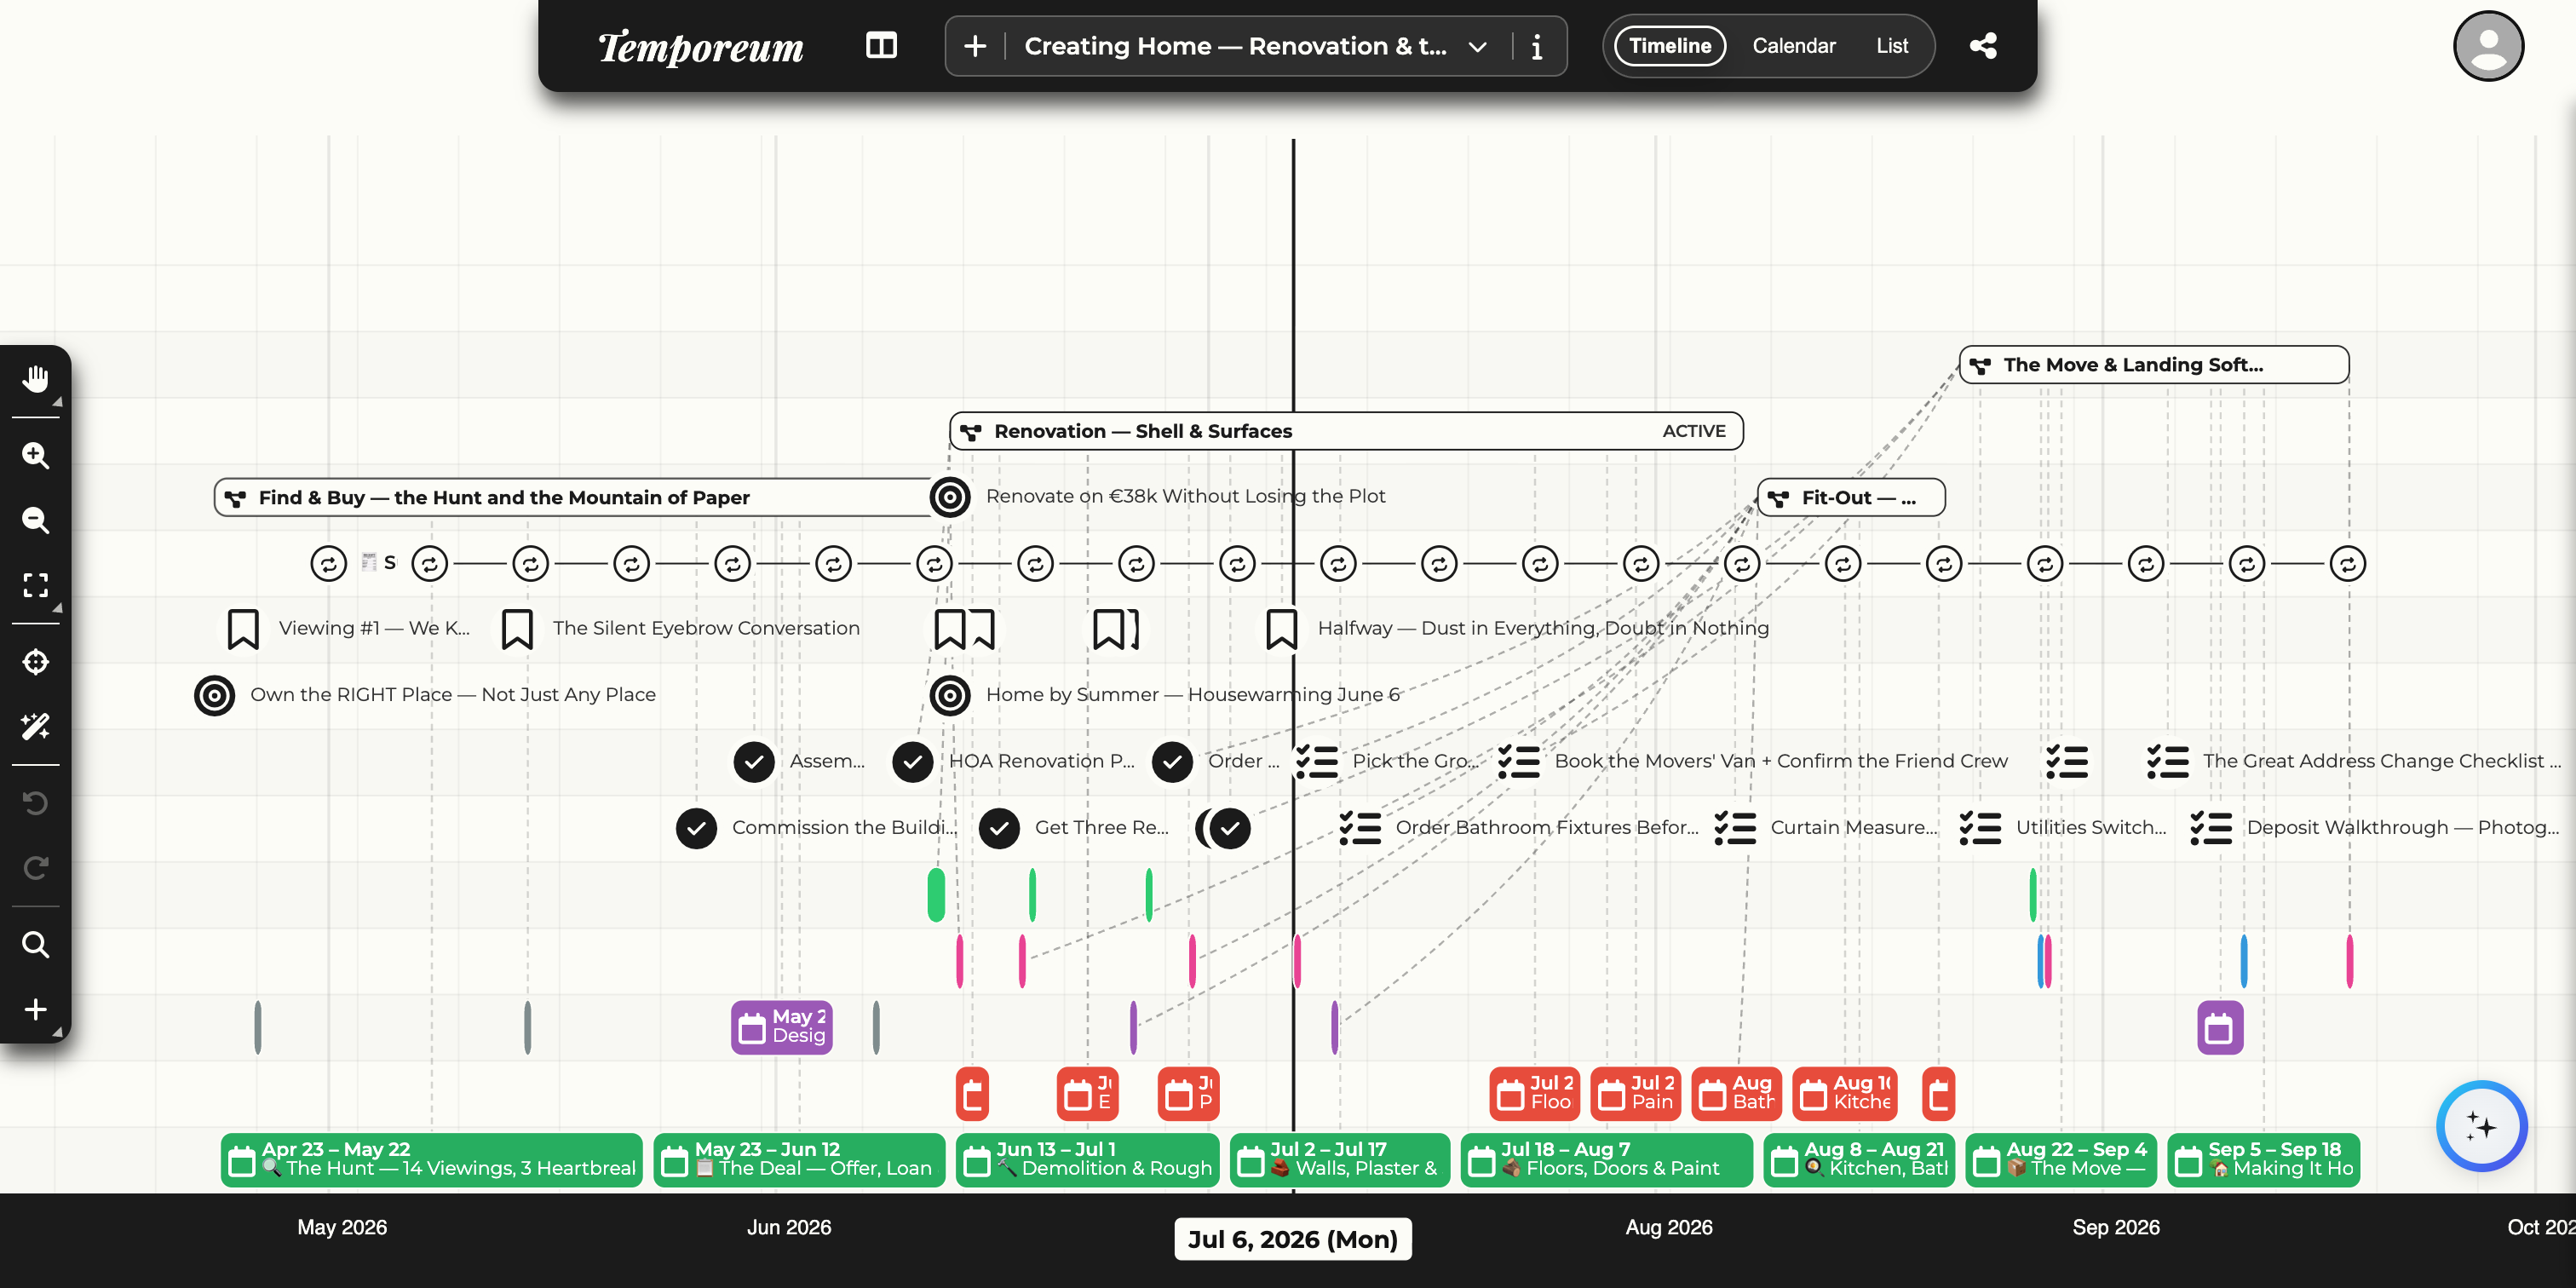
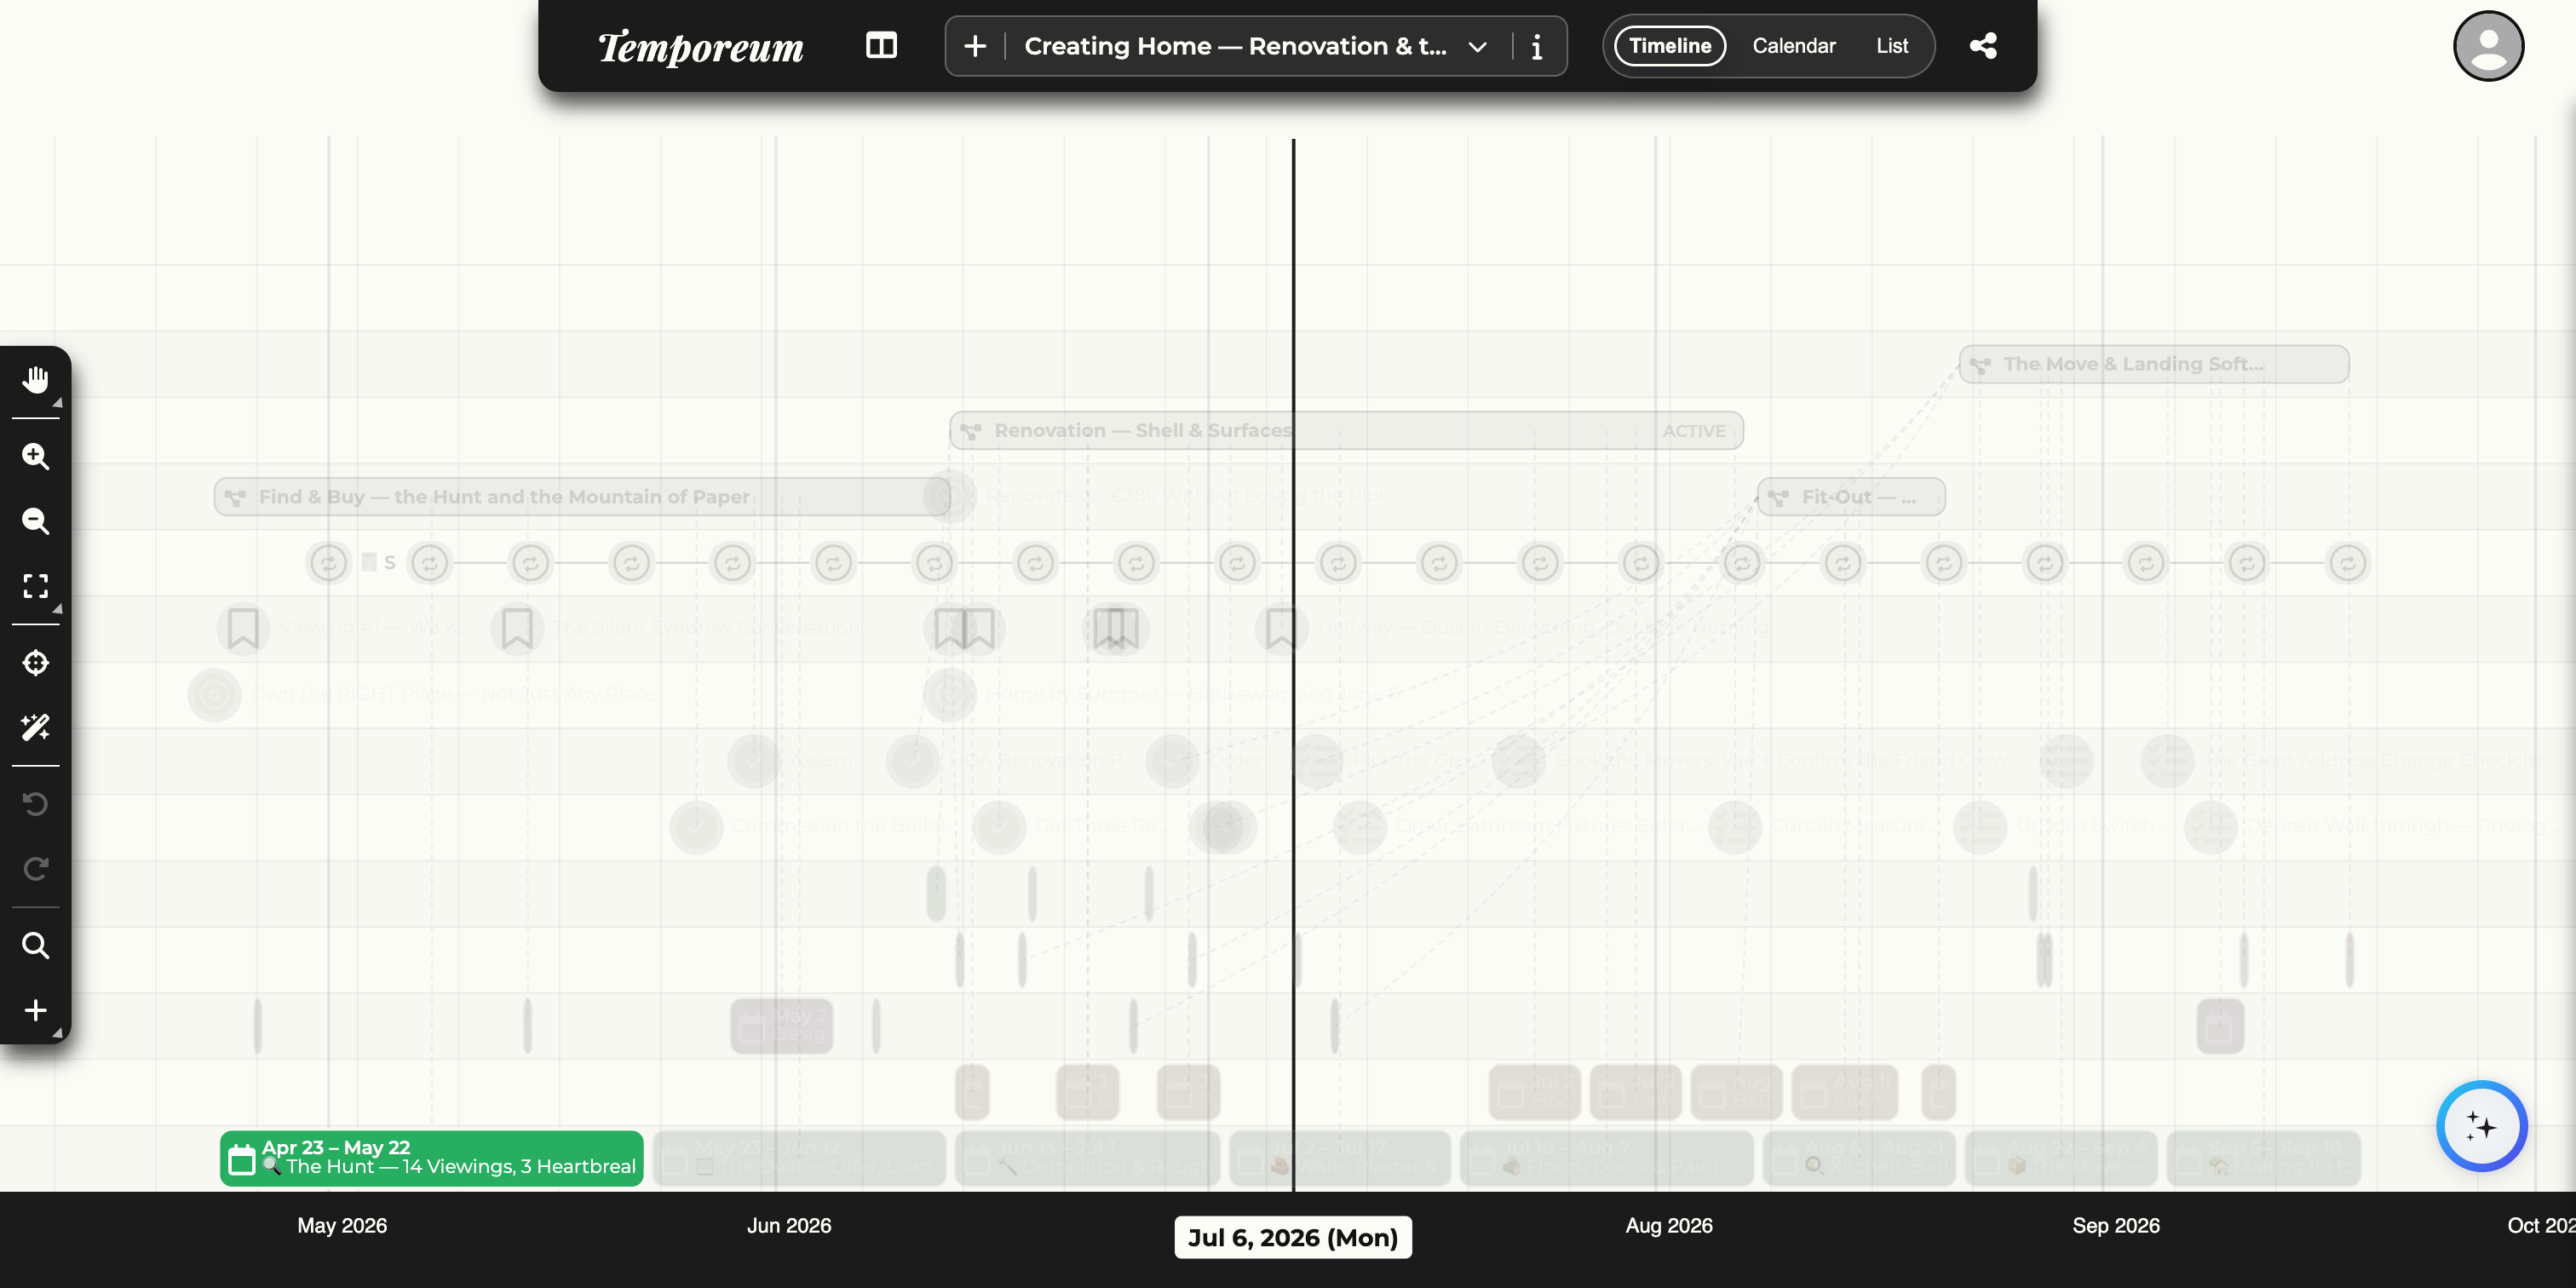
The canvas is where your whole life sits on a single horizontal time axis. The example below is the built-in “Creating a Home — Renovation & the Big Move” demo — five months from the first viewing to moving day on one screen. Every numbered marker points to a part of the interface you will use constantly.
 1
2
3
4
5
6
7
8
1
2
3
4
5
6
7
8
- Timeline selectorThe name of the timeline you are viewing. Click it to switch between your timelines, or the + to create a new one.
- Phase bandsNamed chapters (“Find & Buy”, “Renovation — Shell & Surfaces”) that group a stretch of time so long timelines stay readable.
- Zoom controlsZoom in and out of time, or open the presets to jump straight to a day, week, month, year or full-life view.
- Scroll to todayRecentres the canvas on the current date, wherever you have panned or zoomed to.
- Goal lanesLong-running goals (“Renovate on €38k Without Losing the Plot”) run as their own lanes so you can see progress against them over time.
- EventsEach marker is an event, coloured by its category. Click one to open it, or drag it to move it in time.
- Today lineThe vertical line marks the present. Everything left of it is the past; everything right is what is still ahead.
- Time axisThe scale along the bottom. It relabels itself — years, months, days — as you zoom, so the units always fit the view.
The interface · 4
The top bar
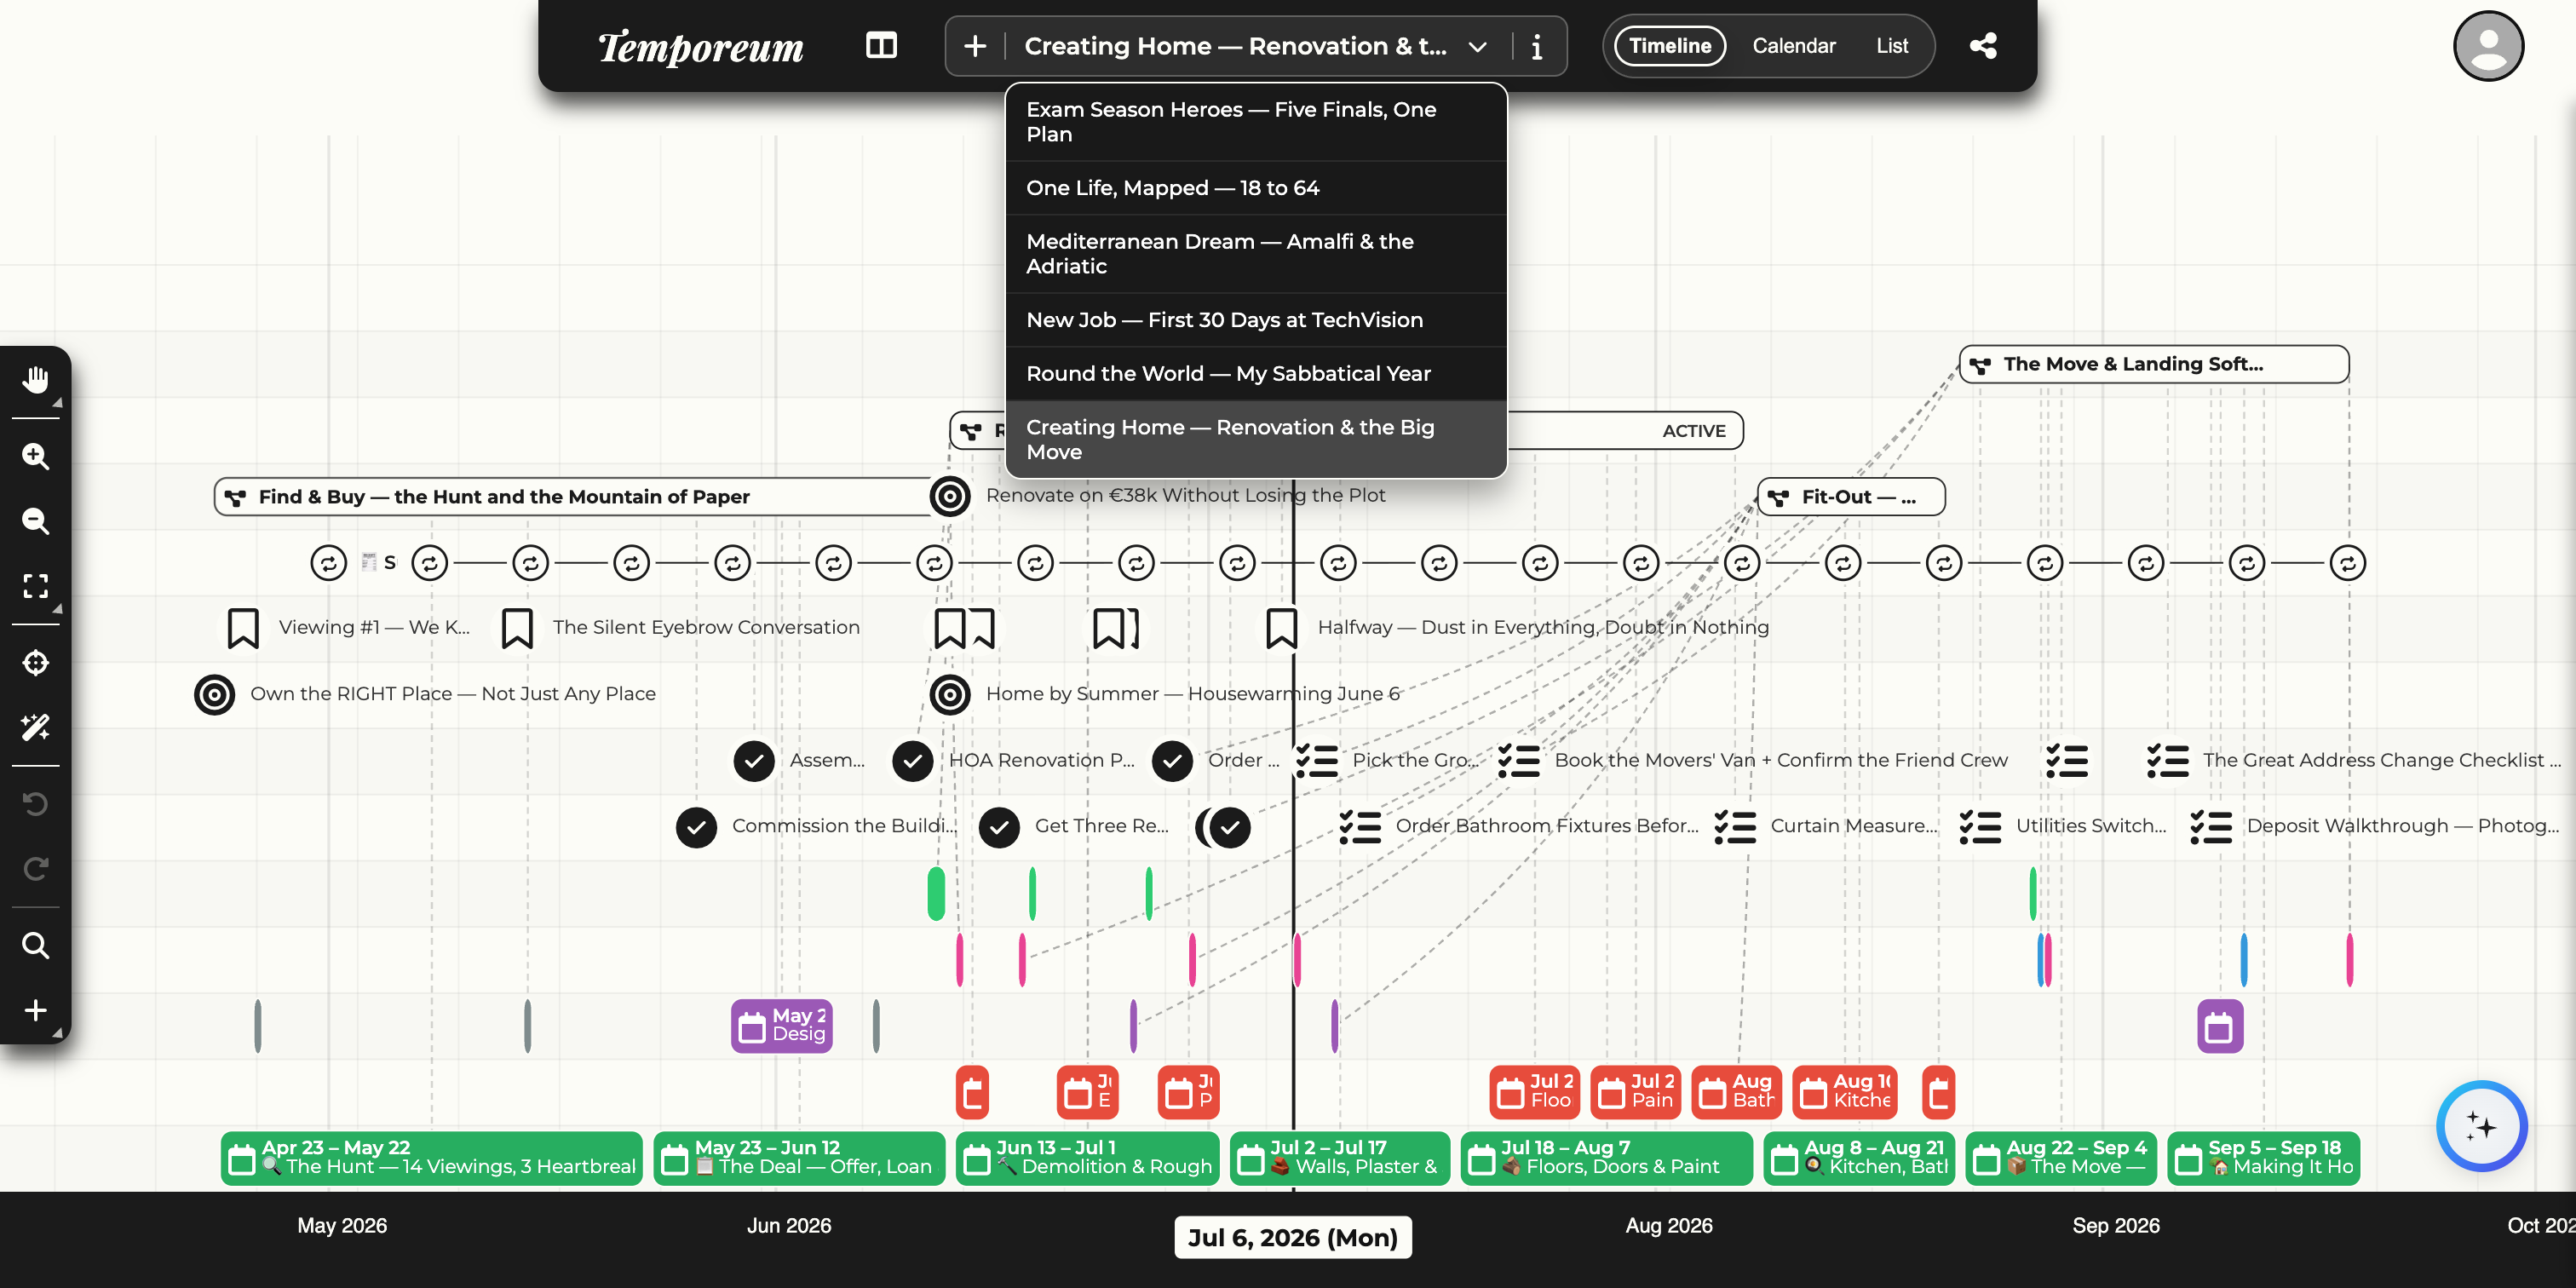
The strip across the top is the app’s control centre, and it has three zones. On the left, the Panels menu — the single door to the Tasks, Sources, Categories and Tags panels (Section 15). In the centre, the timeline switcher — which timeline you are looking at. On the right, the view switch (Section 5), the Shared button (Section 22) and your avatar (Section 24). Learn this one bar and you can reach everything in the app.
 1
2
3
4
5
6
1
2
3
4
5
6
- New timeline (+)Create a fresh timeline — the dialog is covered in Section 6.
- Timeline selectorShows the current timeline. Click to open the list.
- Timeline listAll your timelines. Click any name to switch the whole canvas to it.
- Timeline info (i)Opens details for the current timeline — its name and description, plus copy and export (Section 23).
- Panels menuThe table-columns icon on the left — the door to the organizing panels, covered in Part D (Section 15).
- SharedThe share icon on the right, next to your avatar. Opens the timelines others have shared with you and the ones you have shared out (Section 22).
The interface · 5
Views: Timeline · Calendar · List
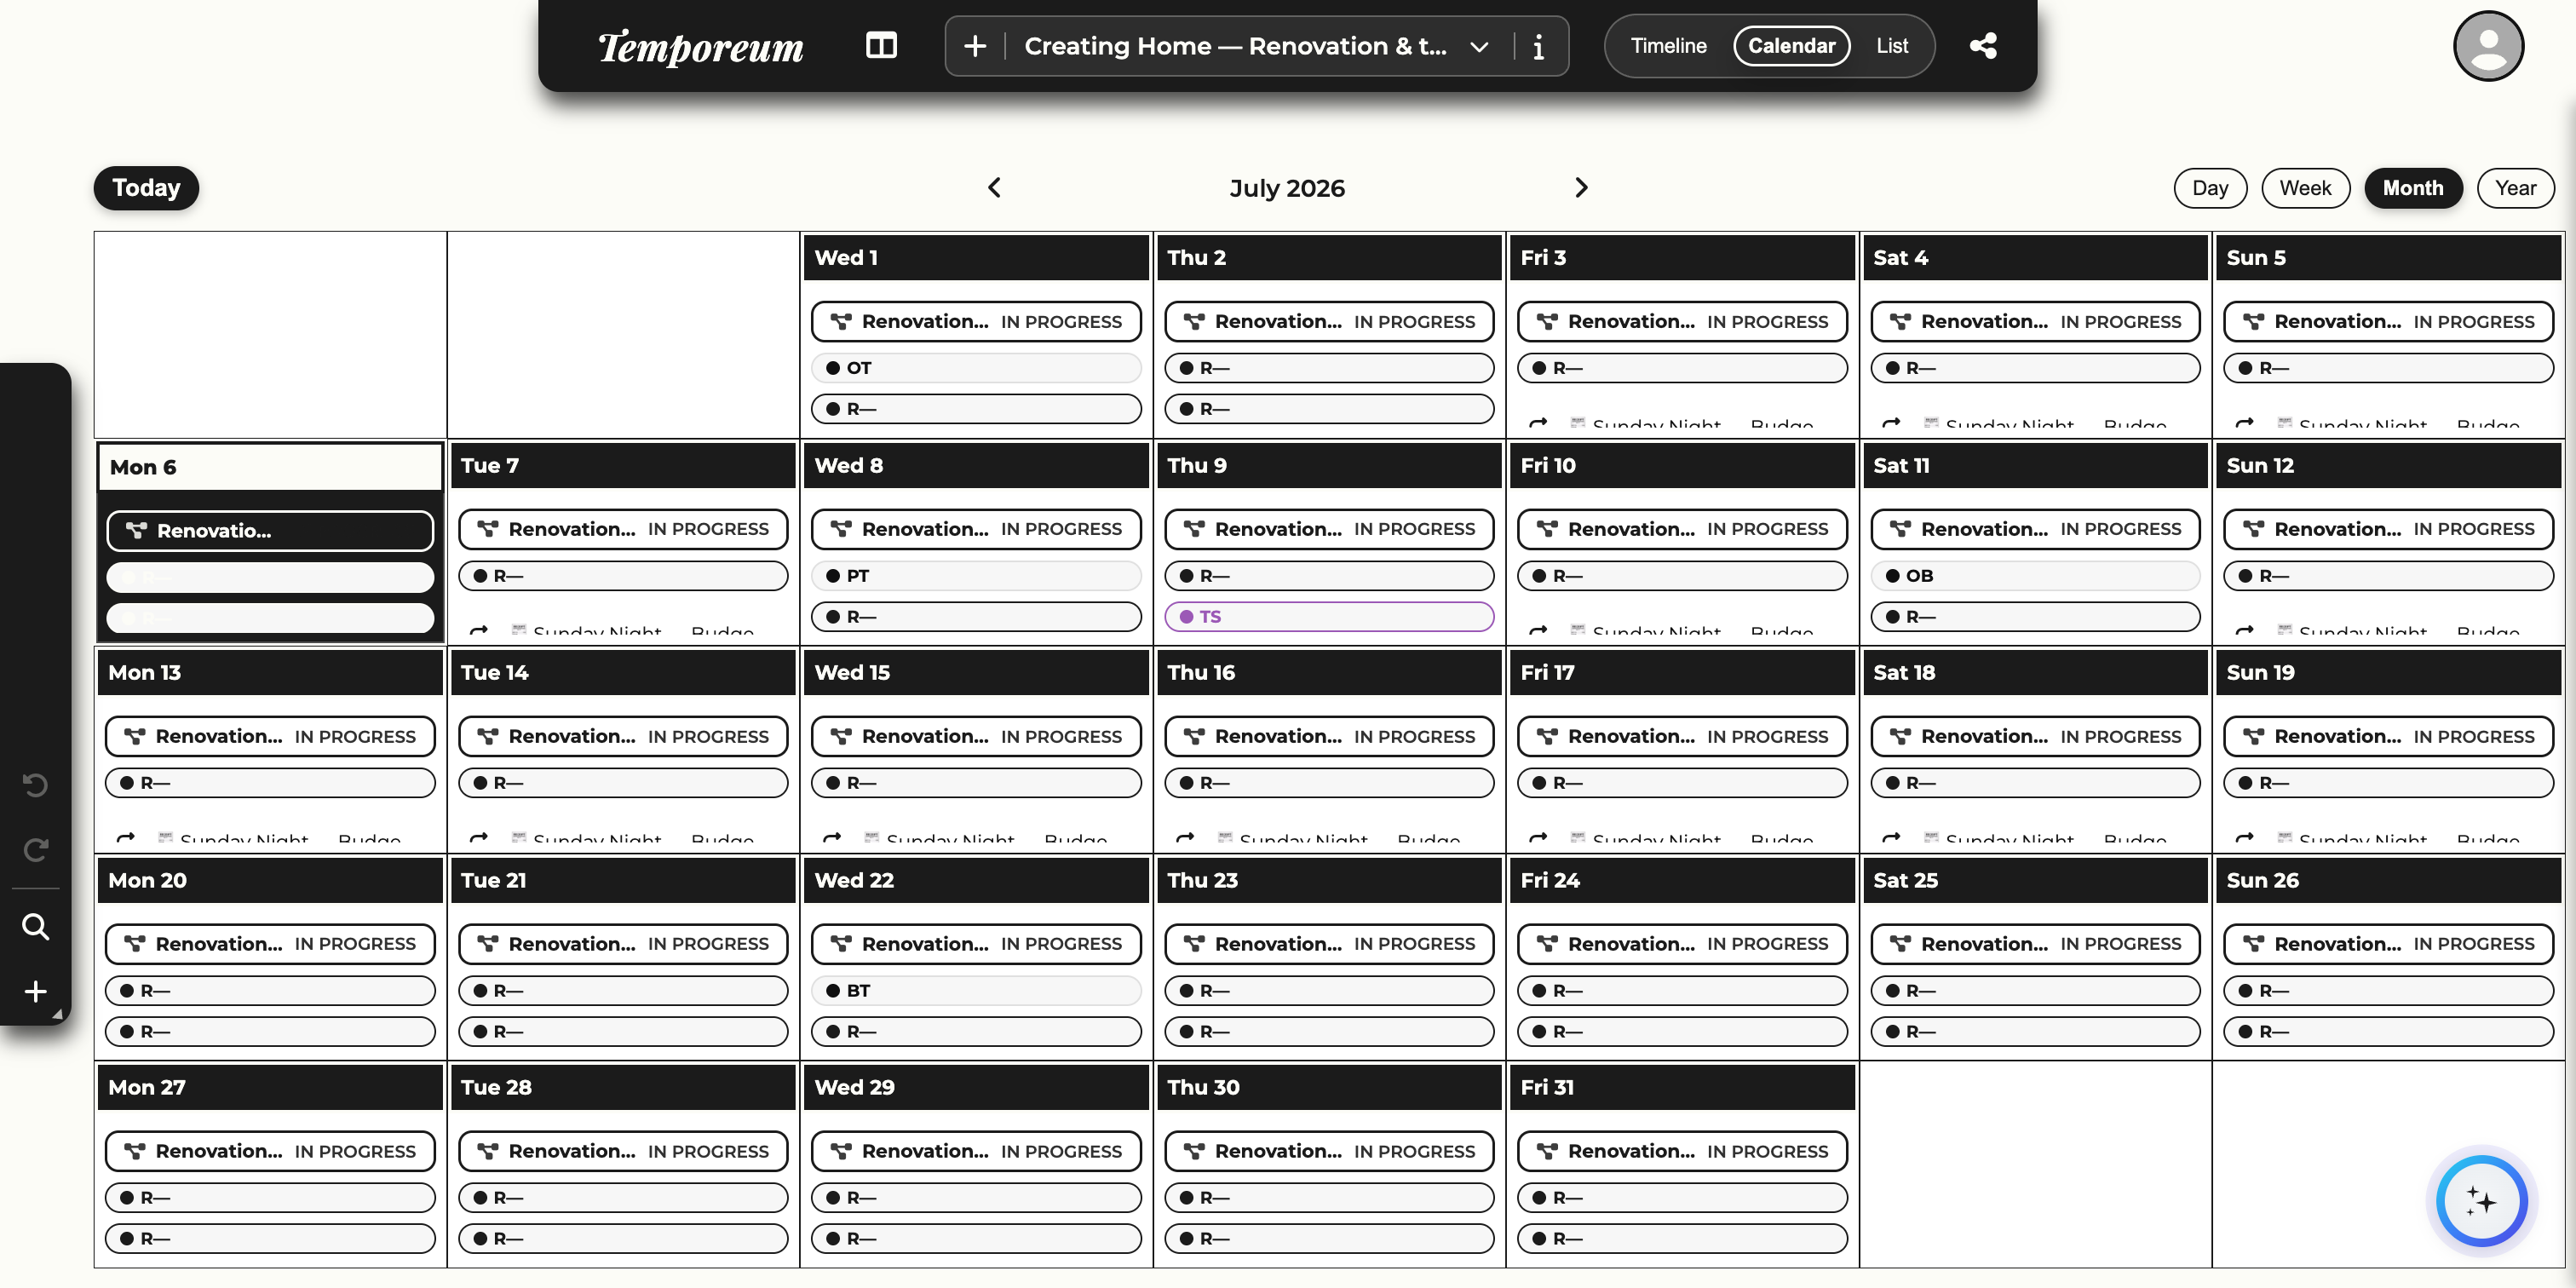
The same events, three ways. Beyond the Timeline, switch to Calendar for a familiar month grid, or List for a scannable chronological rundown. Use the Timeline / Calendar / List switch in the top bar (Section 4) to change — your data never moves, only how you look at it.
 1
2
3
4
1
2
3
4
- View switchJump between Timeline, Calendar and List.
- Today & navigationJump to the current period, or step back and forward through months.
- Day · Week · Month · YearChoose how much time the grid covers.
- Events in cellsEach event sits on its day; click to open it.
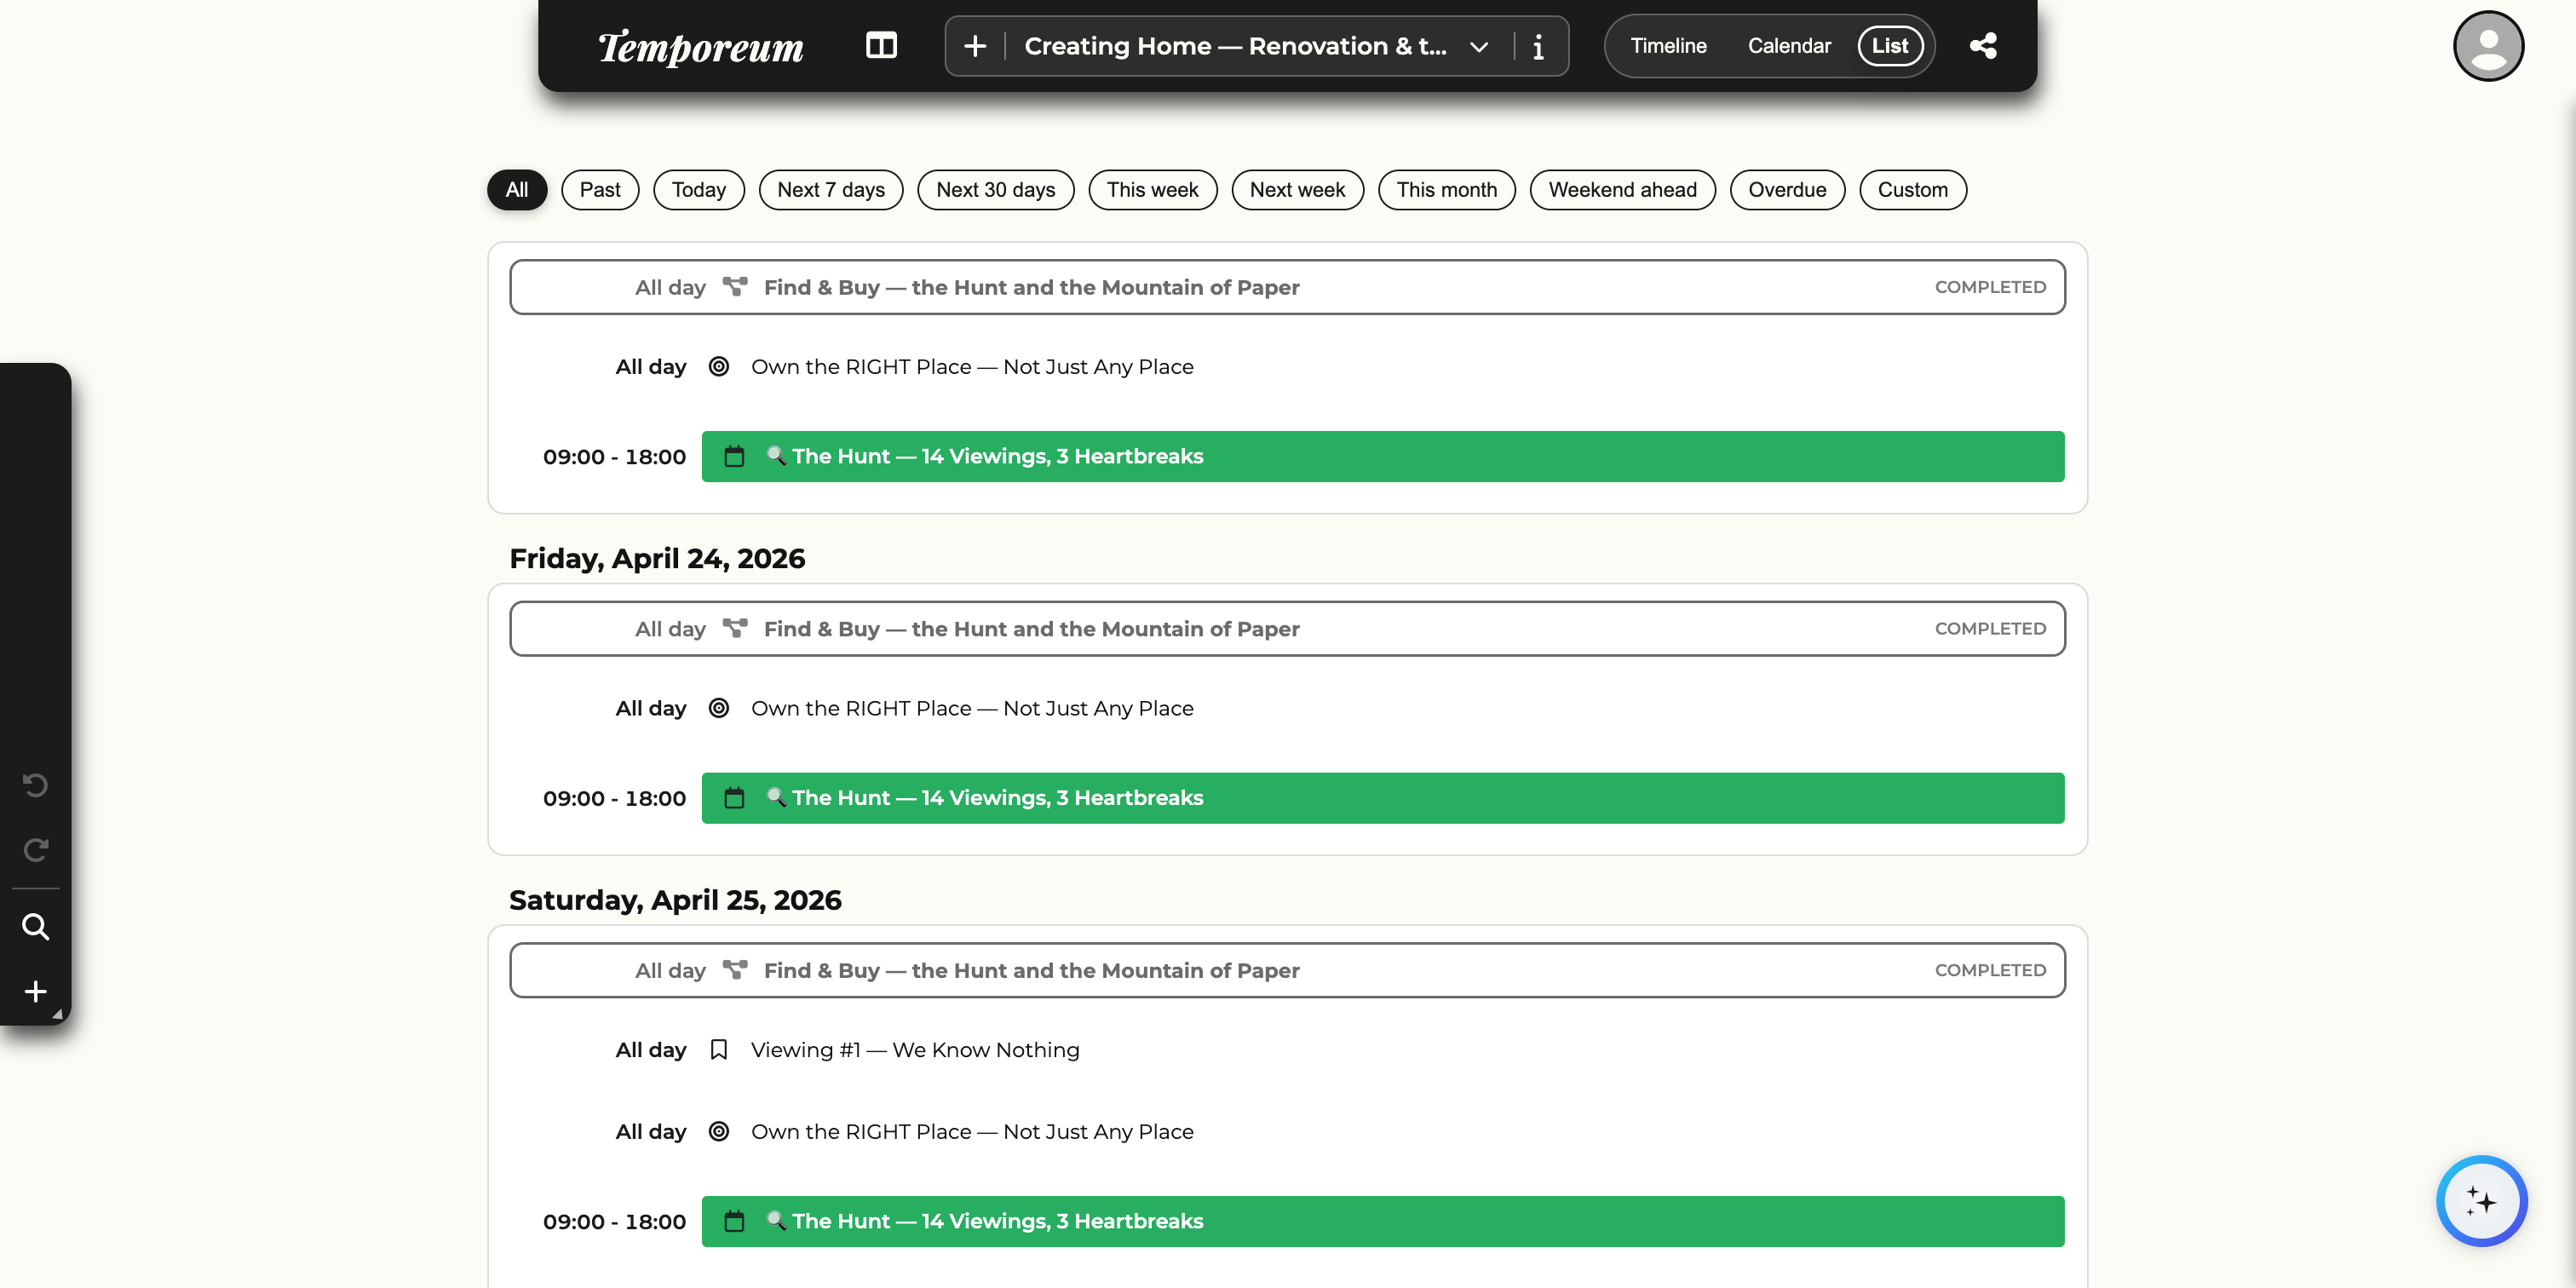
Prefer a plain, chronological rundown? The List view lays everything out in order and lets you filter by time range.
 1
2
3
1
2
3
- Time-range filtersAll, Past, Today, Next 7 days, This month, Overdue and more — narrow the list to what matters now.
- An eventWith its time and category colour. Click to open.
- Date groupsEvents are grouped under the day they fall on.
Building your timeline
Everything you can place on a timeline.
Building your timeline · 6
Timelines
A timeline is a single canvas for one theme — your whole life, one project, a trip, a study plan. You can keep as many as you want and switch between them instantly from the timeline switcher in the top bar (Section 4). Every other building block in this part — events, projects, goals, habits, journals, tasks — lives on one.
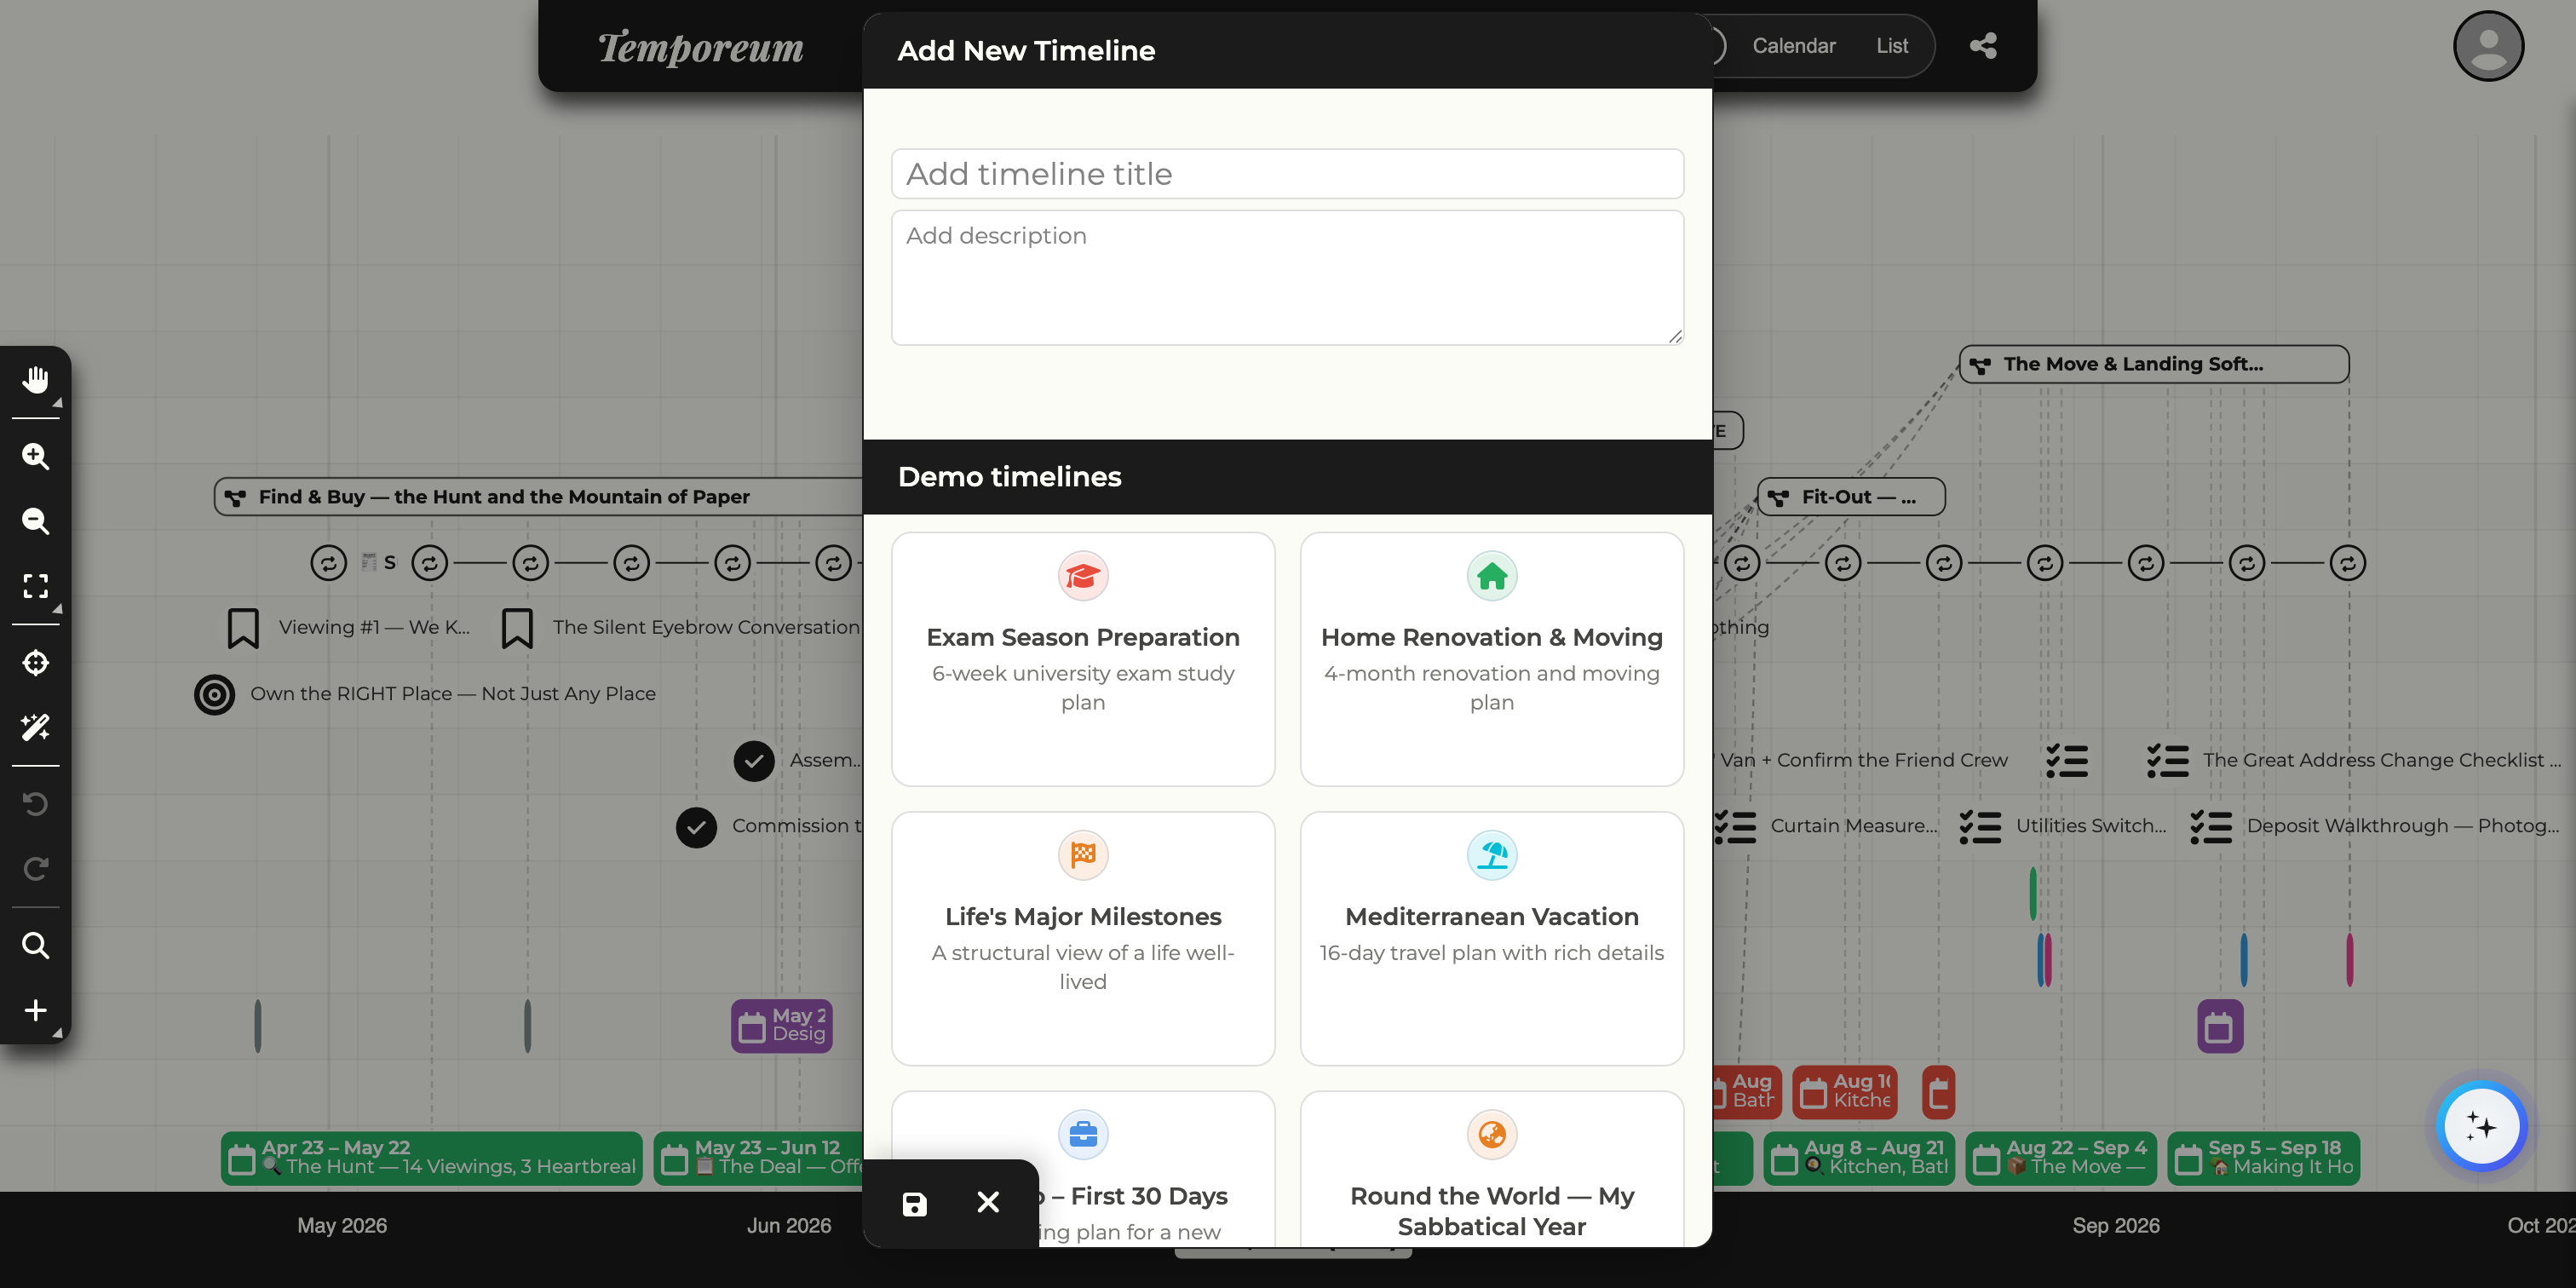
Creating one takes seconds. The + next to the switcher opens the Add New Timeline dialog, where you can start from scratch or drop in a ready-made demo.
 1
2
3
4
1
2
3
4
- TitleName the timeline — this is what shows in the switcher.
- DescriptionOptional context about what the timeline is for.
- Ready-made demosPrefer to start from an example? Pick a demo and a fully-populated timeline is added for you.
- SaveCreates the timeline and switches you to it.
Building your timeline · 7
The LifeOS layer
Everything you place on a timeline is one of six building blocks — events, projects, goals, habits, journals and tasks. Together they are Temporeum’s LifeOS — the layer that turns a record of the past into a system for running your life. A plain timeline only remembers; the LifeOS blocks make it steer: goals give it direction, projects give it chapters, habits give it rhythm, journals give it reflection, and tasks give it next steps. Because they all live on the same canvas, you can see in one glance whether your days are actually moving toward your intentions.
Not sure which block a thing should be? This is the choice in a nutshell:
| You want to capture… | Use | On the canvas it becomes |
|---|---|---|
| A moment or milestone | Event (Section 8) | A coloured marker at its date |
| A chapter or initiative with a span | Project (Section 10) | A named band across the top |
| A long-running aim | Goal (Section 11) | Its own lane, running to a target date |
| Something you do again and again | Habit (Section 12) | A repeating lane with a chip per period |
| How a moment felt | Journal (Section 13) | A small bookmark on its day |
| Something to do by a date | Task (Section 14) | A small marker with a due date |
Quick add — one button for all of them
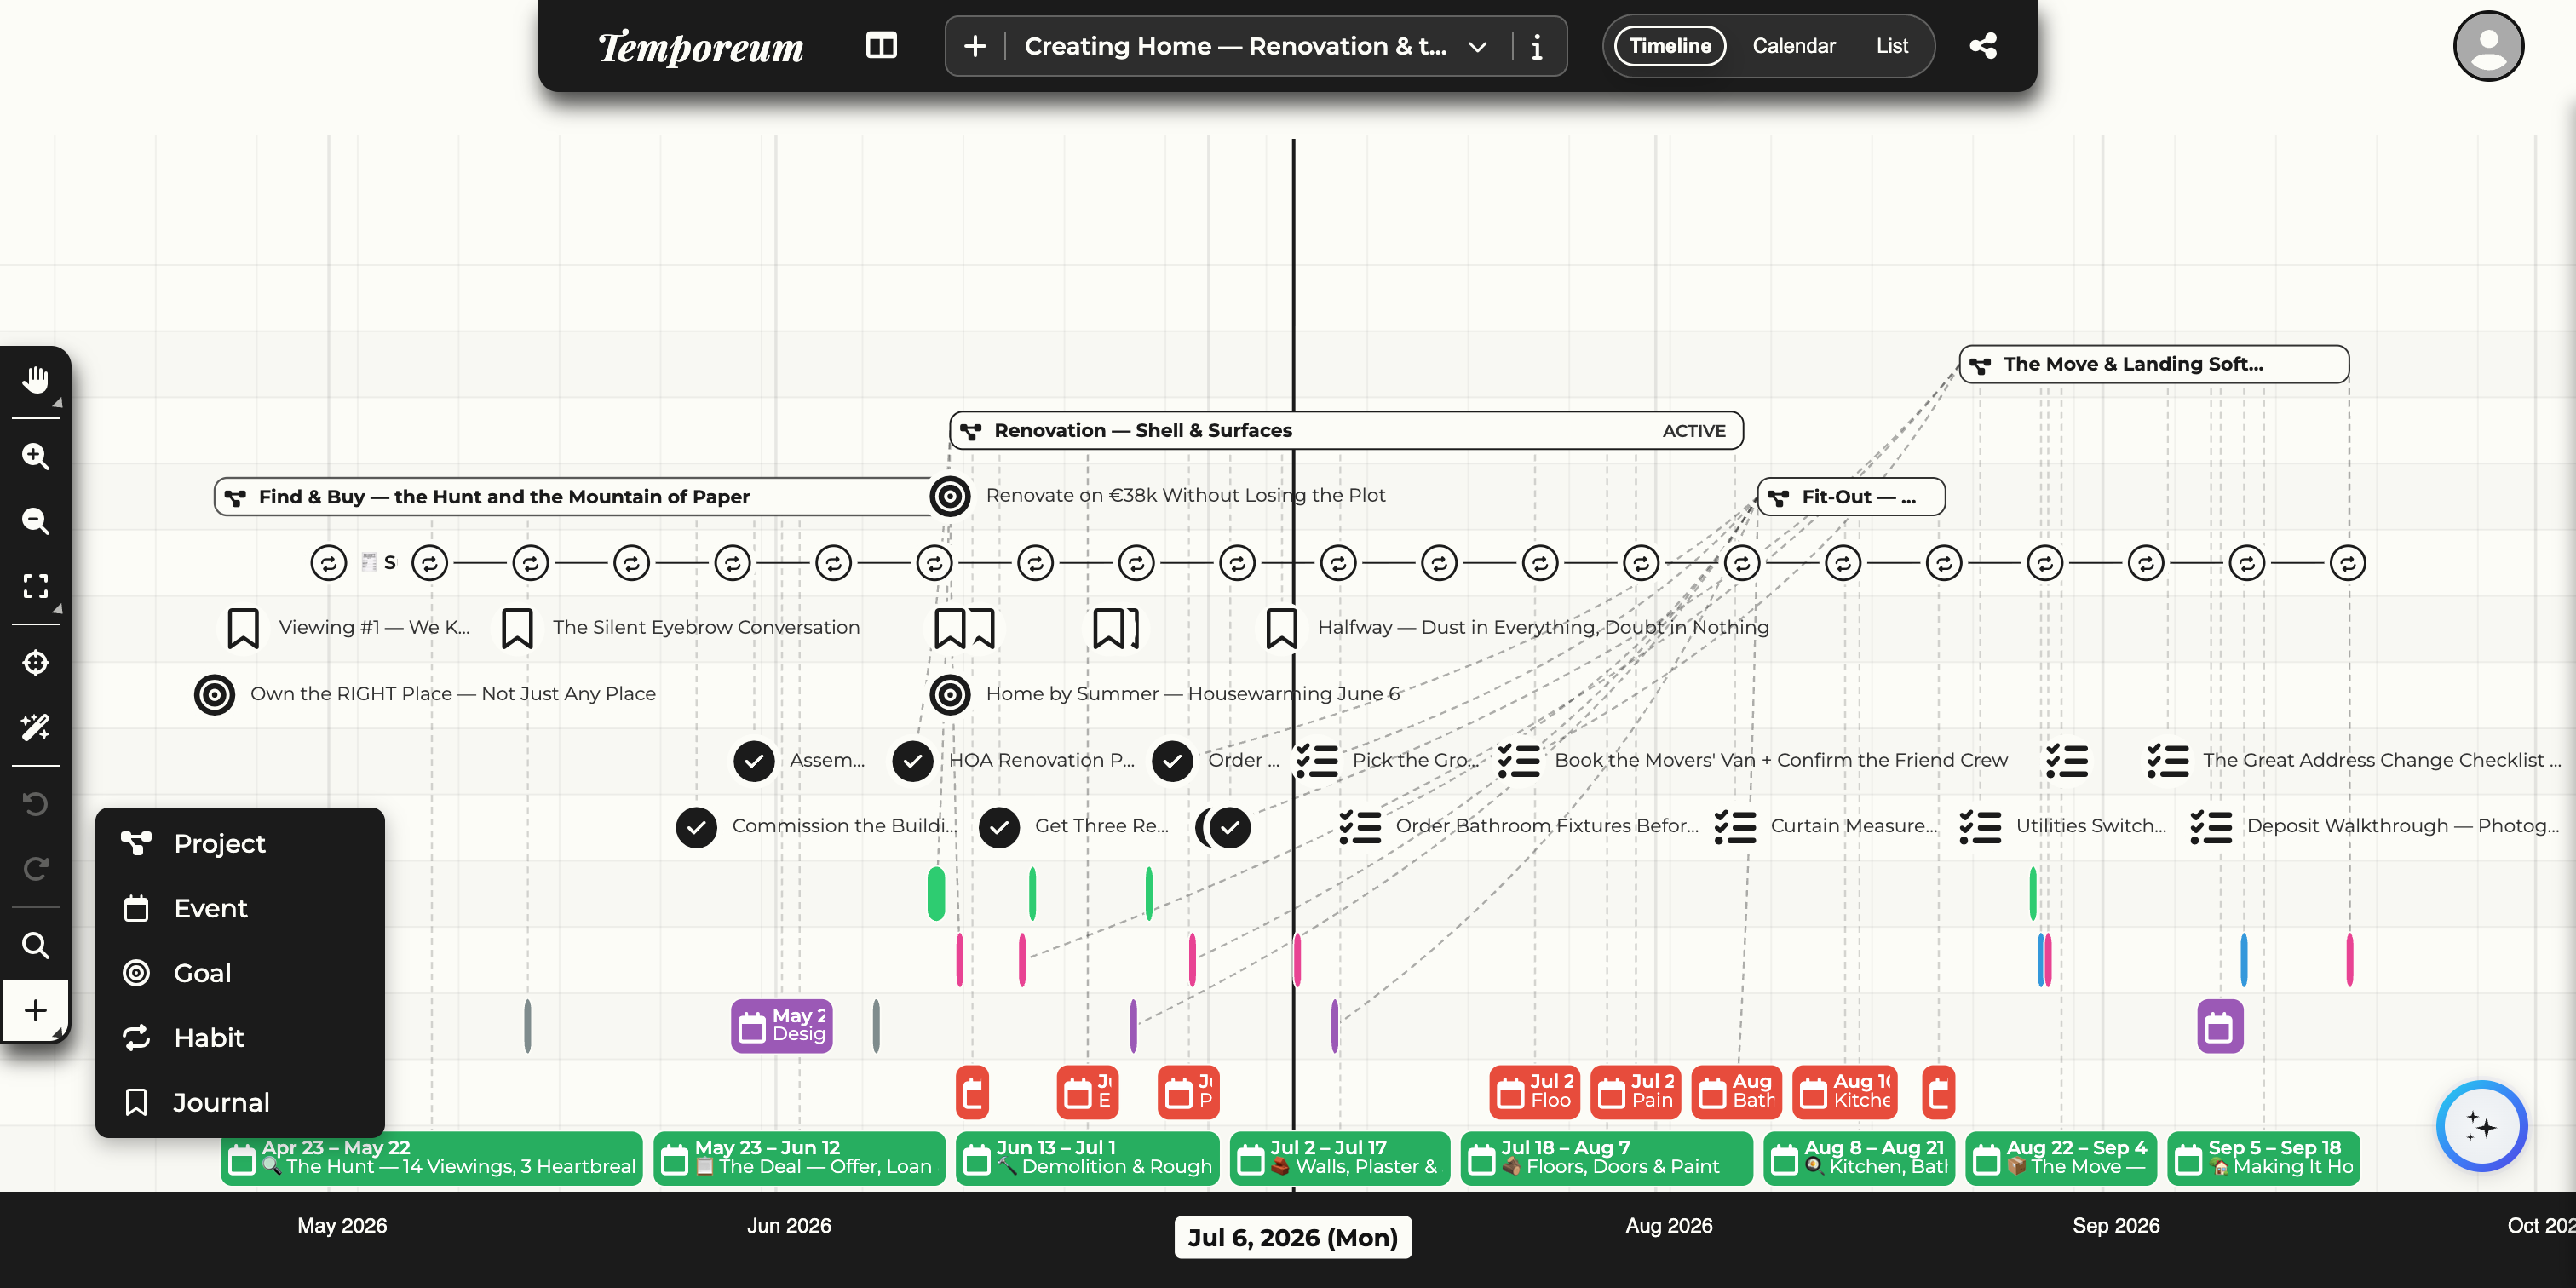
The Quick add button (the + in the toolbar) is the one place to create any building block, and the sections that follow cover each in turn.
 1
2
3
4
5
6
1
2
3
4
5
6
- Quick add (+)Opens this menu from the toolbar.
- ProjectA phase or initiative that spans a stretch of time — the banded chapters across the top of the canvas (Section 10).
- EventA single moment or milestone (Section 8).
- GoalA long-running aim that runs as its own lane so you can track progress over time (Section 11).
- HabitA recurring practice, shown as a repeating lane (Section 12).
- JournalA dated reflection or note (Section 13).
Building your timeline · 8
Events
Events are the heart of a timeline — a moment, a milestone, anything with a place in time. Click any event on the canvas to open it. The coloured header tells you its category at a glance.
 1
2
3
4
5
1
2
3
4
5
- TitleWhat the event is. Emoji are welcome.
- Start & end datesGive an event a single moment or a span — the end date lets it stretch across the timeline.
- DescriptionThe full story, notes or context for the event.
- CategoryThe colour-coded group this event belongs to (Section 16).
- Edit · delete · closeThe pencil switches to editing; the bin removes the event; the cross closes the panel.
Scroll further down an event and you will also find its context, tasks, sources and attachments — the next section opens up that lower half.
Building your timeline · 9
Inside an event
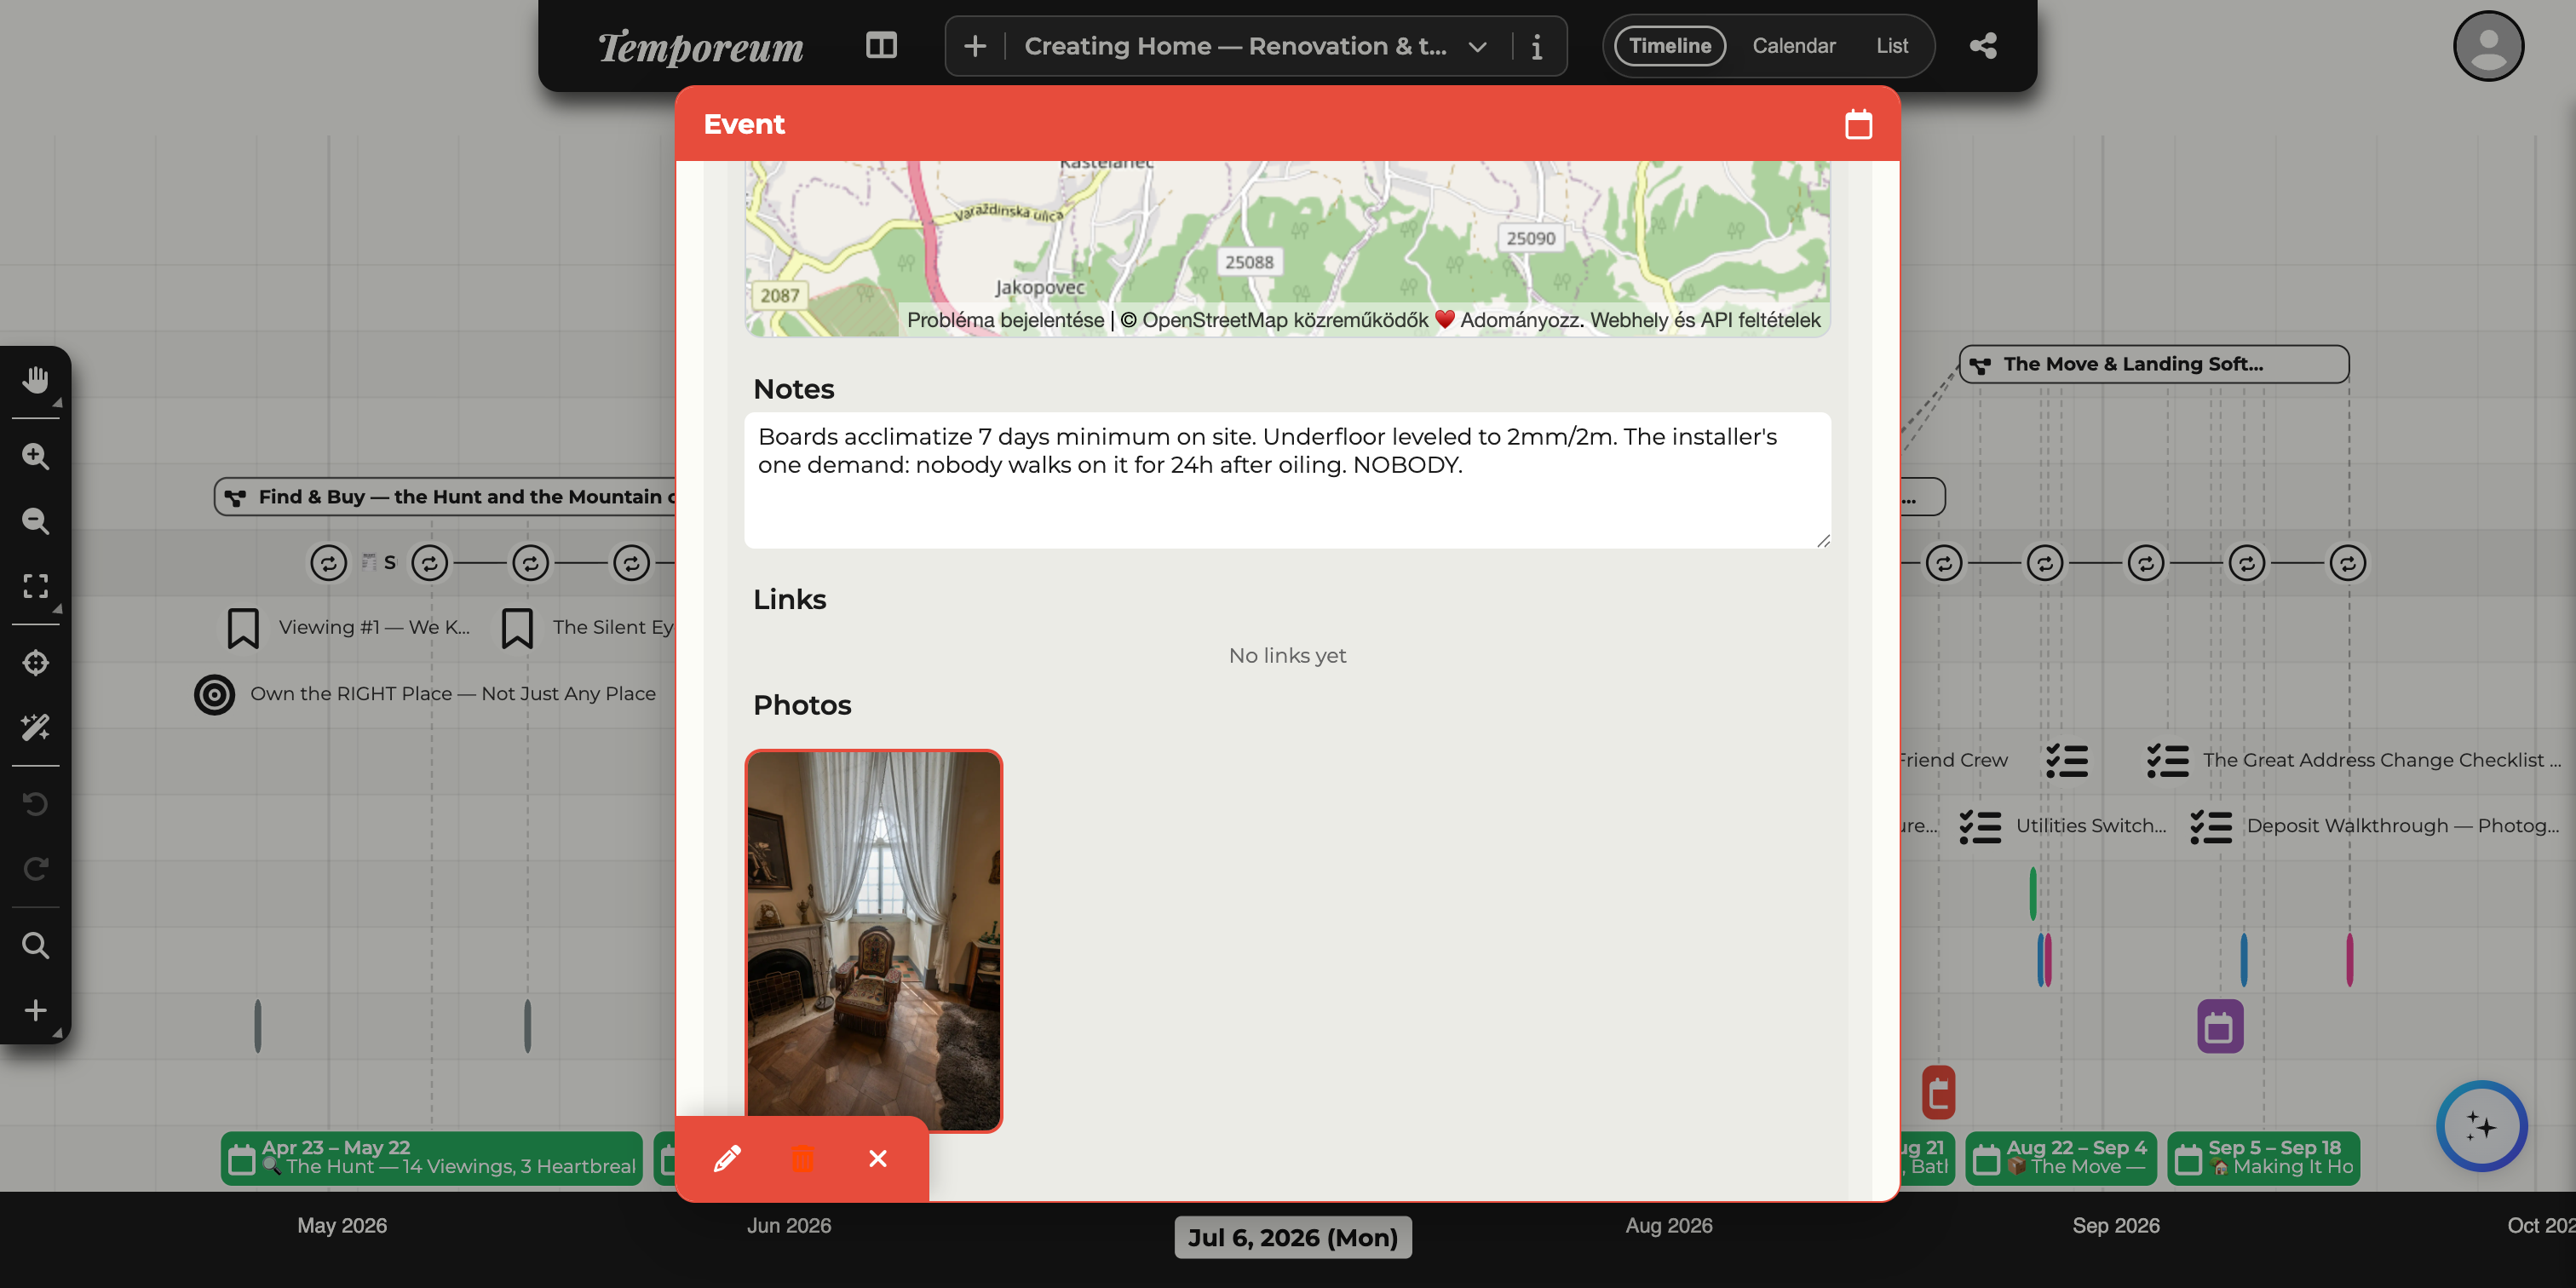
An event can hold more than words. Scroll to the lower half of any event and you will find its context, related items and resources — its category and project, tasks, linked sources, and attachments like photos, documents, audio, notes and a location. Everything that belongs to a moment lives with it.
 1
2
3
1
2
3
- ContextThe event’s category, project and tags — how it is filed and what it belongs to (categories and tags are covered in Sections 16–17).
- Related tasksTo-dos that belong to this event, added right here.
- Resources & attachmentsLinked sources (Section 18) plus files, photos, audio, notes and a location attached to the event. Each opens in its own viewer.
Building your timeline · 10
Projects
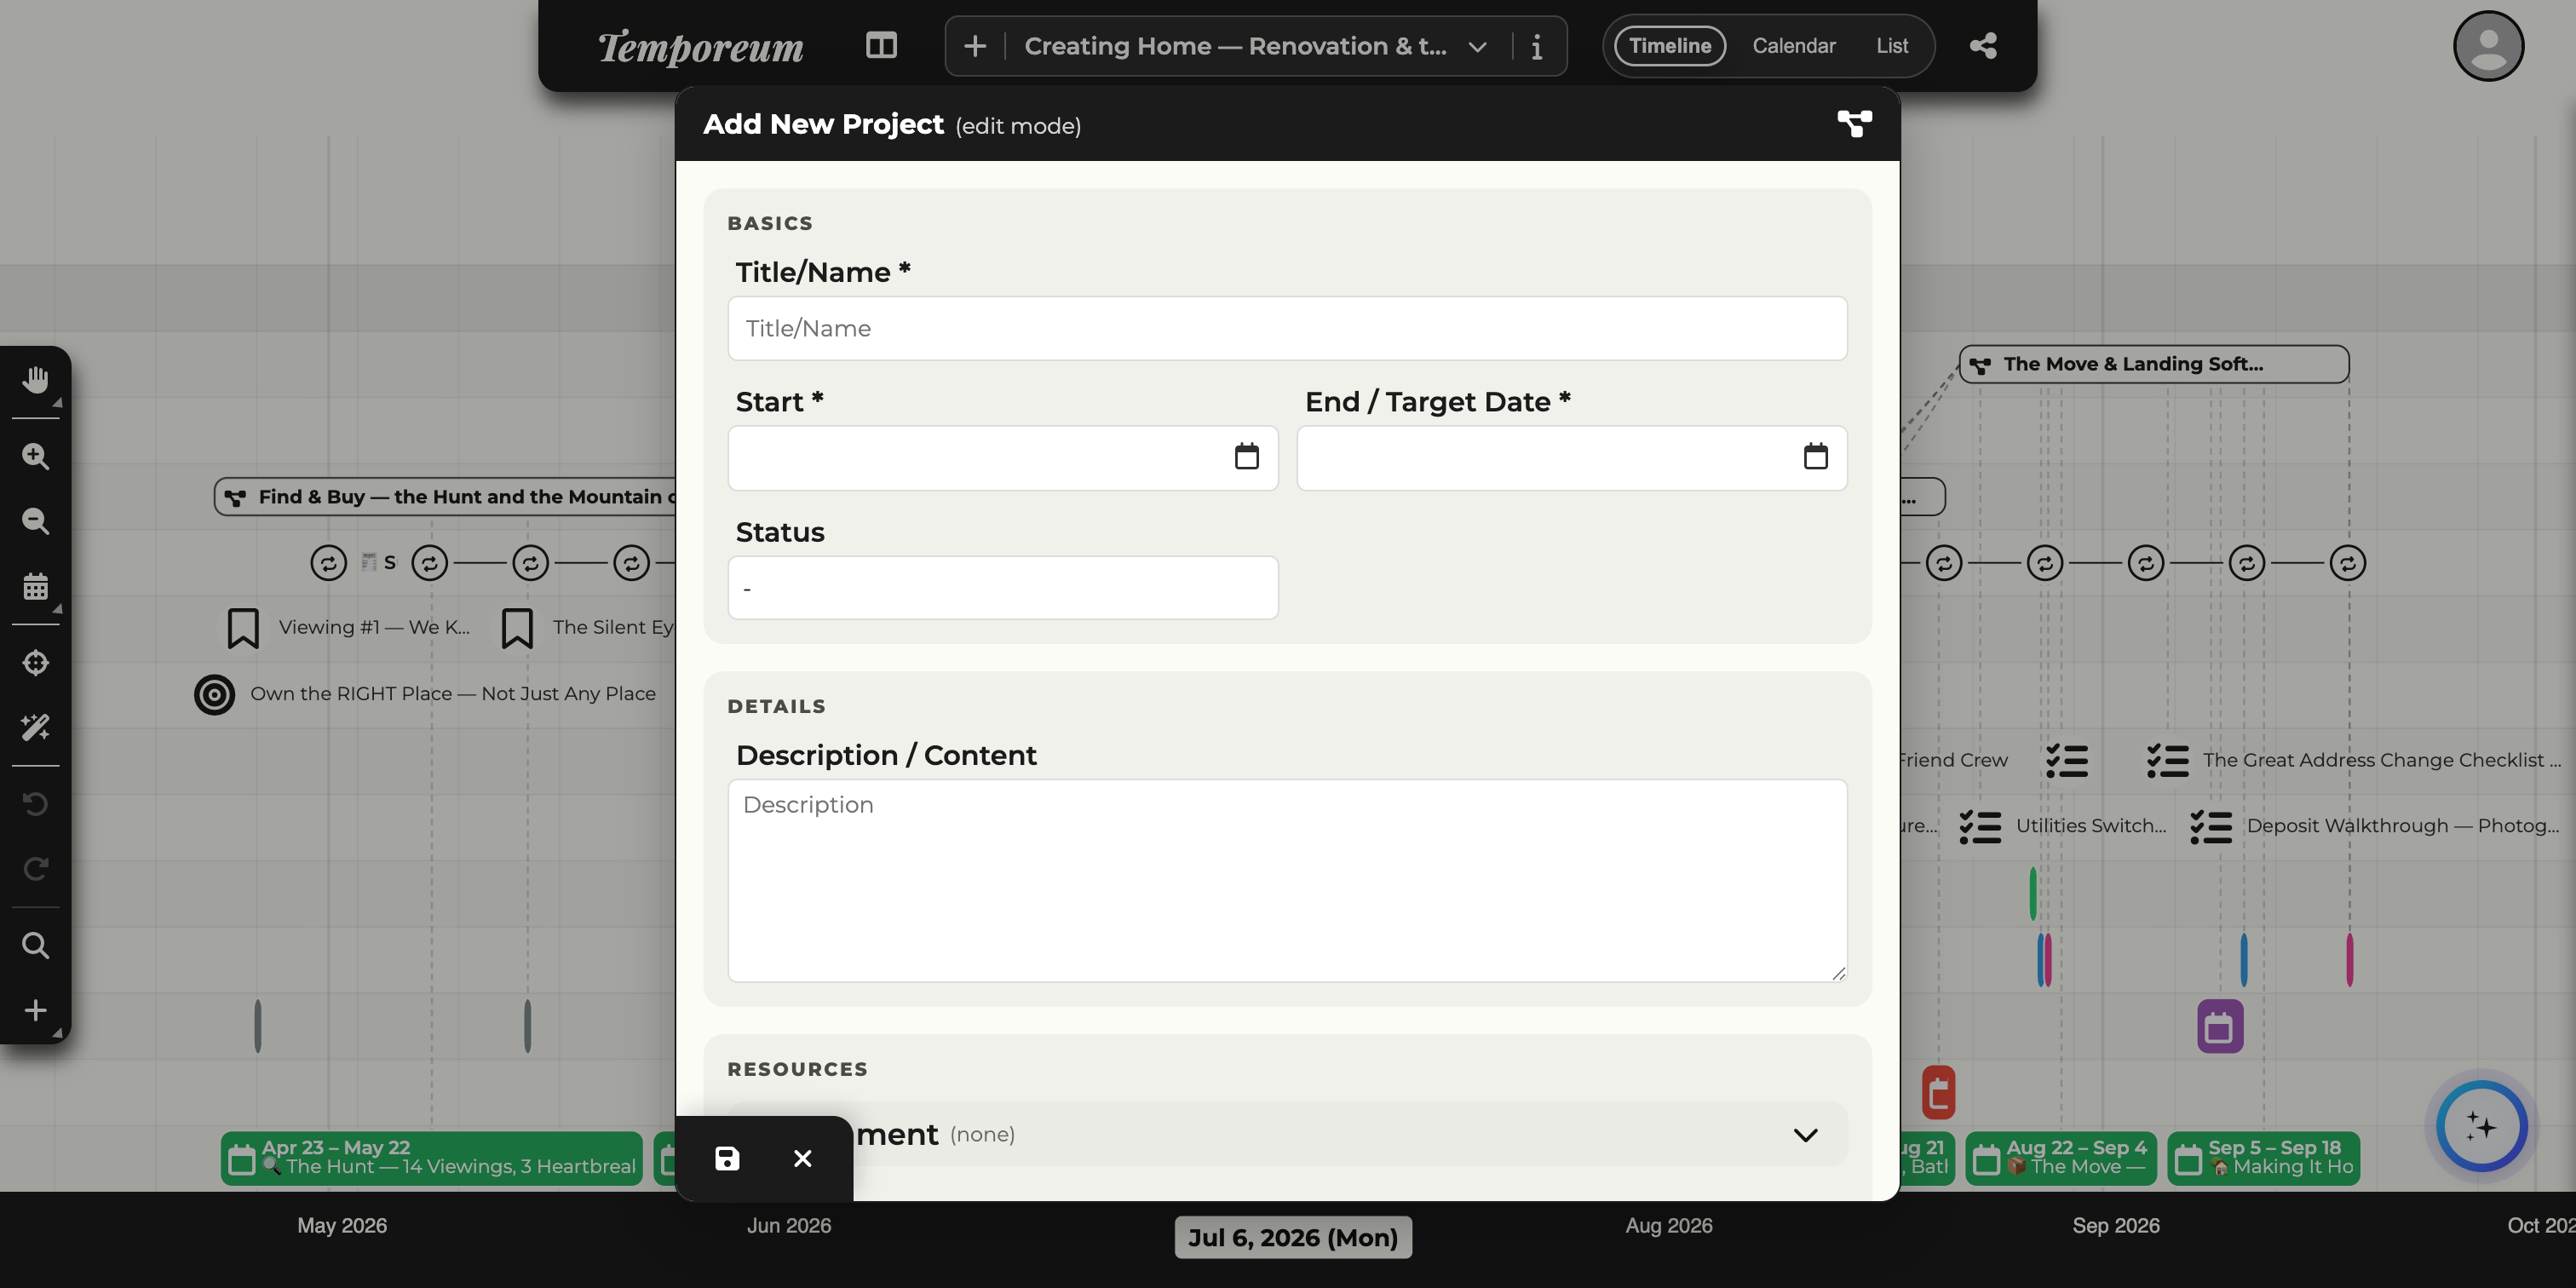
A project is a phase or initiative that spans a stretch of time — the banded chapters across the top of the canvas (“Find & Buy”, “Renovation — Shell & Surfaces”). Give it a start and an end and it becomes a band that groups everything happening within it; events and tasks can then be filed under it so a whole chapter of your life reads as one thing.
 1
2
3
4
1
2
3
4
- TitleThe project’s name — it labels the band on the canvas.
- Start & end / target dateThe span the band covers; this is what stretches the project across the timeline.
- StatusWhere the project stands — planned, active, completed, and so on.
- DescriptionWhat the project is for. Below it, a Resources section attaches sources and files to the project itself, and once saved the project also lists the events and tasks filed under it.
Building your timeline · 11
Goals
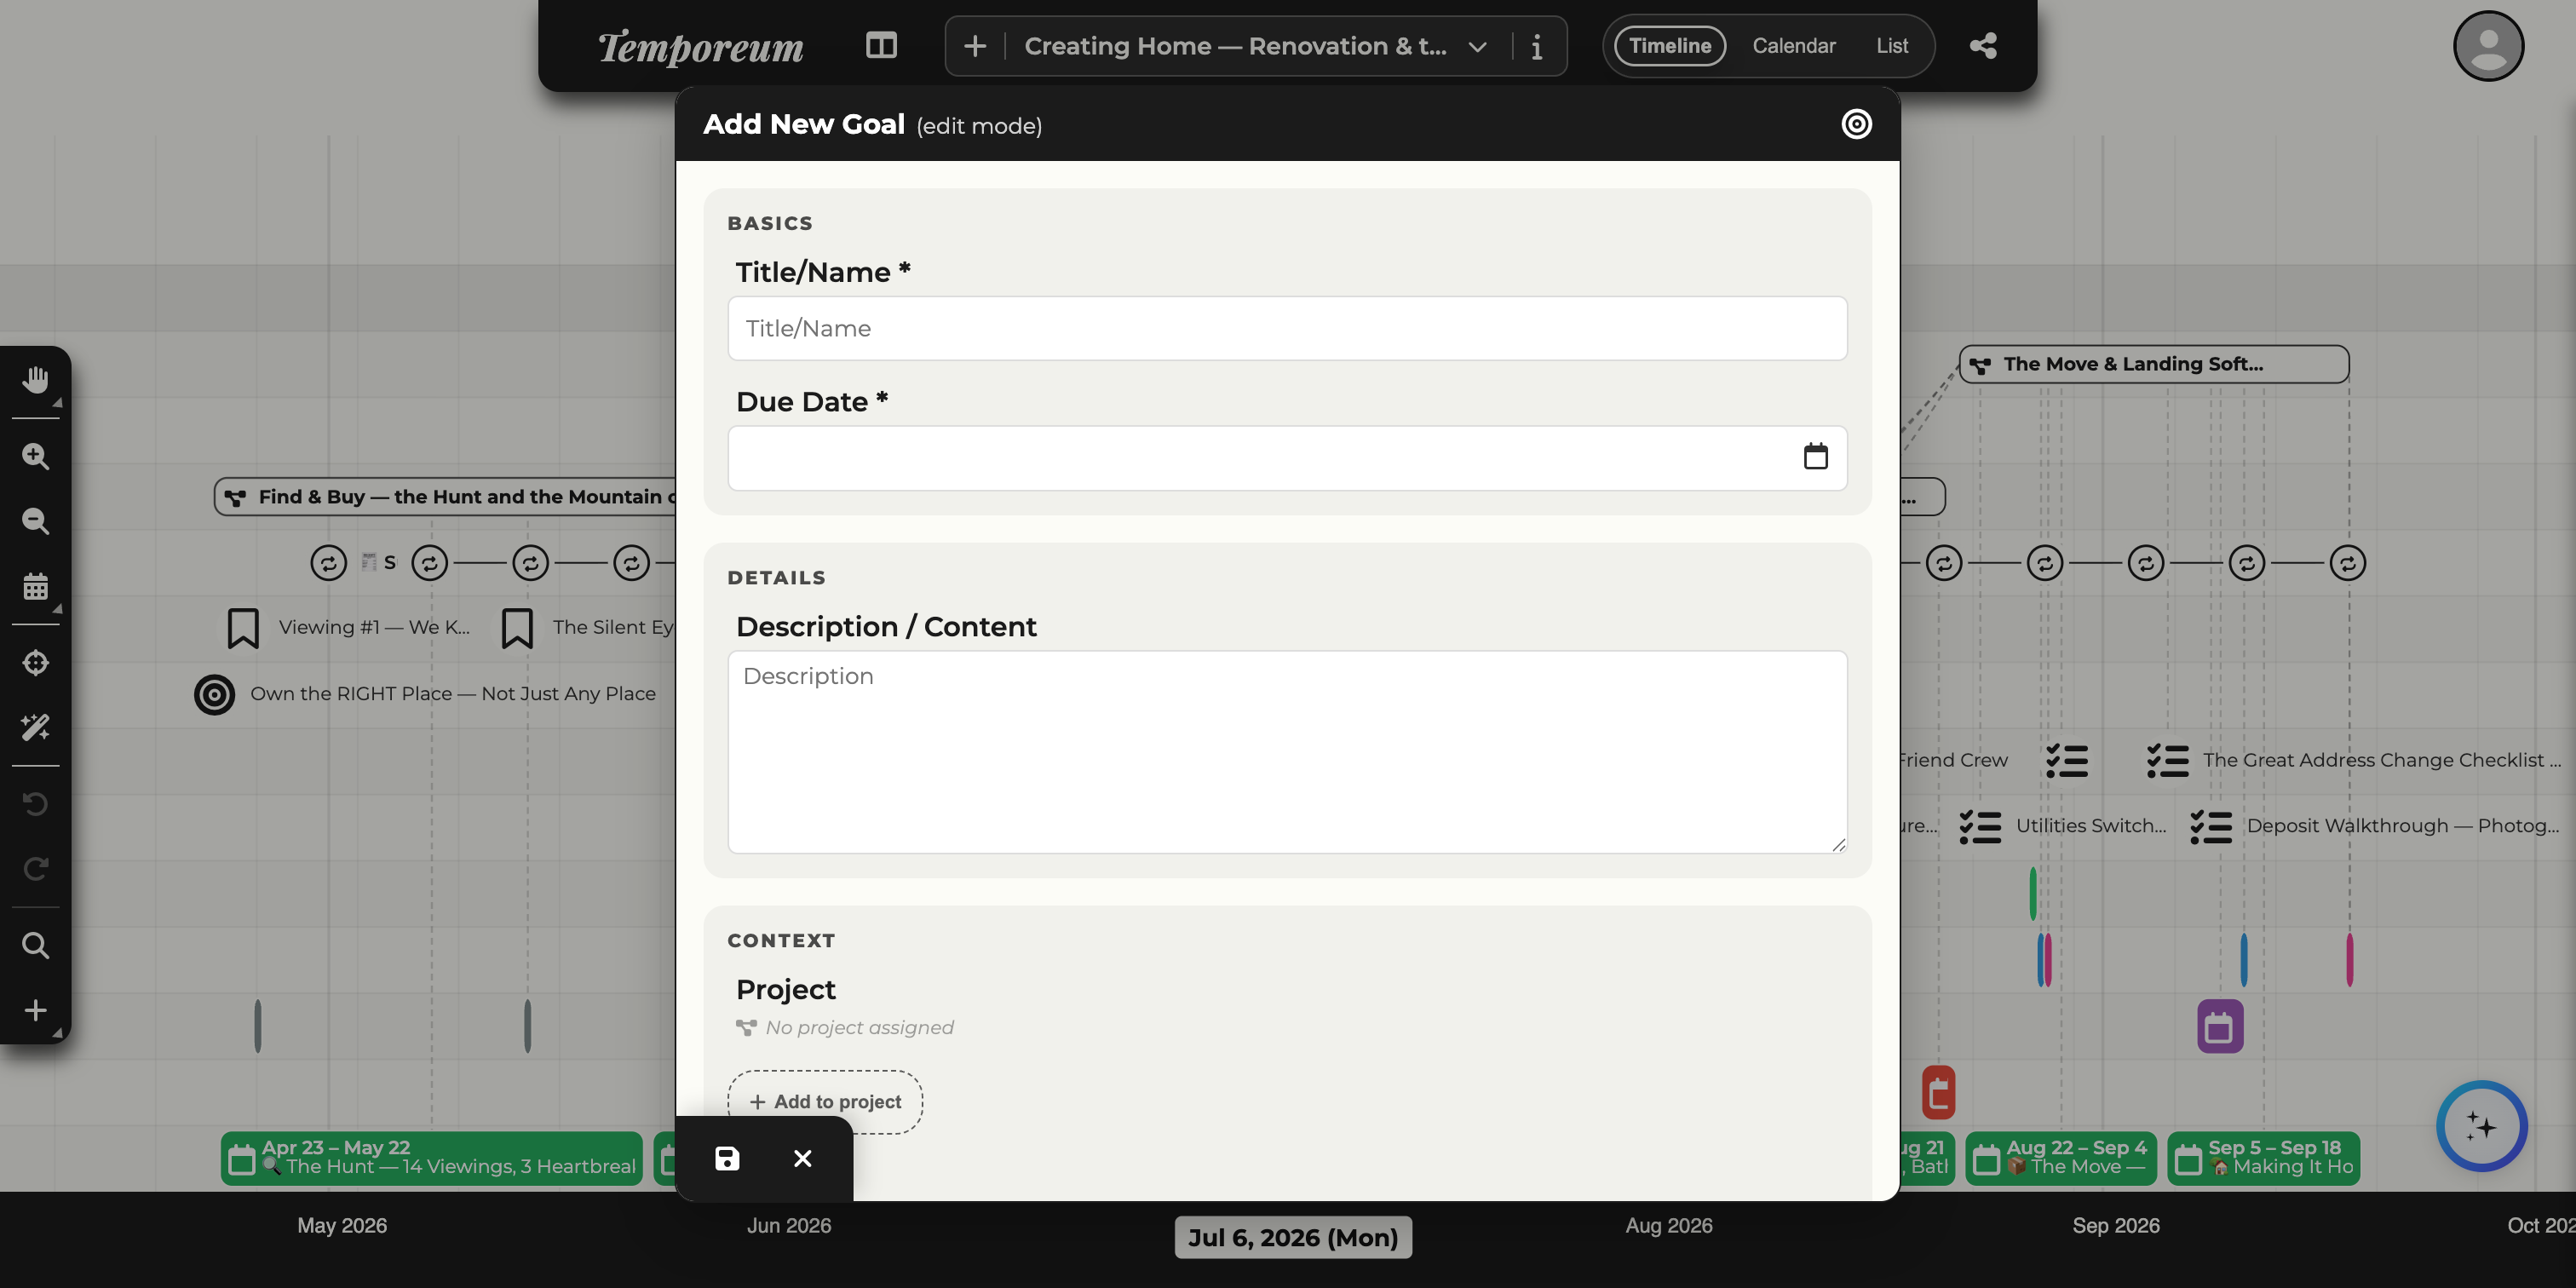
A goal is a long-running aim — “Own the RIGHT Place”, “Home by Summer — Housewarming June 6”. It runs as its own lane across the timeline so you can see progress against it over time, and events and tasks can be linked to a goal to show what is moving it forward.
 1
2
3
4
1
2
3
4
- TitleWhat you are aiming for — it labels the goal’s lane.
- Due dateThe target the goal runs toward — its lane is drawn up to this date on the canvas.
- DescriptionThe detail behind the aim.
- Add to projectFile the goal under a project, so it reads as part of that chapter.
Building your timeline · 12
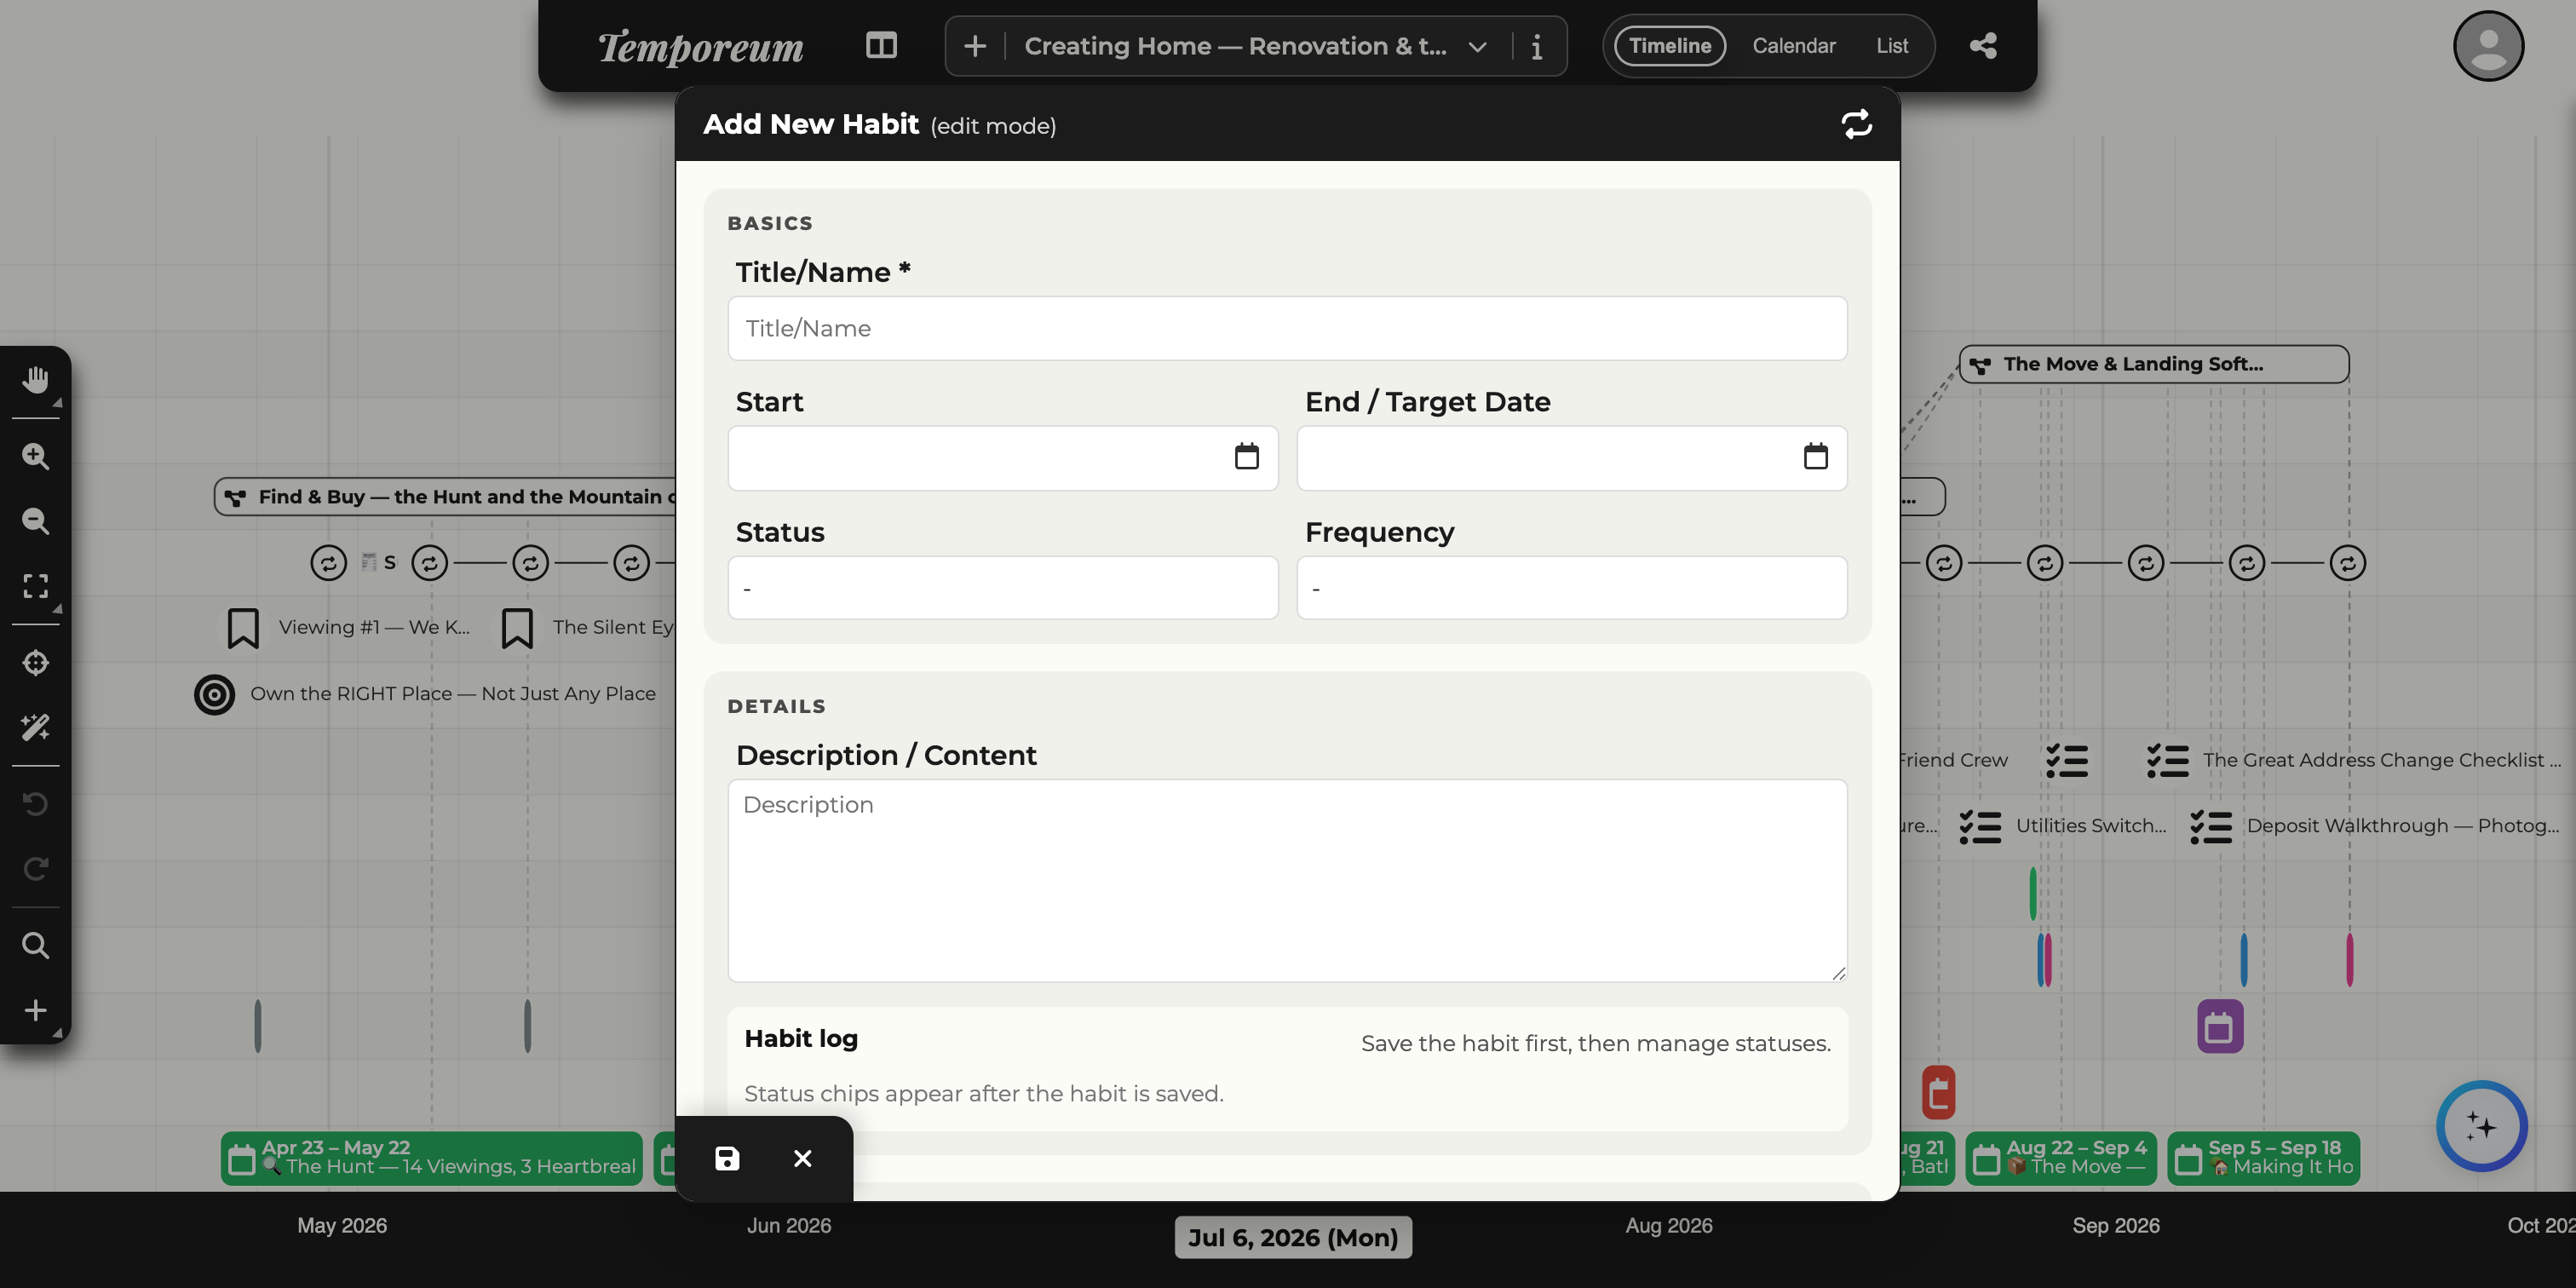
Habits & habit lanes
A habit is something you do again and again — a morning walk, a weekly review. Give it a frequency and Temporeum draws it as its own repeating lane across the timeline, with a chip for each period so you can see your streaks and gaps at a glance.
 1
2
3
4
1
2
3
4
- TitleWhat the habit is.
- StatusWhether the habit is active, on hold, and so on.
- FrequencyHow often it repeats — this is what turns it into a lane on the timeline.
- Habit logOnce saved, each period gets a status chip you tick off — done, skipped or missed — building your streak history.
Building your timeline · 13
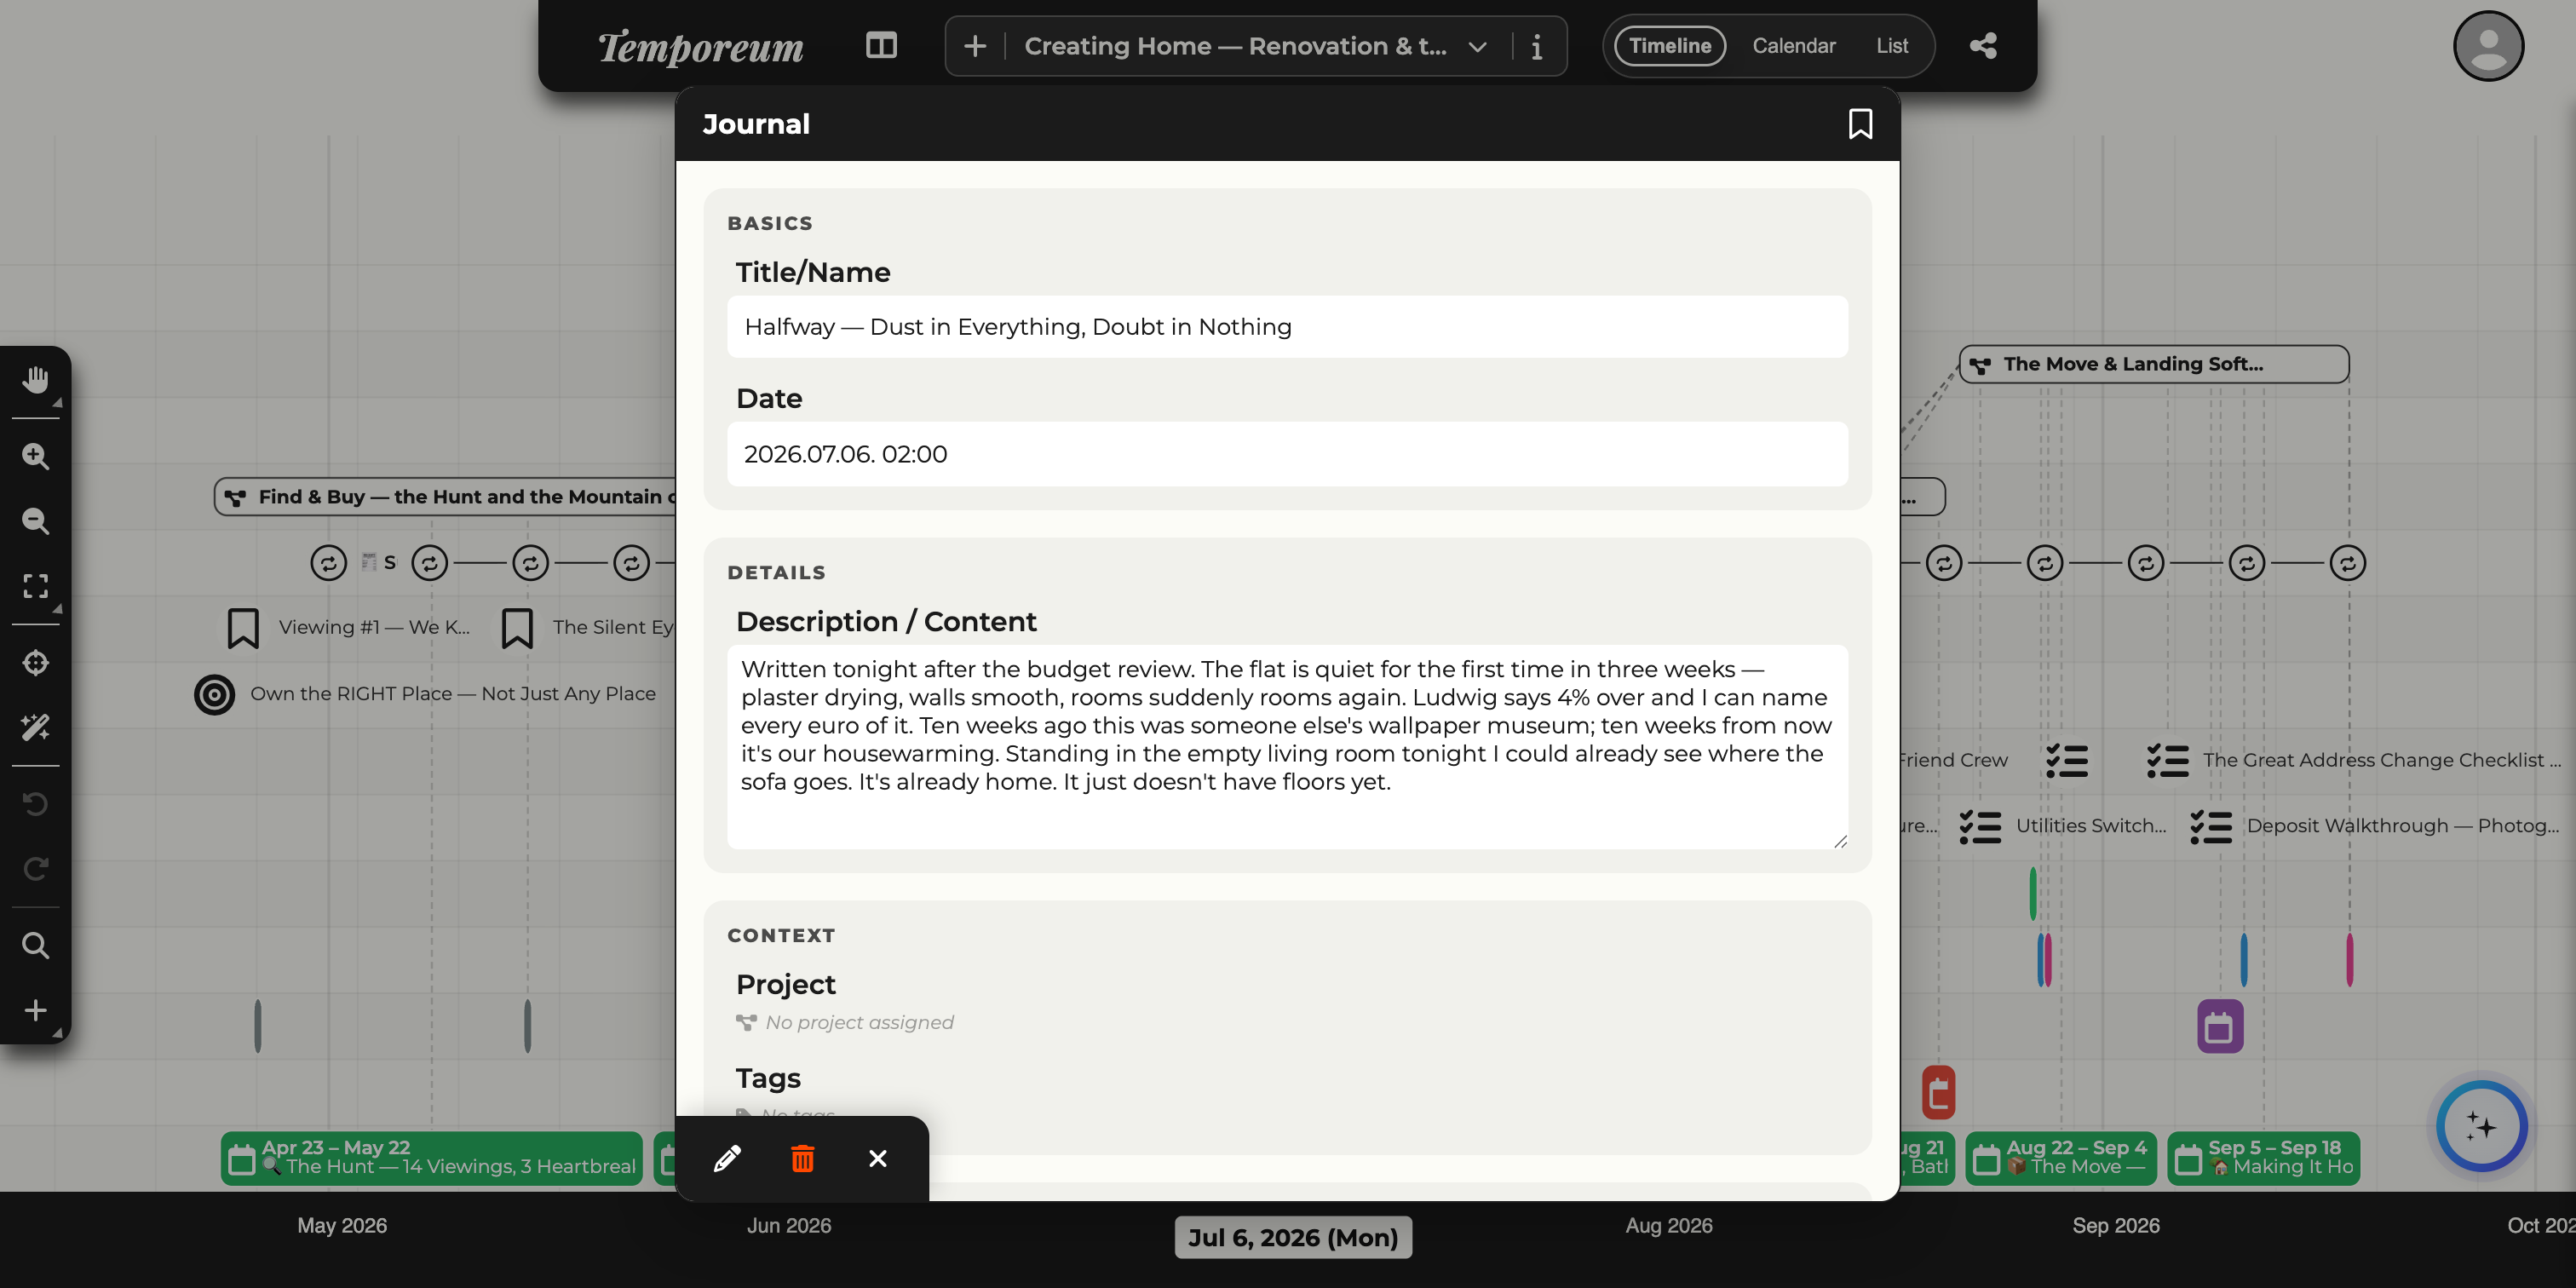
Journals
Journals are dated reflections — the “how it felt”, not just the “what happened”. Each one is pinned to a moment in time and holds as much writing as you like, so years later you can read back the thoughts that belong to a place on your timeline.
 1
2
3
4
1
2
3
4
- TypeThe header shows this entry is a Journal, so you always know what you are reading.
- TitleA short name for the reflection.
- DateThe single point in time the entry belongs to.
- ContentThe reflection itself — as long as you want.
Building your timeline · 14
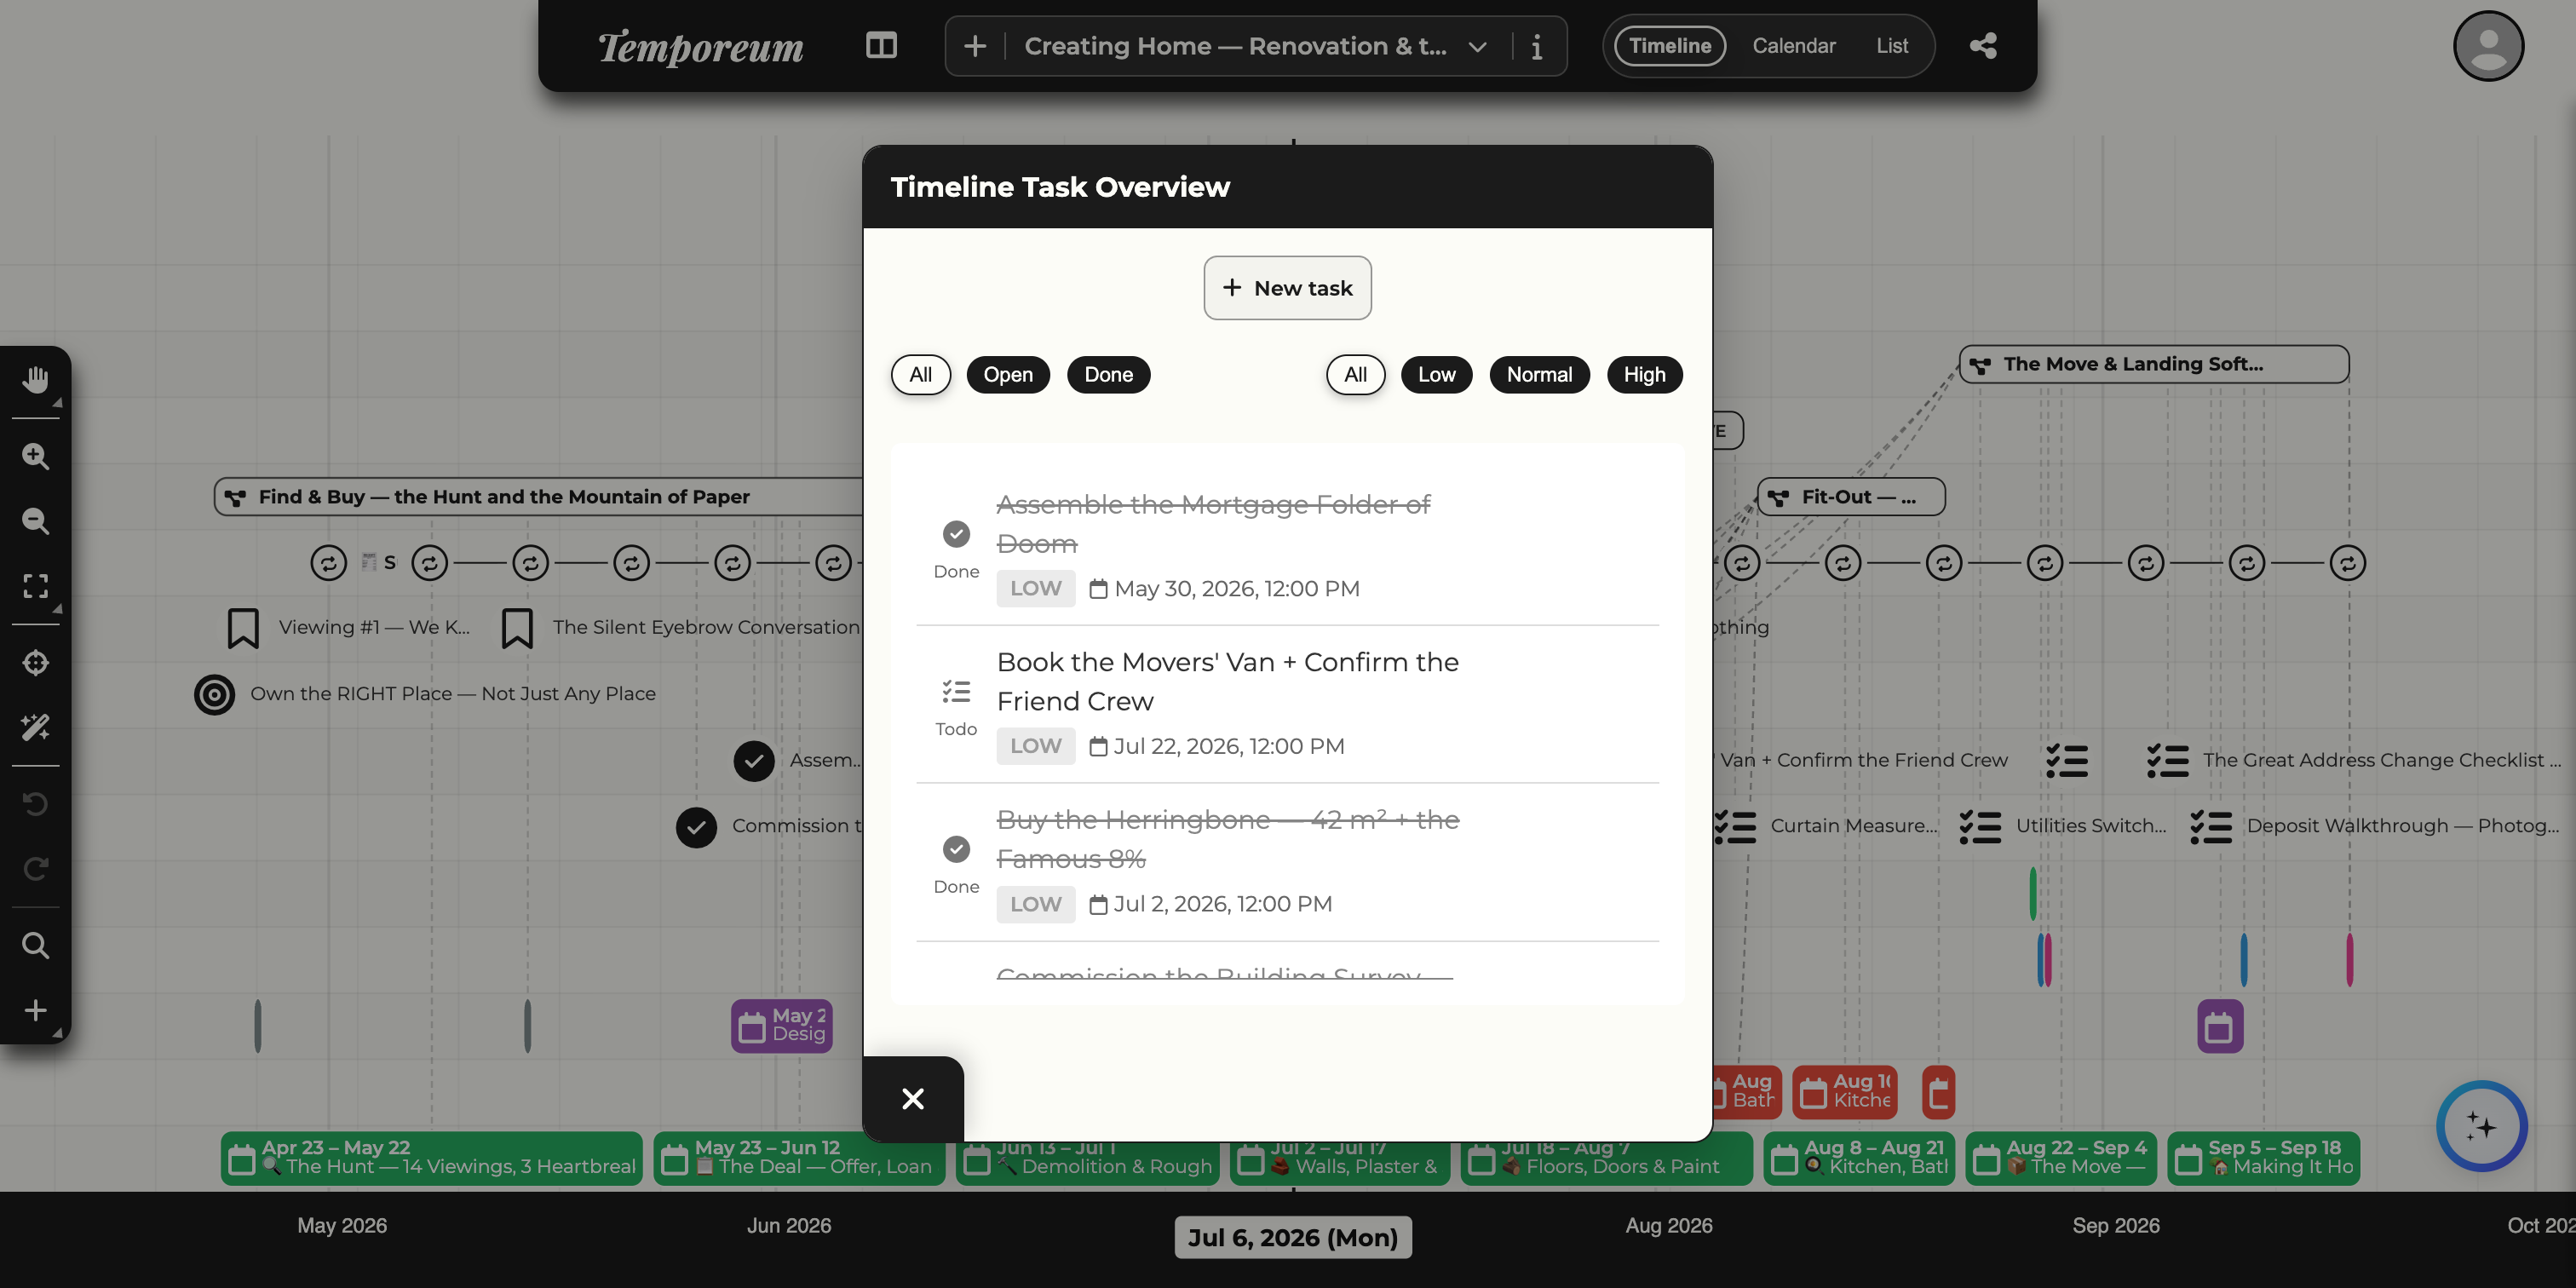
Tasks
Tasks are the to-dos of a timeline — things to do, with a due date, a priority and a status. They can stand on their own or hang off an event, and they appear as small markers on the canvas so you never lose sight of what is coming. The Timeline Task Overview gathers them all in one list — open it from the Panels menu (Section 15) → Tasks.
 1
2
3
4
5
1
2
3
4
5
- New taskAdd a task with a title, due date and priority.
- Status filterShow All, only Open, or only Done tasks.
- Priority filterNarrow the list to Low, Normal or High priority.
- A taskShows its title, priority chip, due date and status. Click to open and edit it.
- CloseCloses the overview.
Organizing
File it, label it, back it up with sources.
Organizing · 15
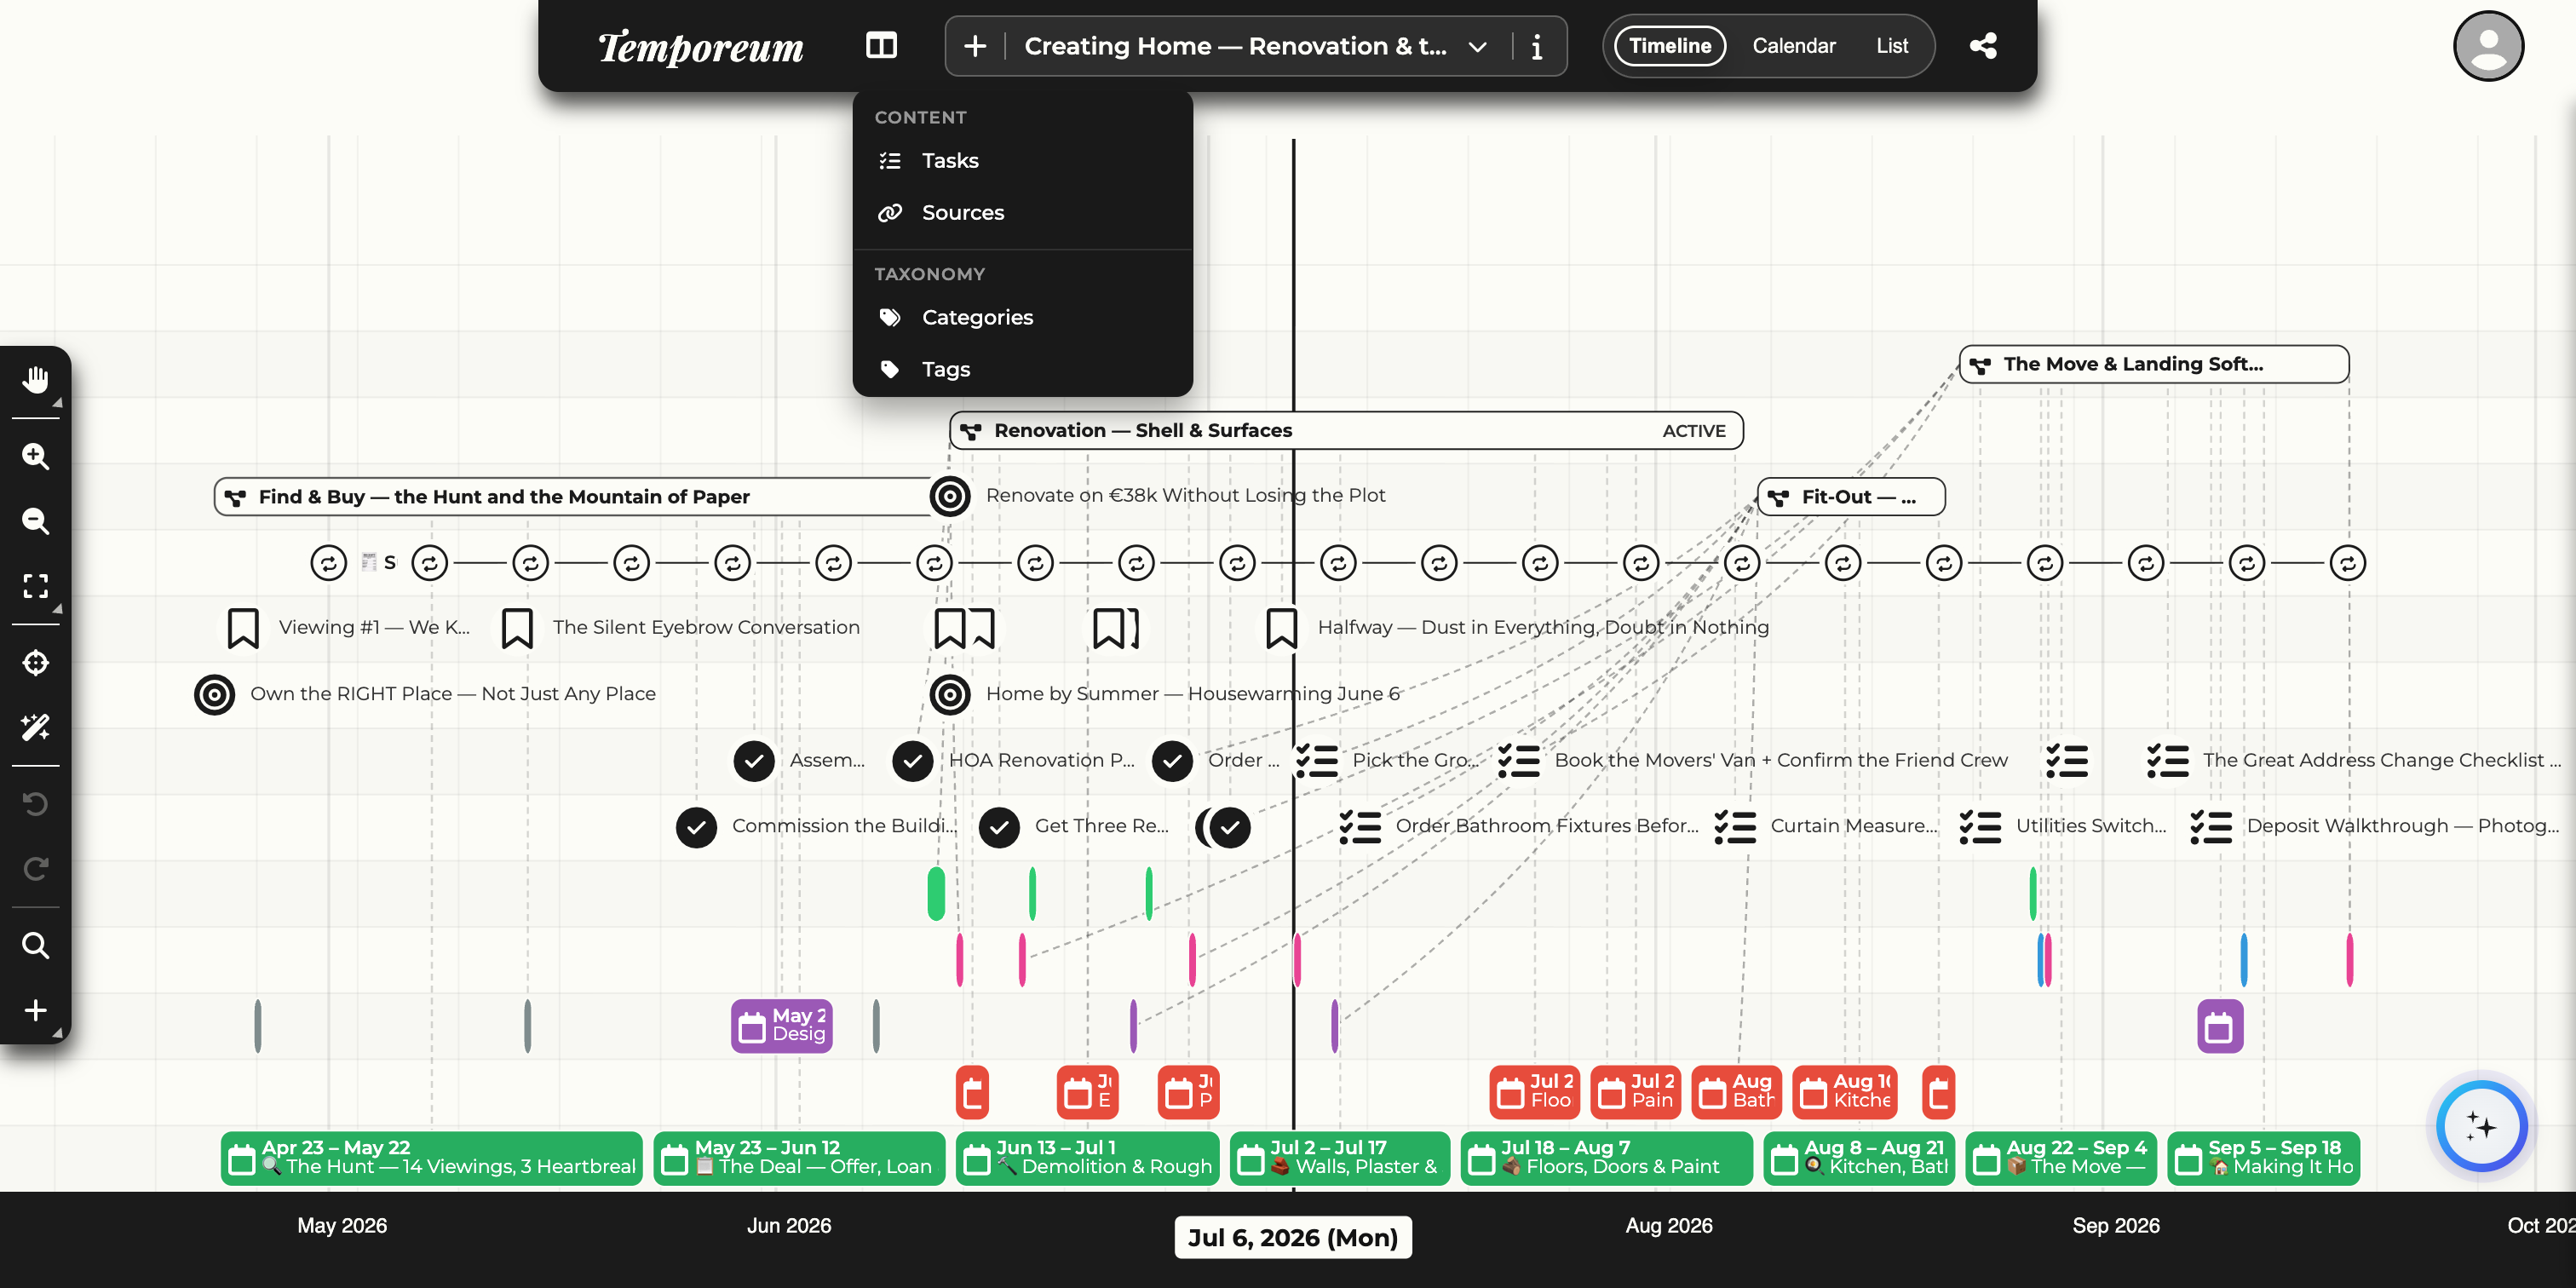
The Panels menu
Everything in this part lives behind one button: the Panels menu — the table-columns icon at the far left of the top bar (Section 4). Click it and a dropdown opens in two groups: Content — the things on your timeline (tasks, sources) — and Taxonomy — the labels that file them (categories, tags). The next three sections walk through the organizing panels one by one; the Tasks panel was covered with the building blocks (Section 14).
 1
2
3
4
5
1
2
3
4
5
- Panels buttonThe table-columns icon at the far left of the top bar. Click it to open or close this menu.
- TasksOpens the Timeline Task Overview — every task on the timeline (Section 14).
- SourcesOpens the Sources Overview — your reference material (Section 18).
- CategoriesOpens the Categories panel — the colours and icons (Section 16).
- TagsOpens the Tags panel — cross-cutting labels (Section 17).
Organizing · 16
Categories
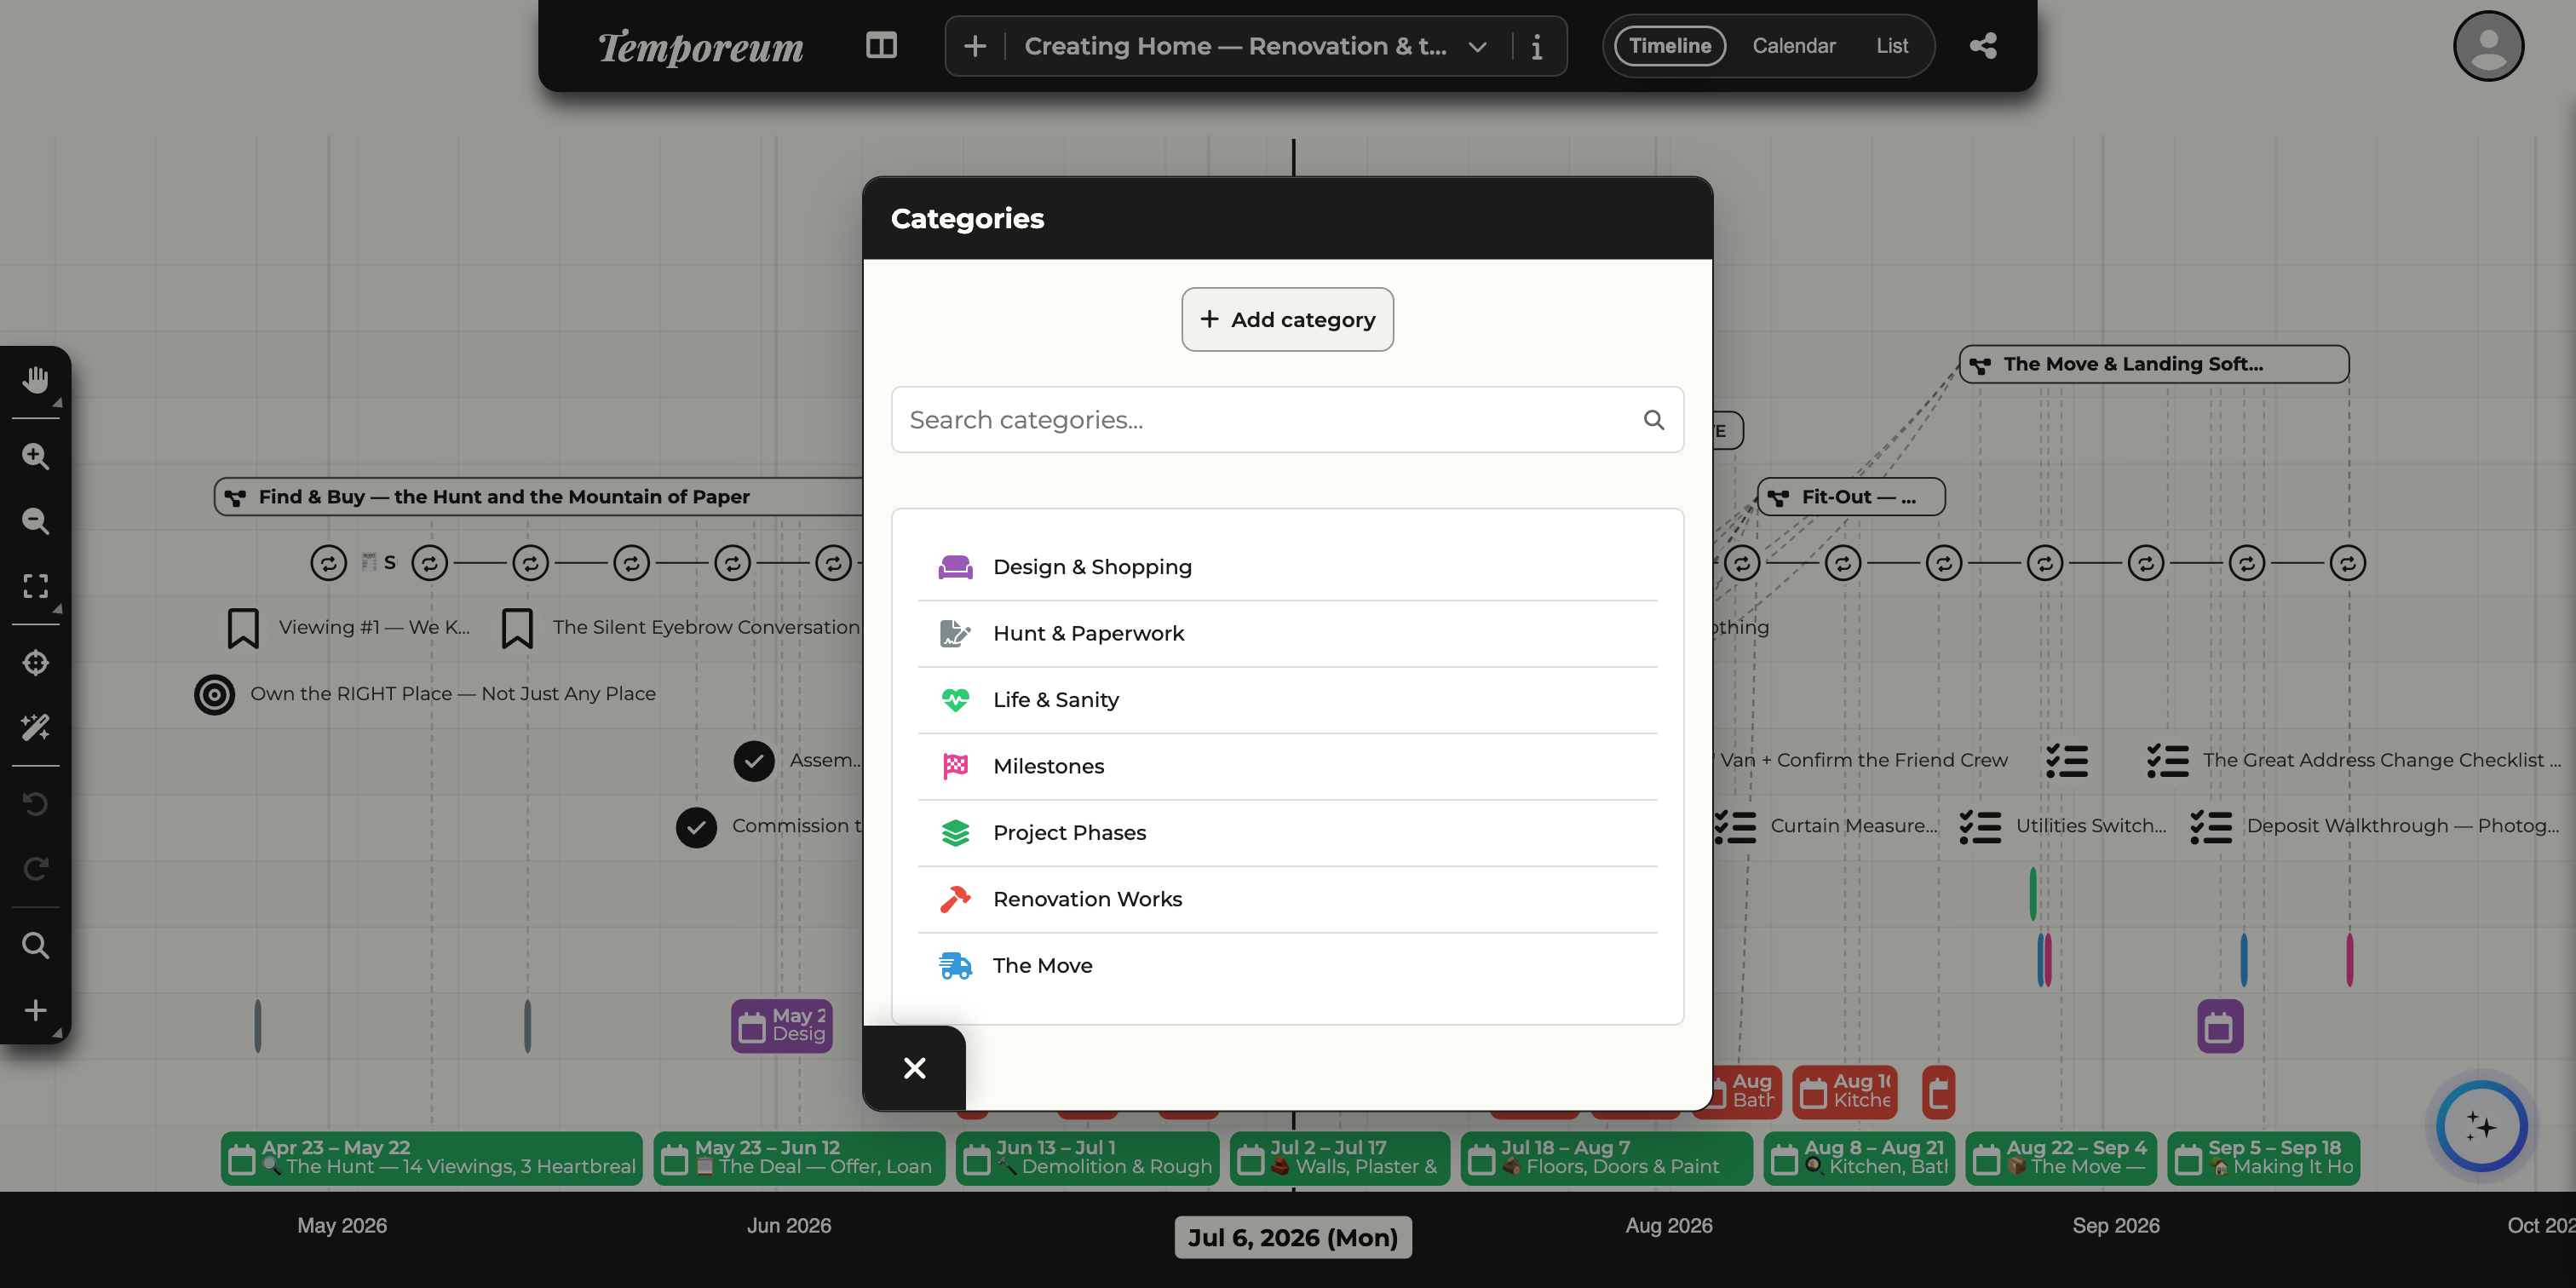
A category gives an event its colour and icon. Because every event on the canvas is coloured by category, patterns jump out — a burst of “Health & Lifestyle” here, a run of “Education & Career” there. Manage them from the Categories panel (Panels menu → Categories).
 1
2
3
4
1
2
3
4
- Add categoryCreate a new category with its own name, colour and icon.
- SearchFilter a long list of categories by name.
- A categoryEach row shows the colour and icon used for its events. Click to edit them.
- CloseCloses the panel.
Organizing · 17
Tags
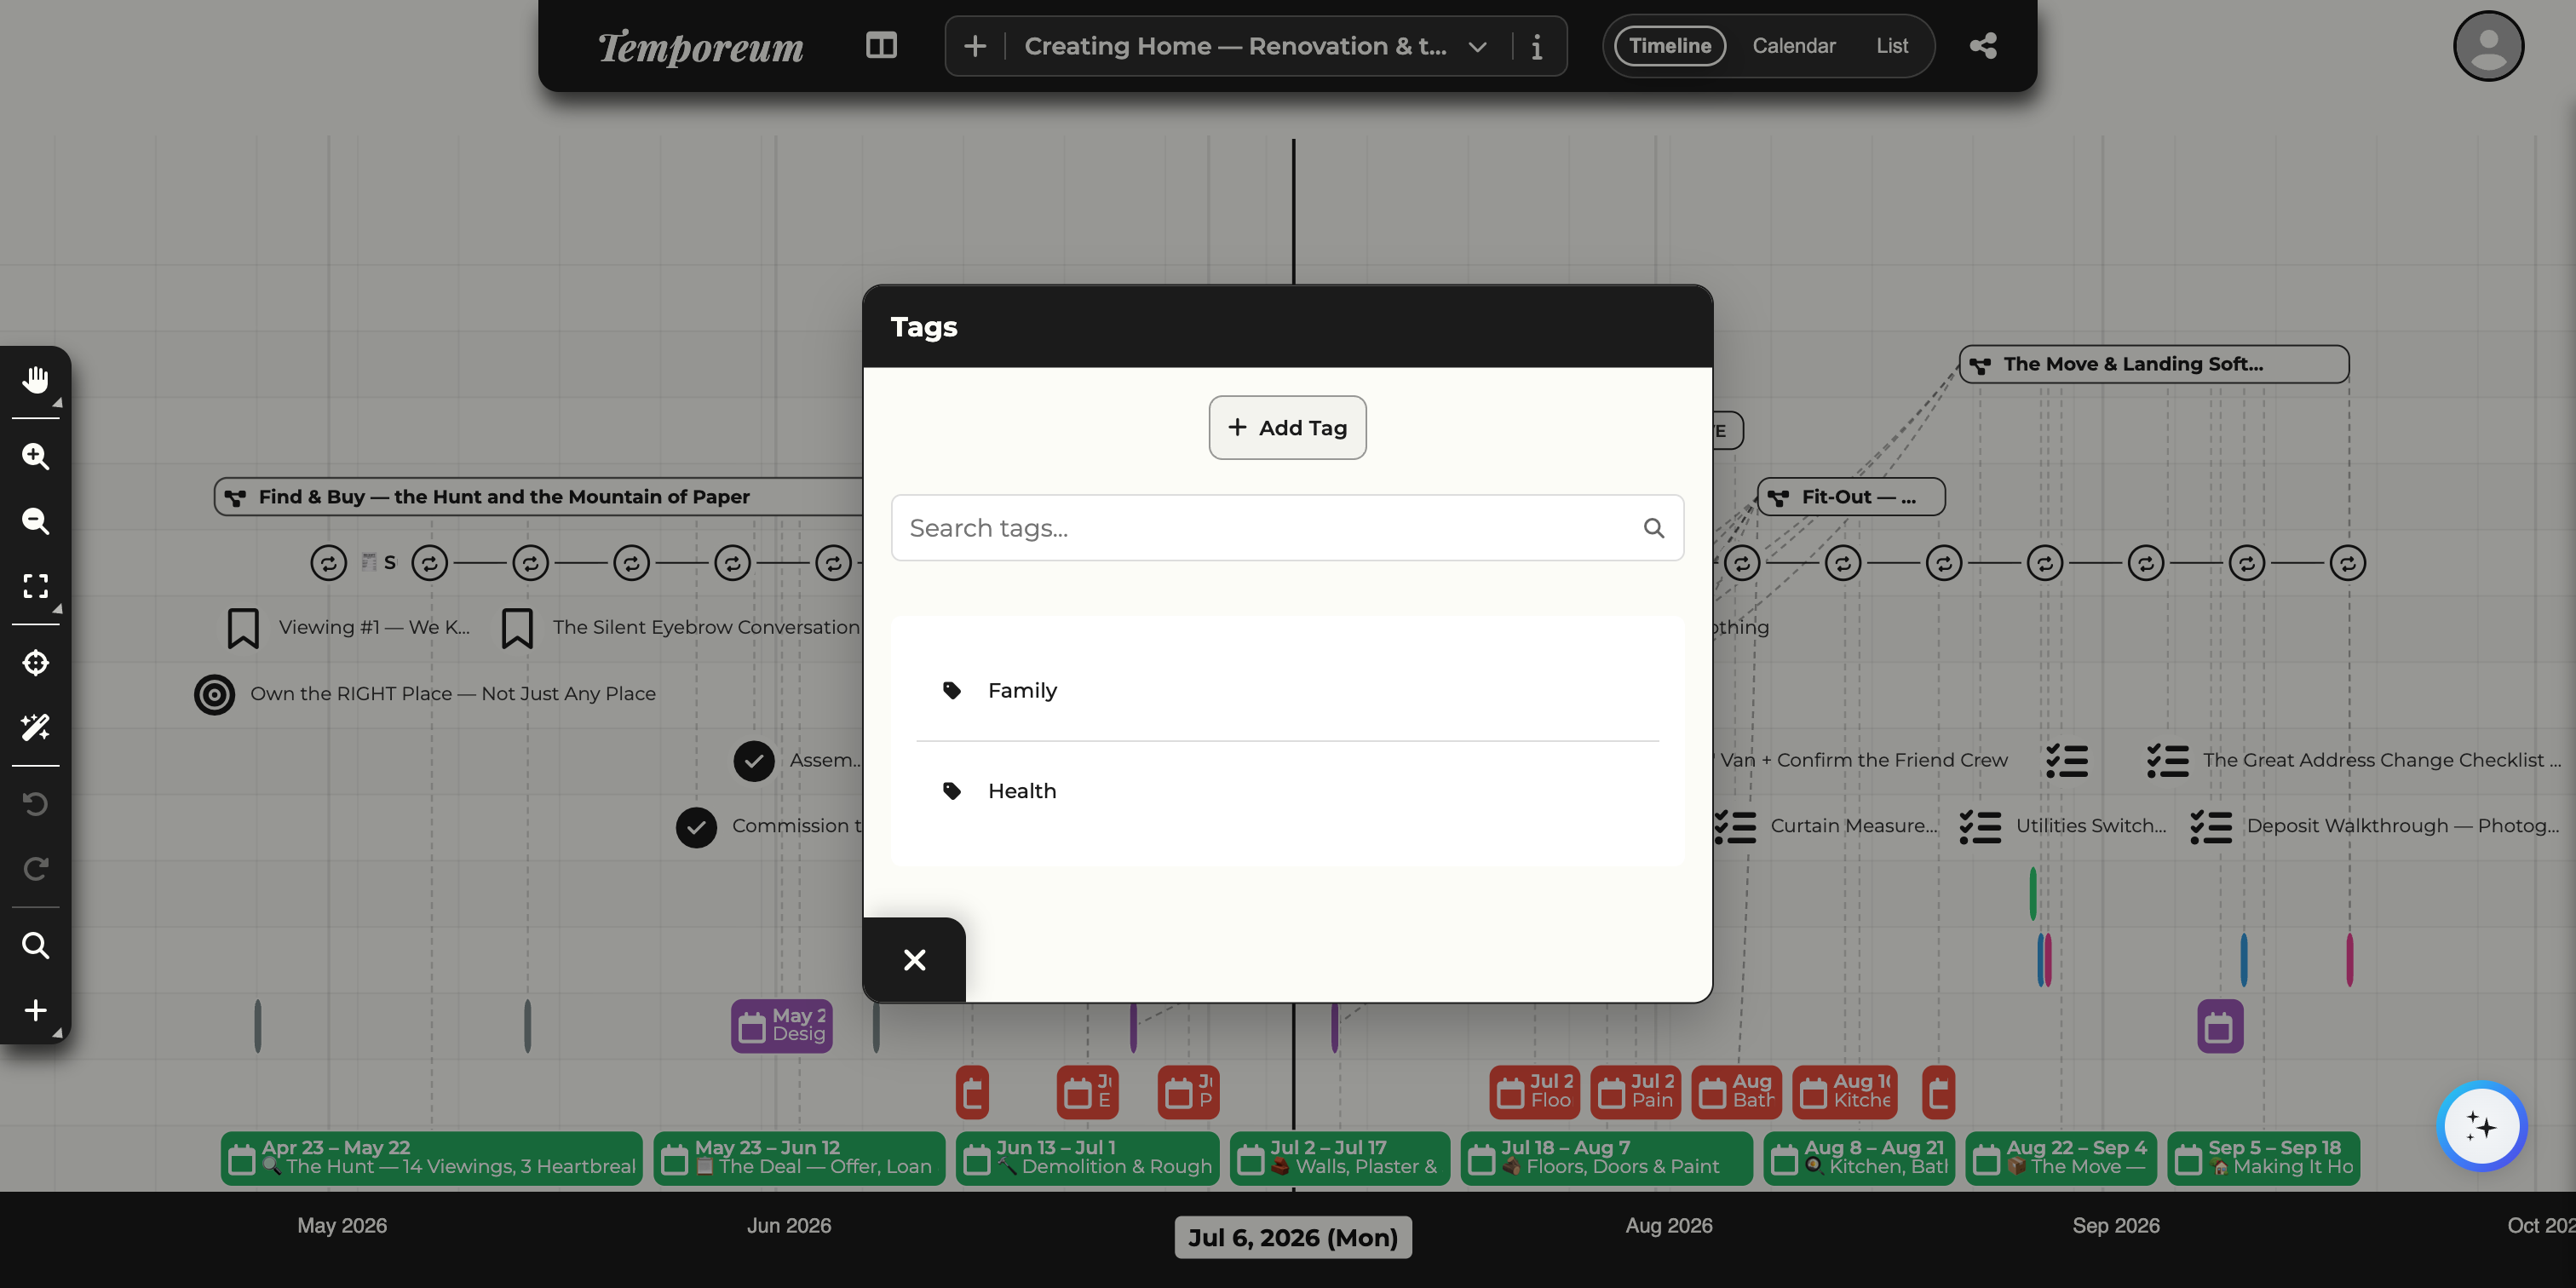
Where an event has exactly one category, it can carry many tags. Tags are free-form labels that cut across categories — “Family”, “Health”, “Travel” — so you can pull together everything that shares a theme no matter where it sits. Manage them from the Tags panel.
 1
2
3
1
2
3
- Add tagCreate a new label to reuse across events.
- SearchFind a tag quickly once the list grows.
- A tagEach row can be renamed (pencil) or removed (bin). Deleting a tag just unlabels its events — it never deletes them.
Organizing · 18
Sources
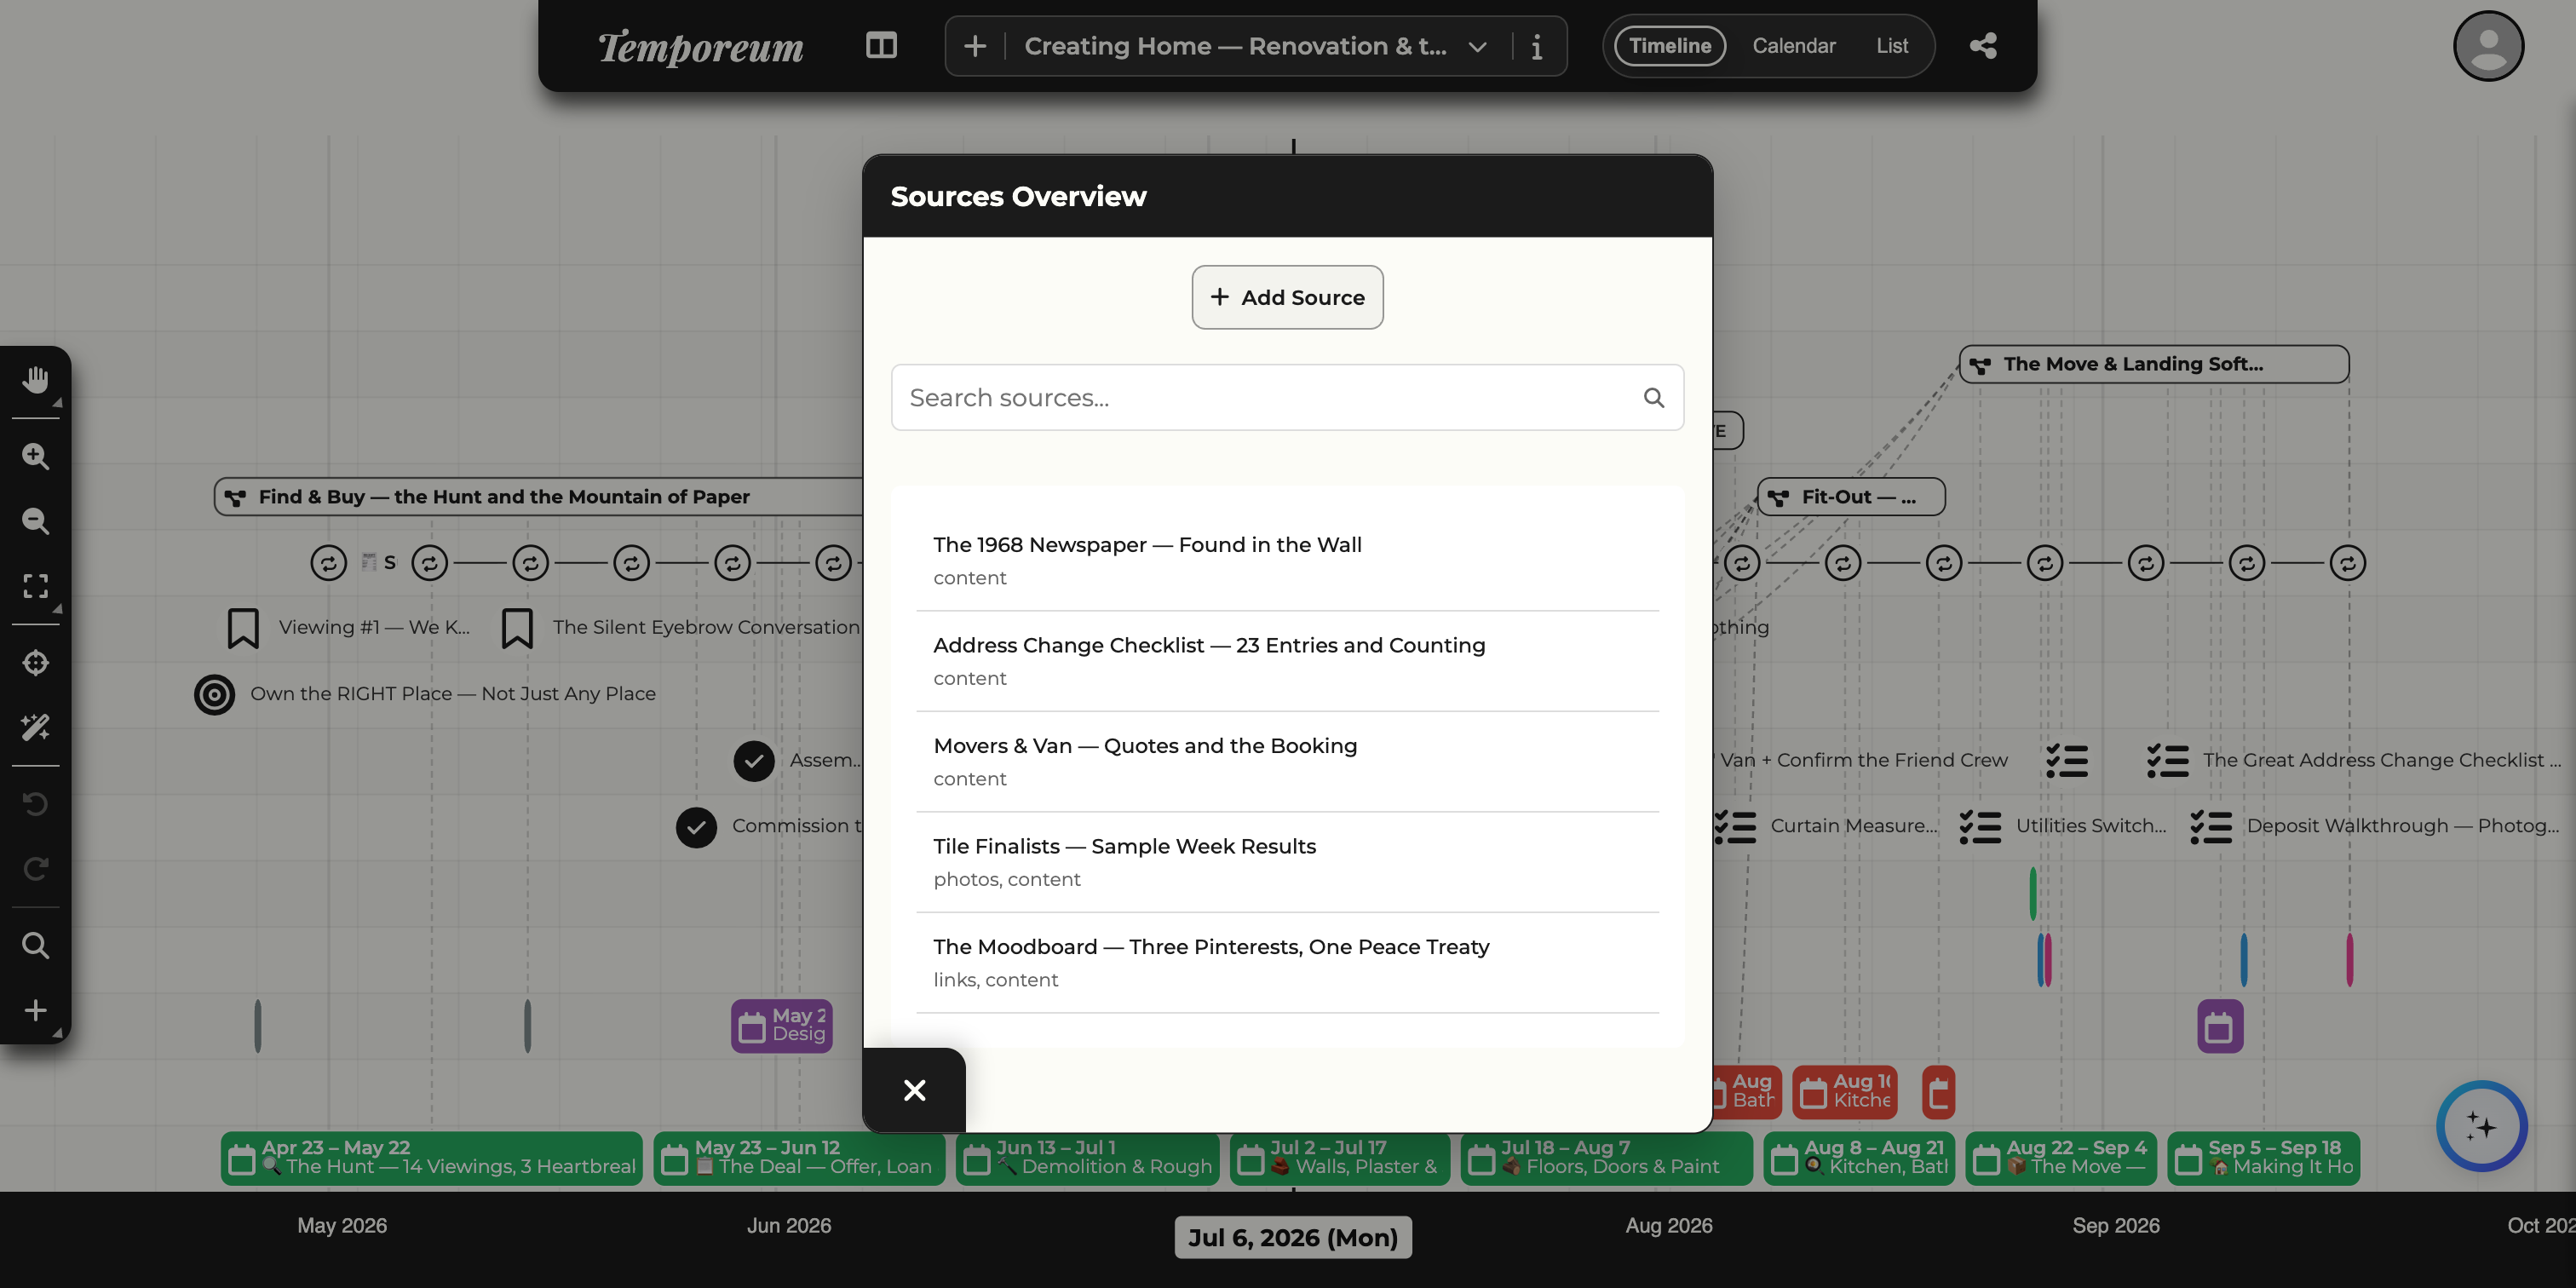
Sources are the reference material behind your timeline — links, files and notes that back up an event. A “1968 Newspaper — Found in the Wall”, an “Address Change Checklist”, a “Movers & Van” quote sheet: keep the supporting documents attached where they belong. The Sources Overview (Panels menu → Sources) lists them all.
 1
2
3
4
1
2
3
4
- Add sourceCreate a source and give it links, files or written content.
- SearchFind a source by name.
- A sourceThe small label under each name (“content, files”, “links, content”) shows what kind of material it holds. Click to open it.
- CloseCloses the overview.
Working faster
Find it, bulk-edit it, let AI draft it.
Working faster · 19
Search & filters
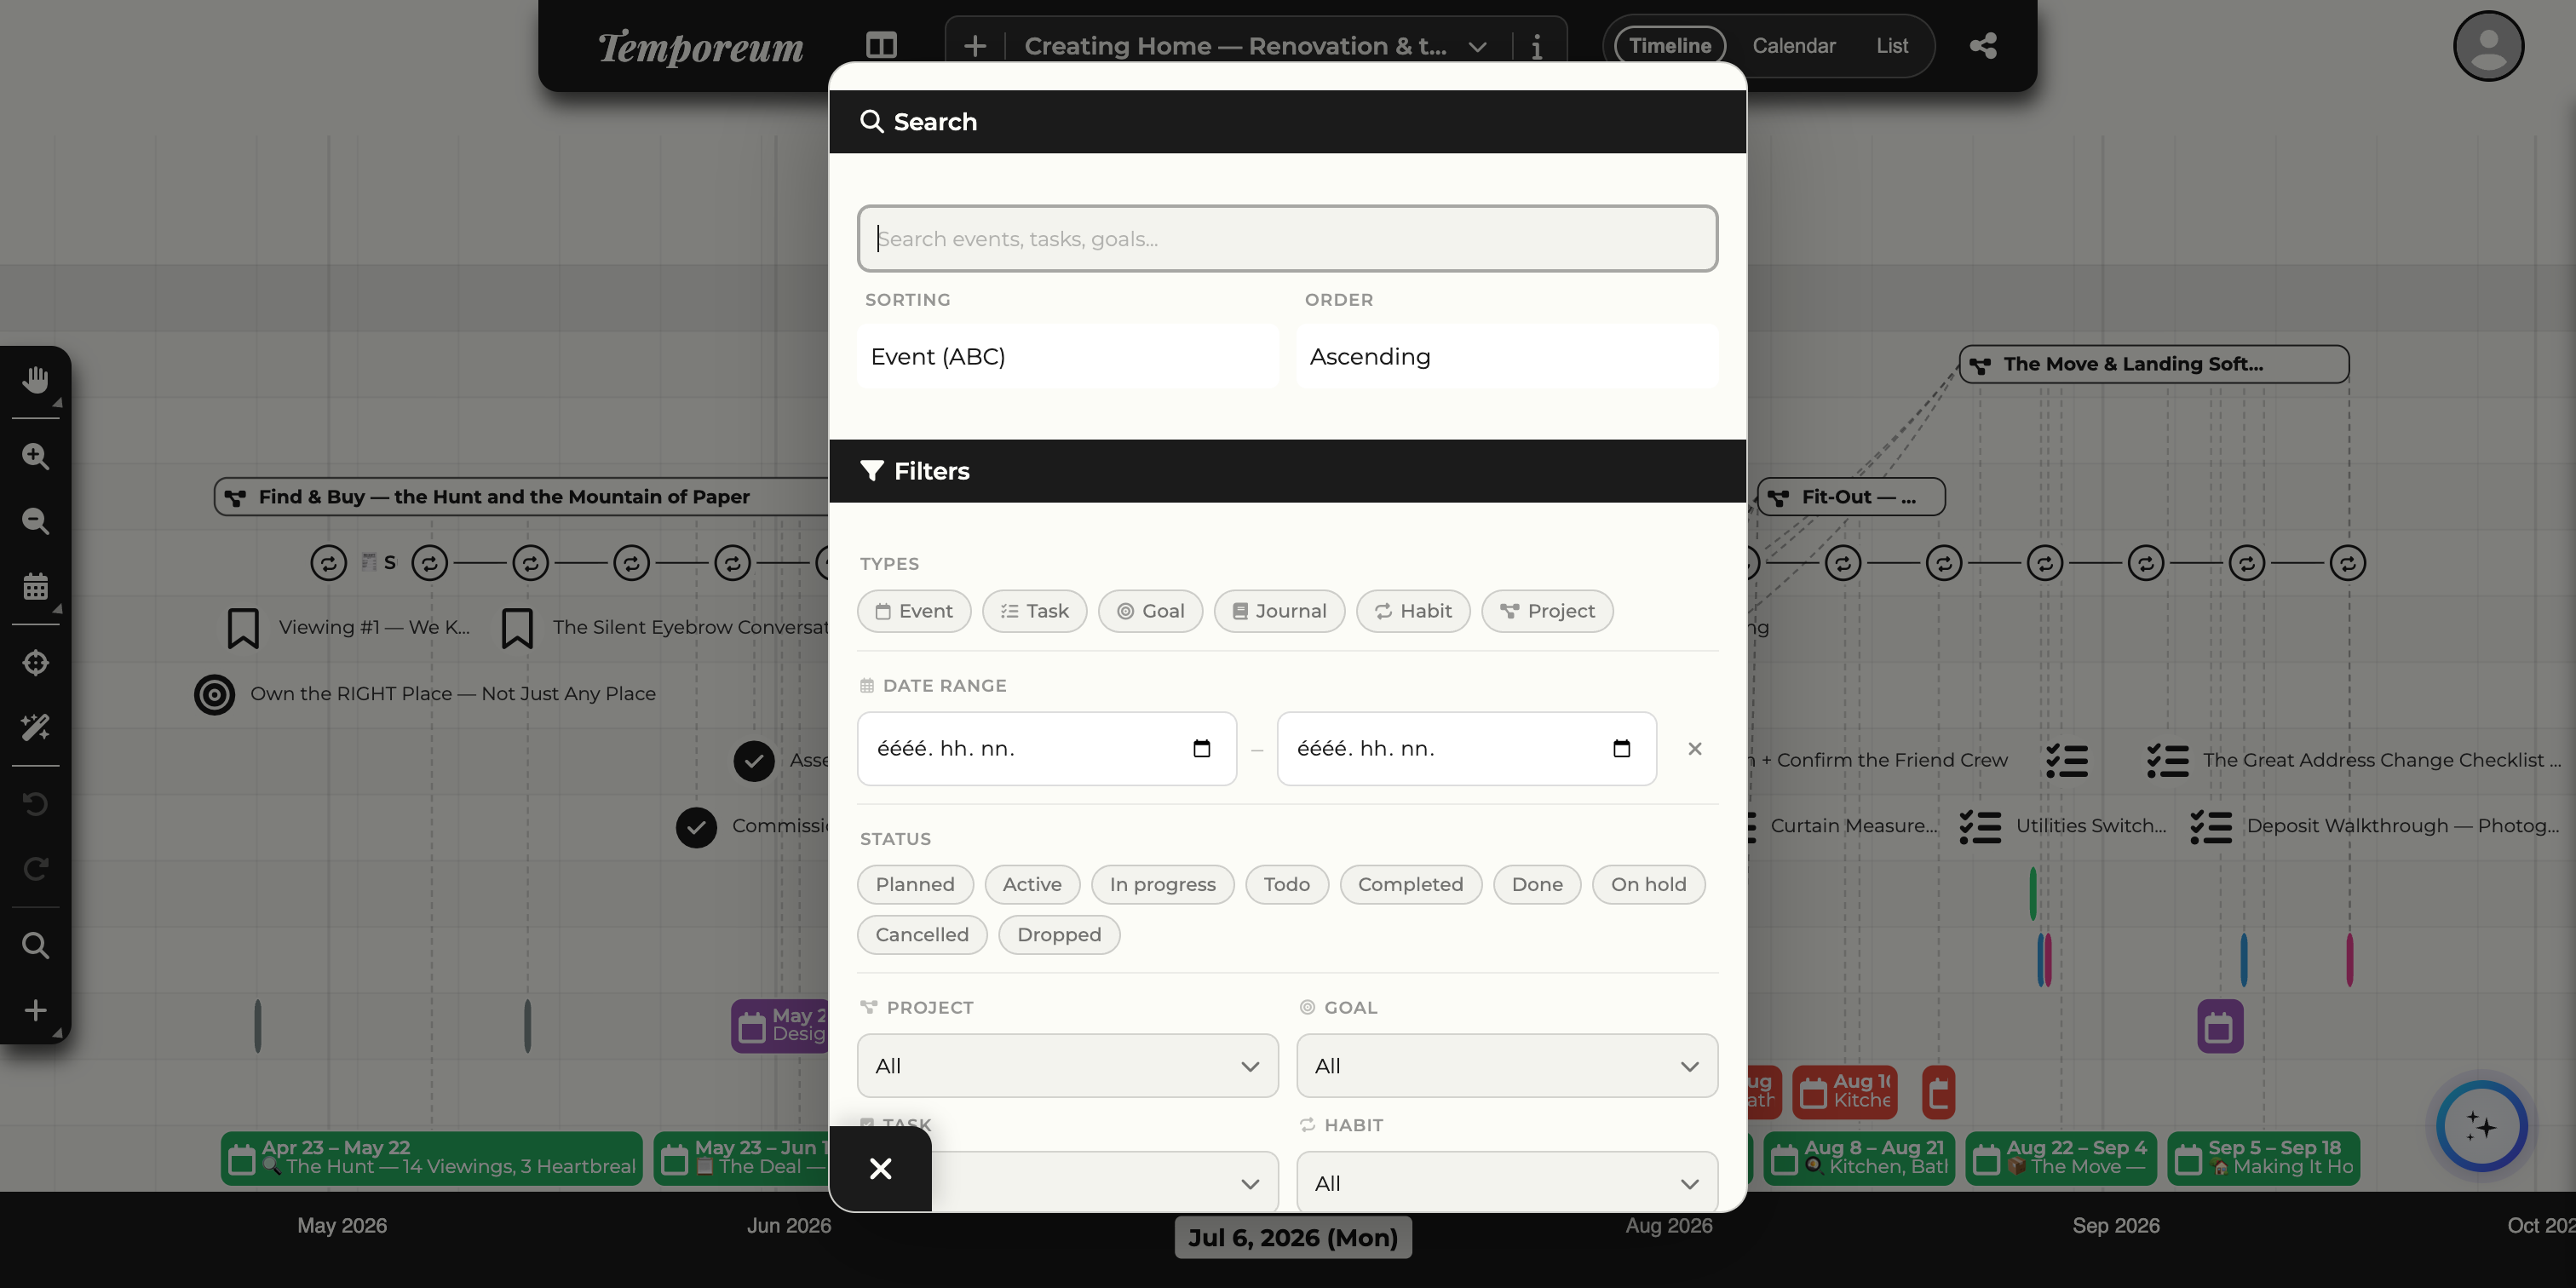
As a timeline fills up, this is how you find the needle. The Search & Filters panel (the magnifier in the toolbar) searches across everything and narrows the canvas to just what matches — by type, date, status, project, goal or habit.
 1
2
3
4
5
1
2
3
4
5
- Search boxFree-text search across events, tasks, goals and more.
- Sorting & orderSort results by name, date and so on, ascending or descending.
- Type filtersShow only Events, Tasks, Goals, Journals, Habits or Projects — in any combination.
- Date rangeLimit results to a window of time.
- Status filtersPlanned, Active, In progress, Completed, Cancelled and more.
Working faster · 20
Tool modes & selection
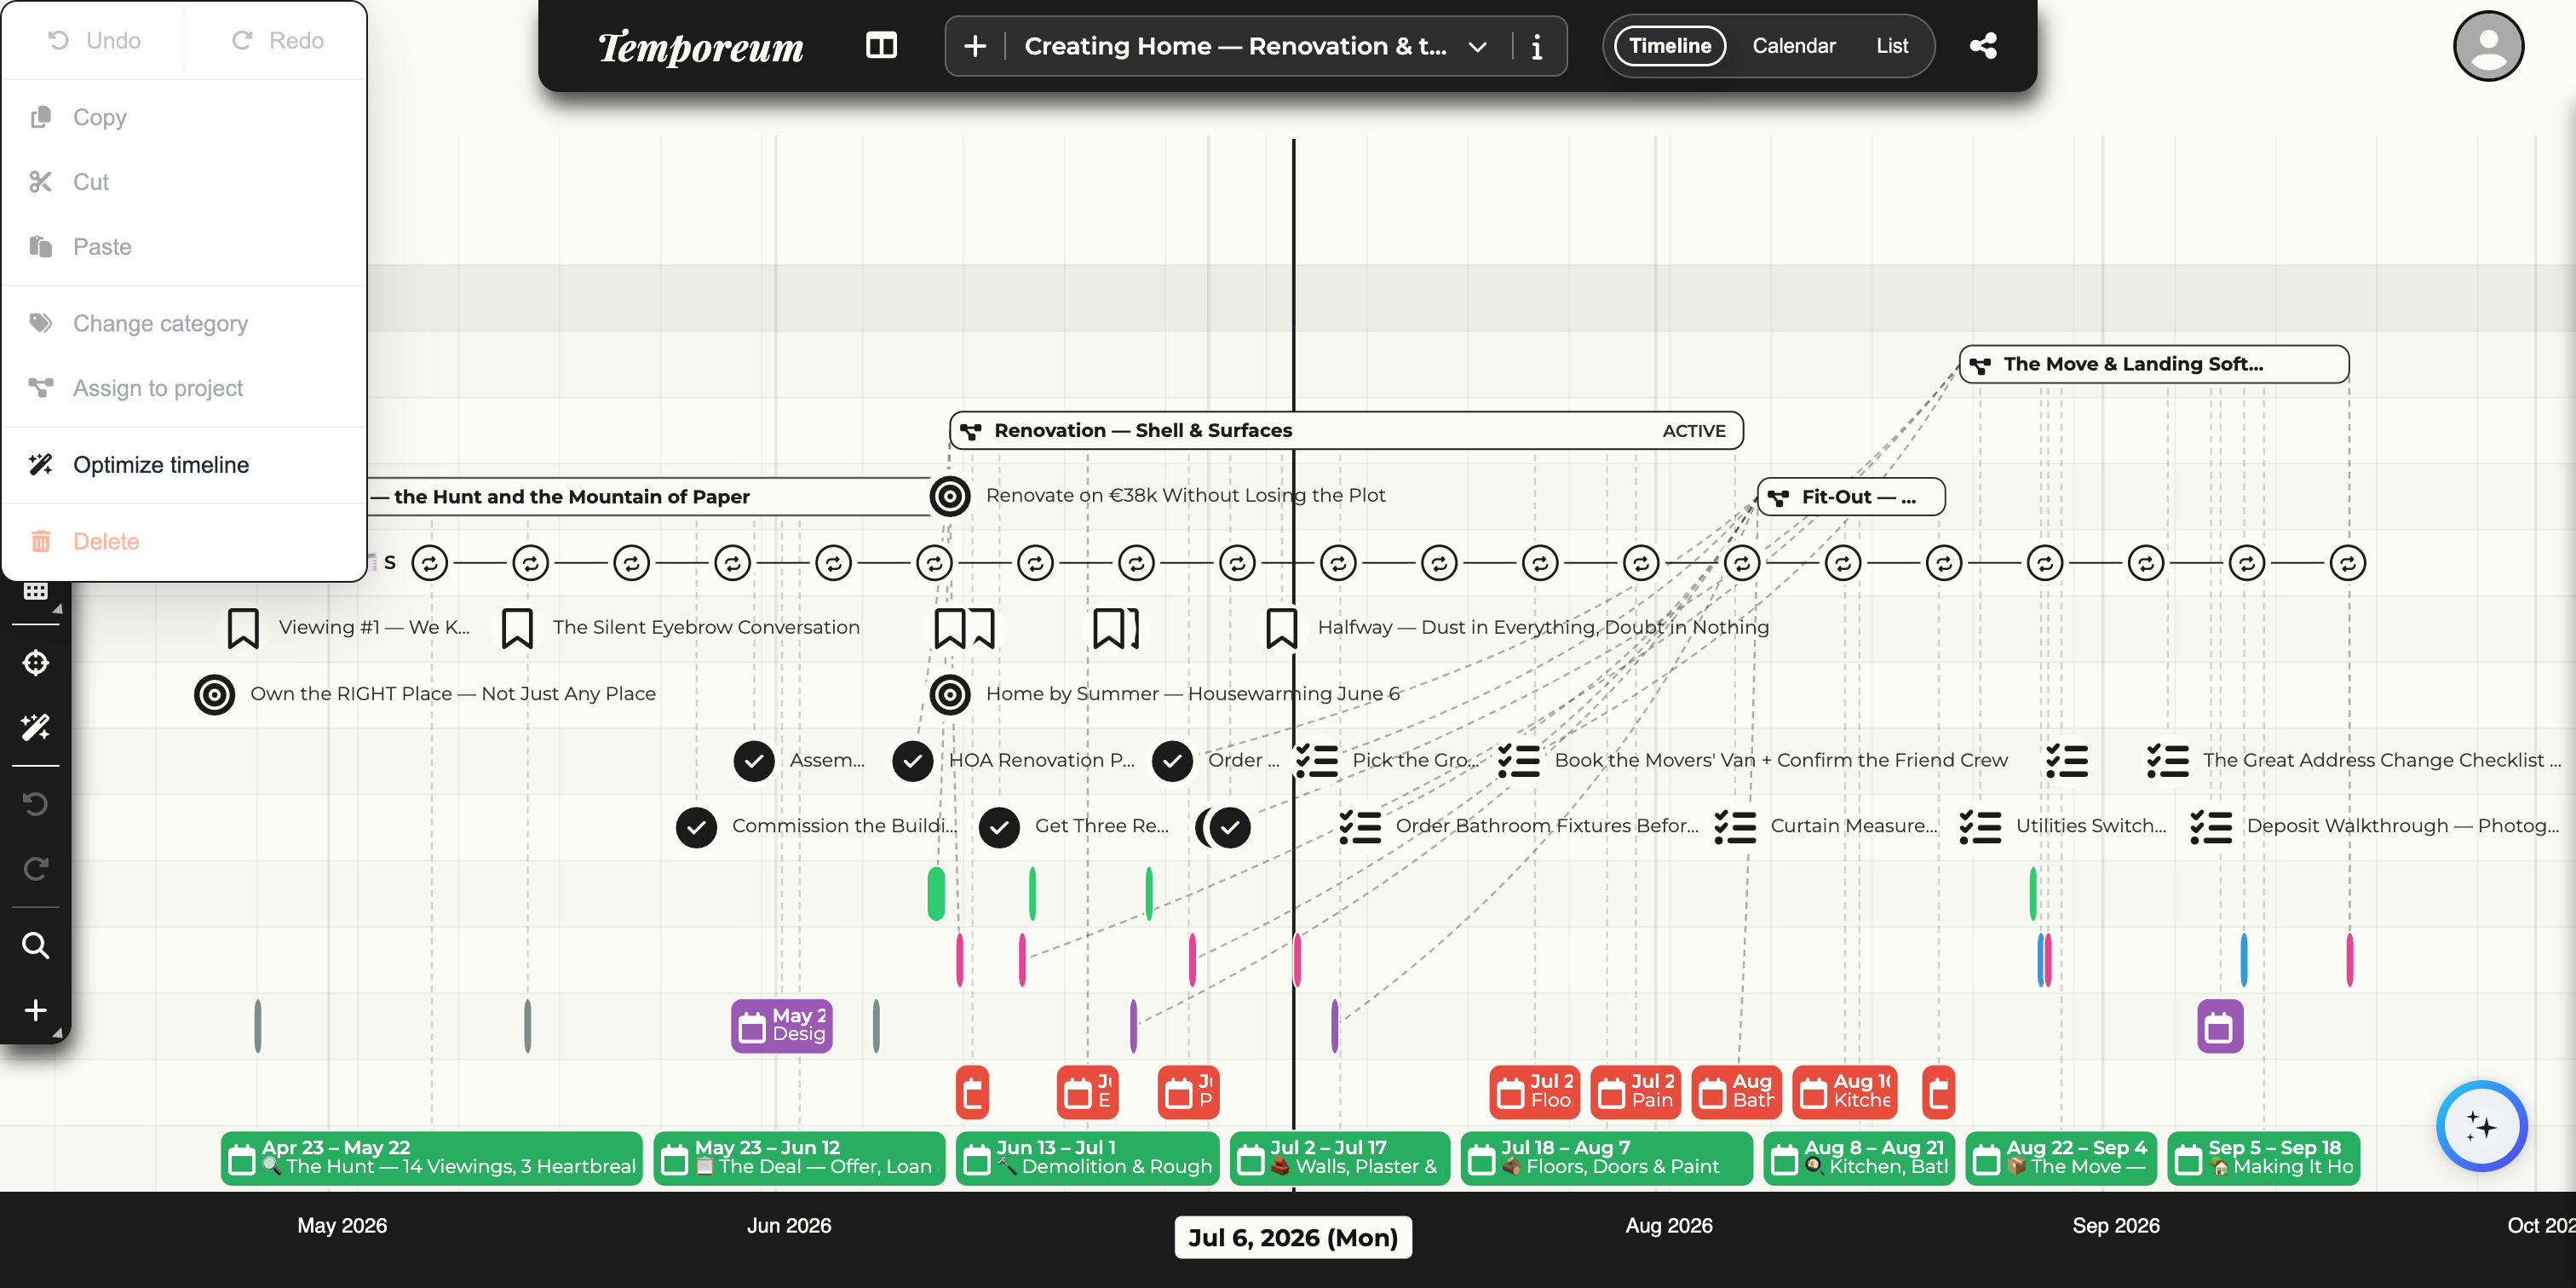
The canvas has two modes. Move (the hand) is the default — drag to pan, drag an event to reschedule it. Switch to Select and you can rubber-band a group of events, then act on all of them at once from the action menu below.
 1
2
3
4
5
6
1
2
3
4
5
6
- Move / Select toggleIn the toolbar — switch between panning the canvas and selecting events.
- Undo / RedoStep back and forward through your changes.
- Copy · Cut · PasteDuplicate or move selected events, even to a different point in time.
- Change category · Assign to projectRecolour or re-file many events in one action.
- Optimize timelineAuto-tidies the layout so overlapping events stack cleanly and nothing hides behind anything else.
- DeleteRemoves every selected event at once.
Working faster · 21
AI — text to timeline
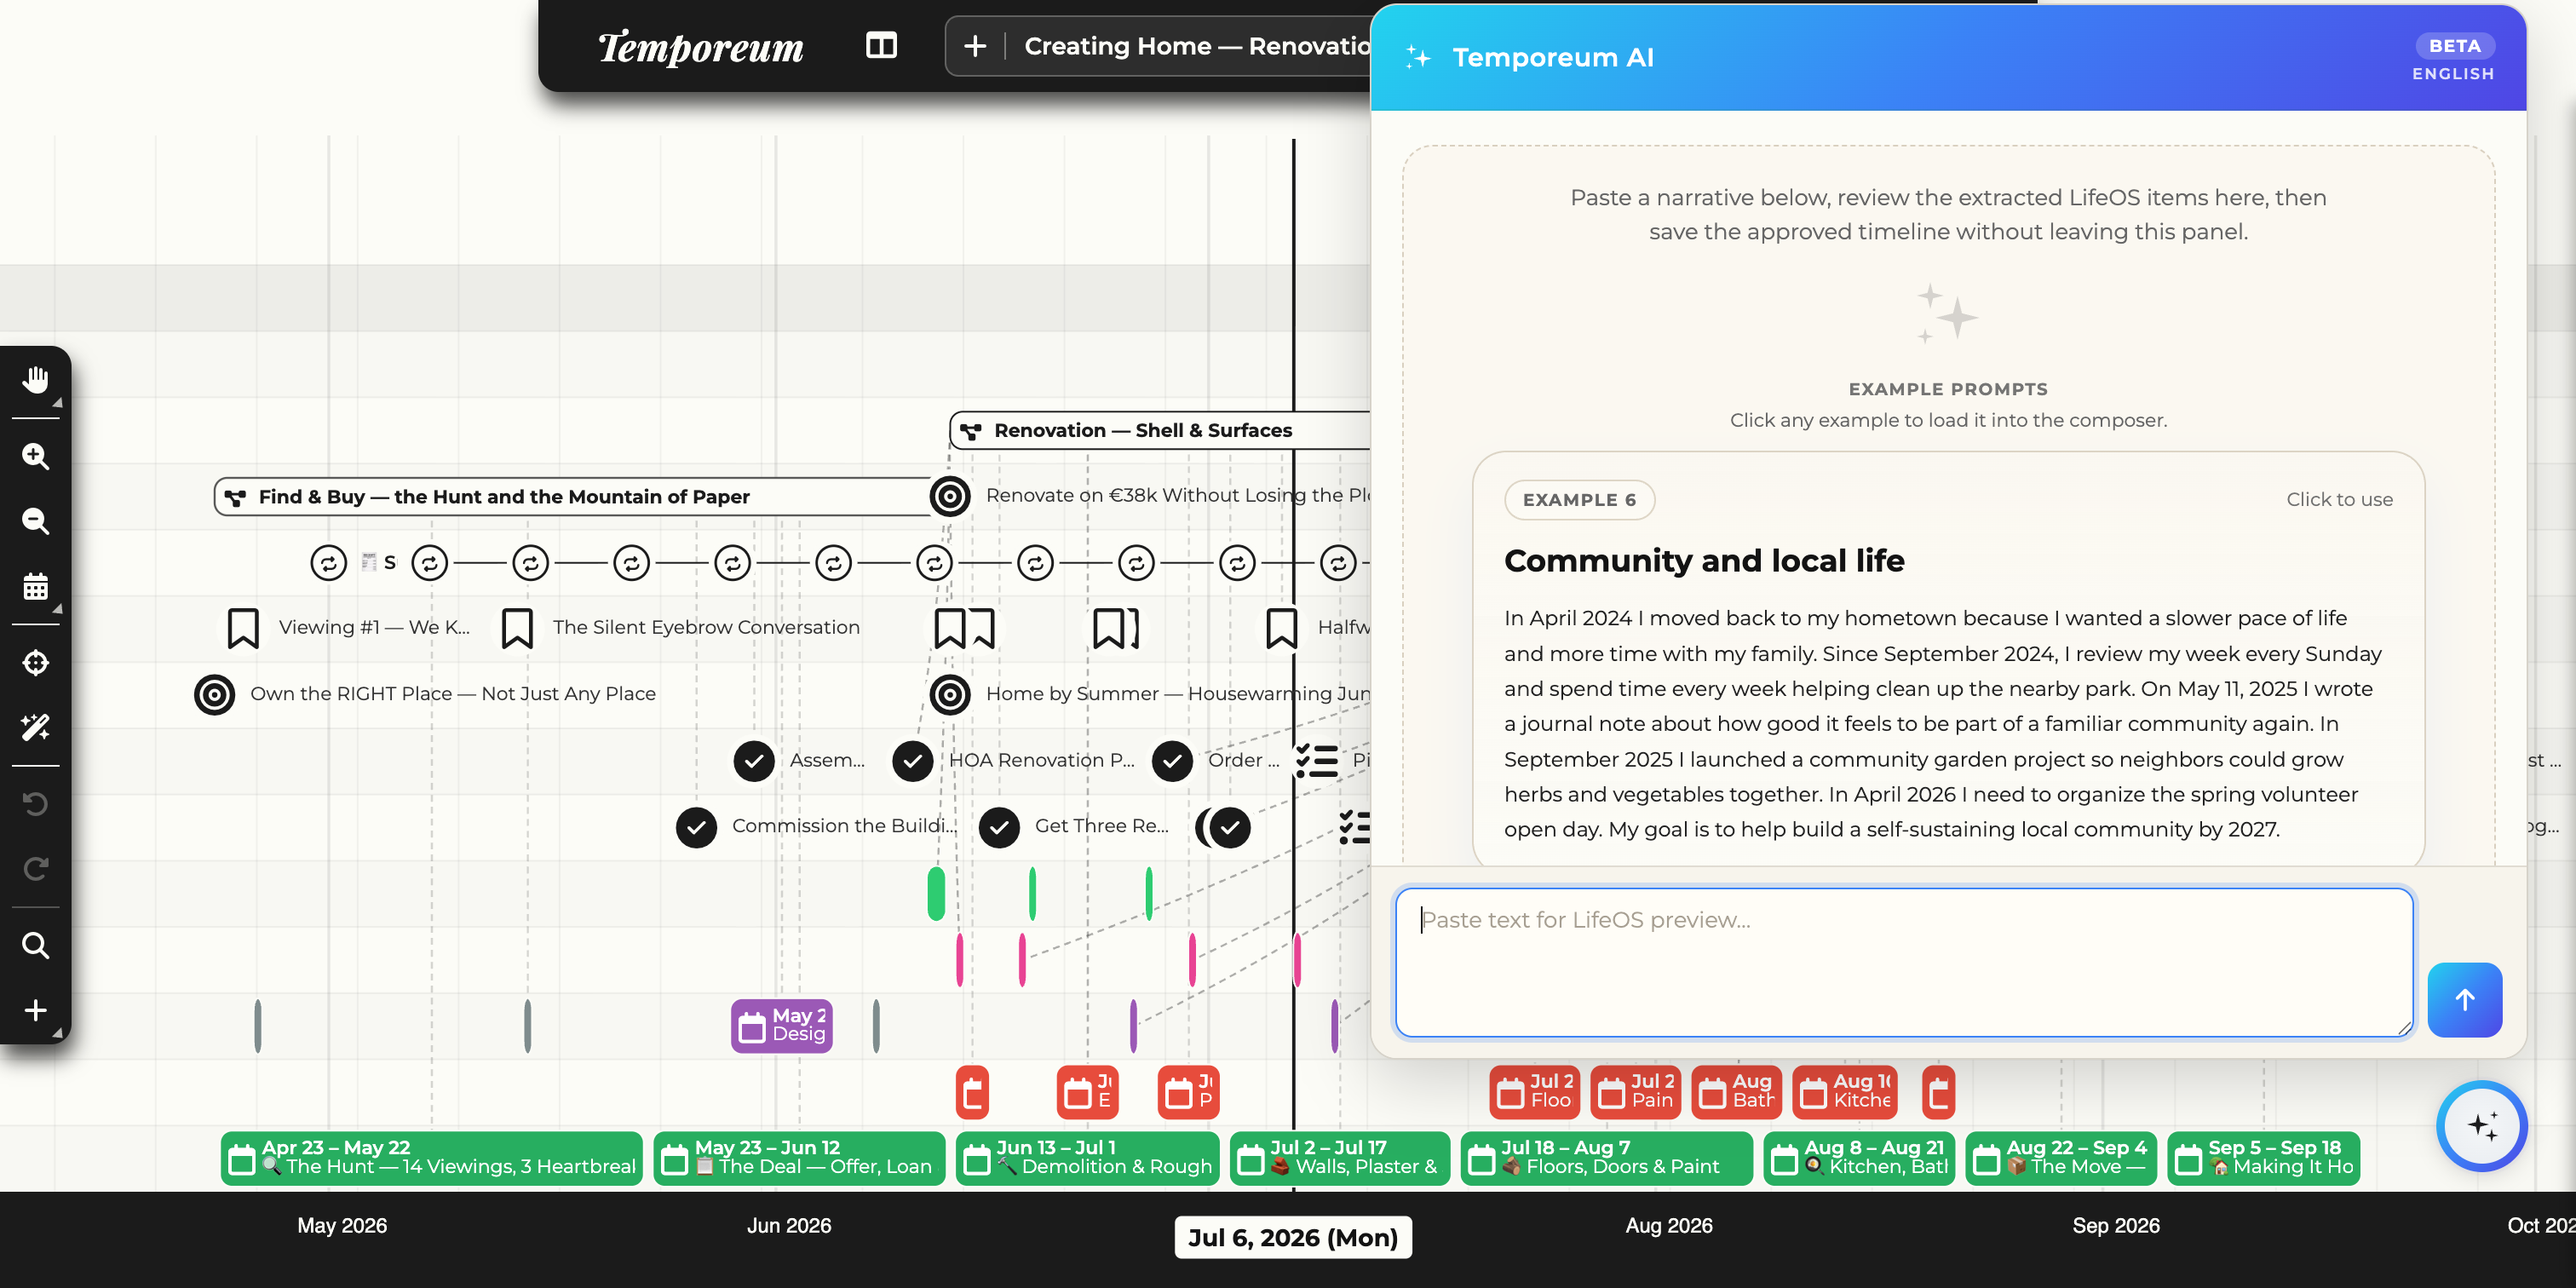
The fastest way to fill a timeline is to just describe it. Open Temporeum AI (the sparkle button, bottom-right), paste a paragraph about your life or a plan, and it pulls out the events, goals, habits and journals for you to review — then saves the ones you approve, all without leaving the panel.
 1
2
3
4
5
1
2
3
4
5
- Temporeum AIThe assistant panel — currently in beta, working best in English.
- How it worksPaste a narrative, review the extracted items, save the ones you want.
- Example promptsNot sure what to write? Click an example to load it into the composer and see the result.
- ComposerPaste or type the text you want turned into timeline items.
- SendRuns the extraction; the proposed events, goals and habits appear in the panel for review.
Sharing & your data
Collaboration, comments, and taking your data with you.
Sharing & your data · 22
Sharing & collaboration
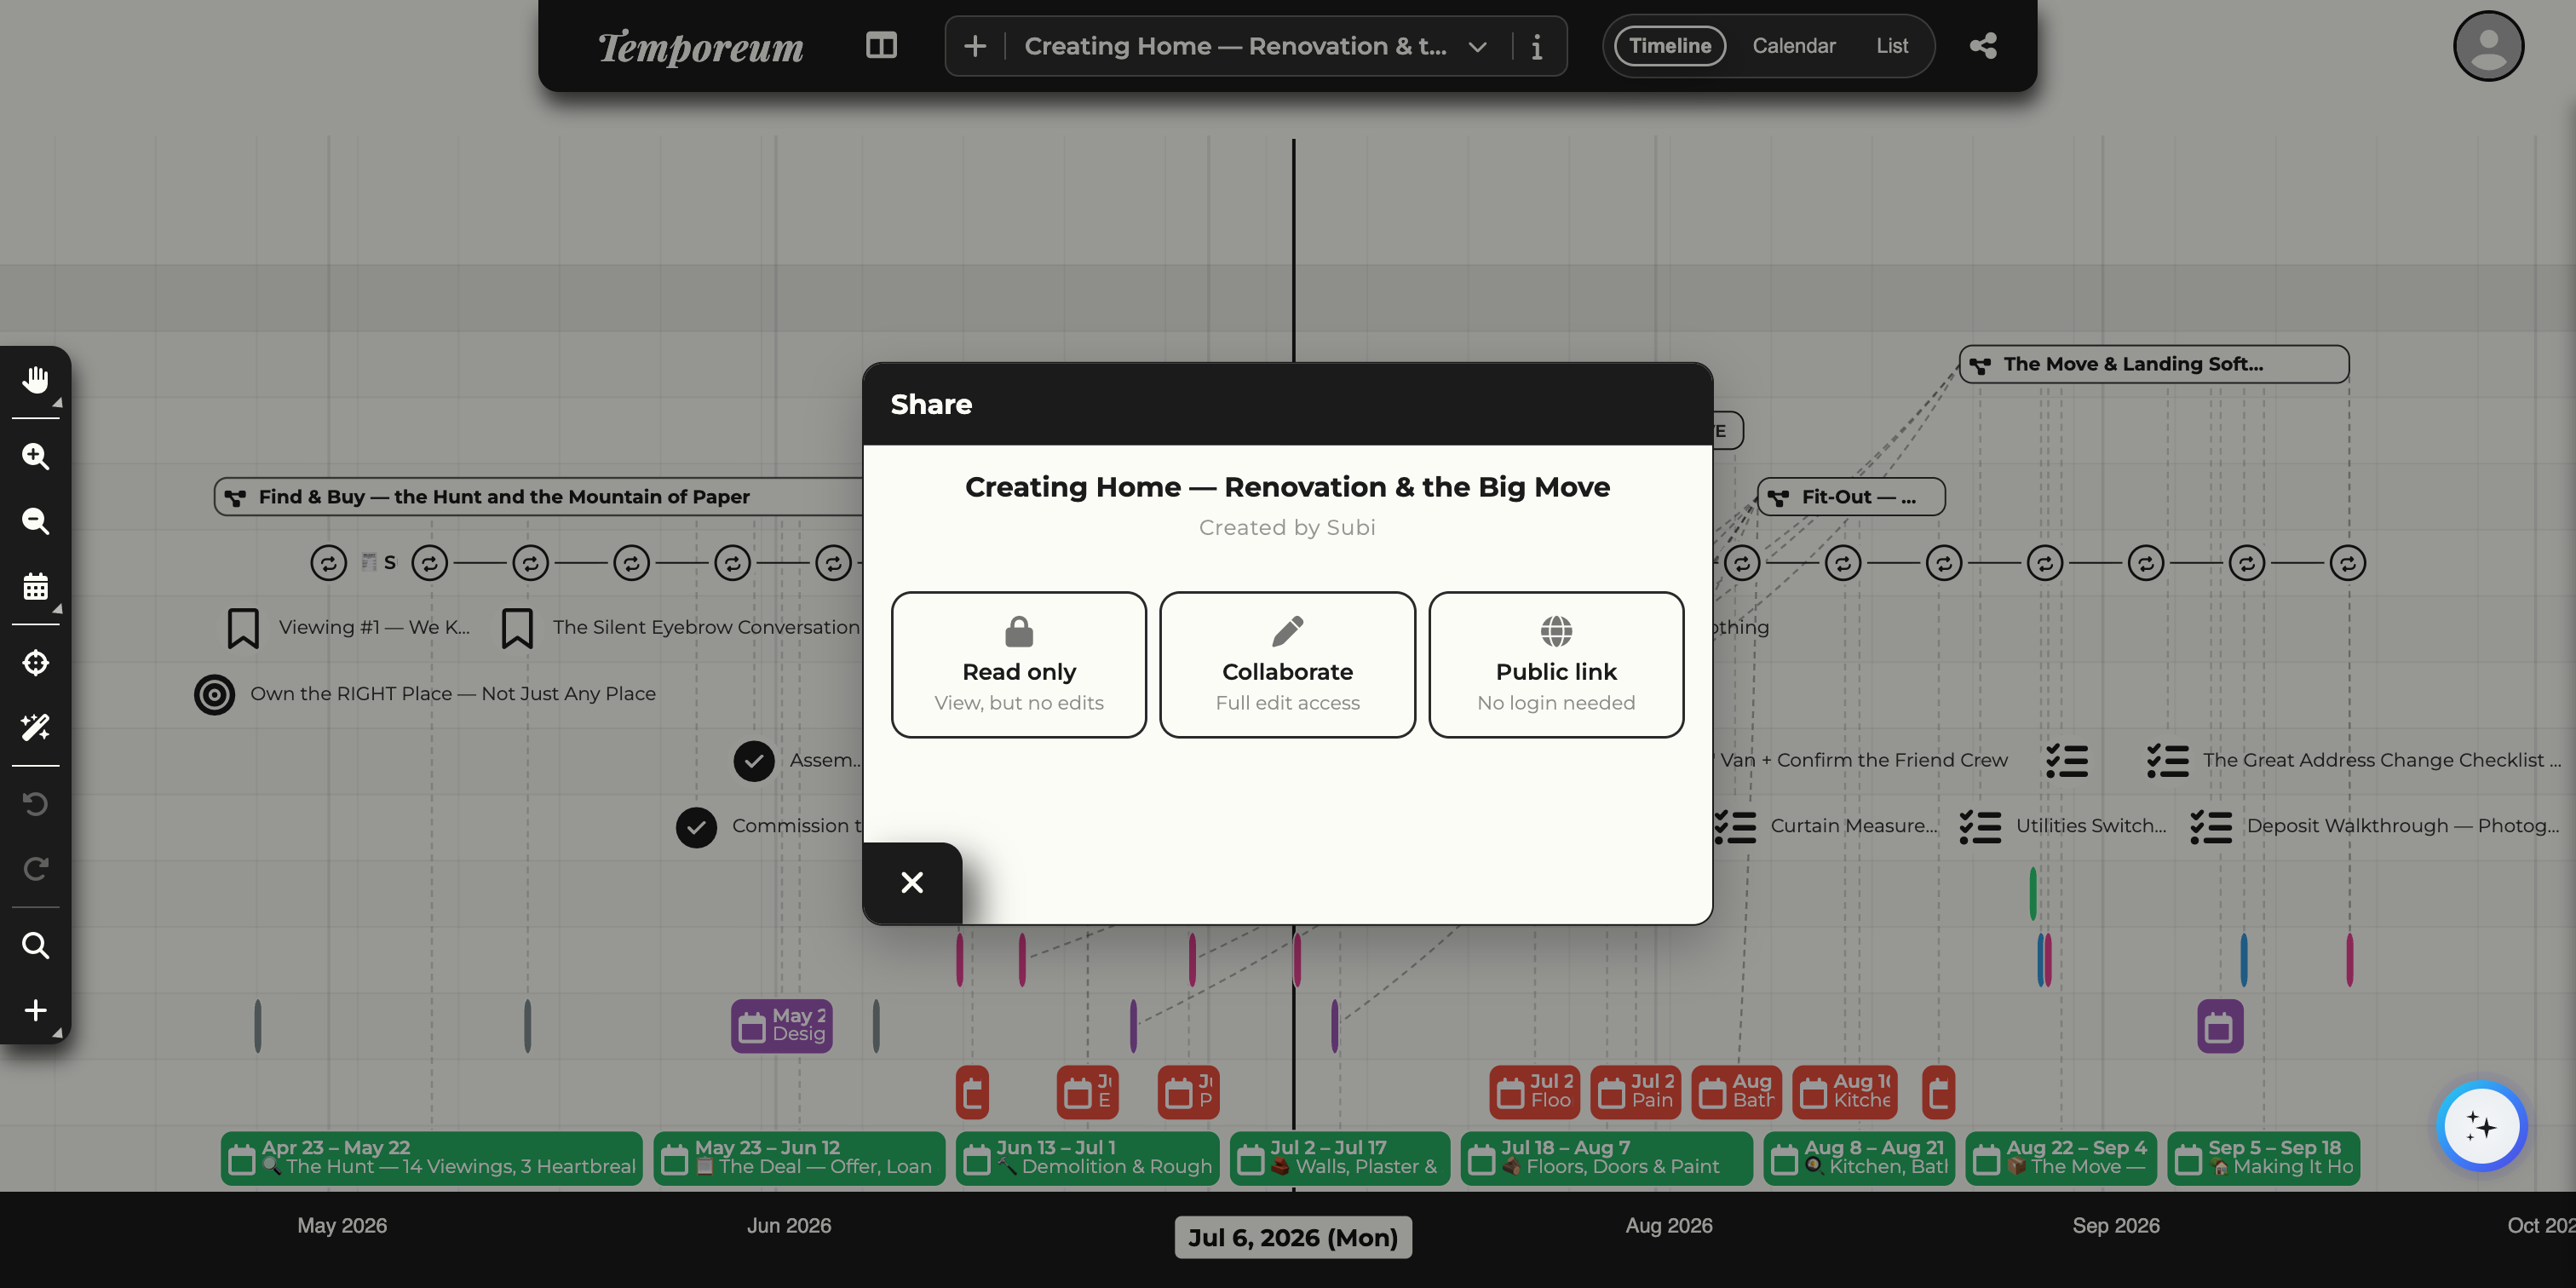
A timeline does not have to stay private. Open the Share dialog from the Shared button in the top bar (the share icon next to your avatar) → Share this timeline. Each way to share is a card you toggle on — pick one or more.
 1
2
3
1
2
3
- Read onlyThe recipient can view the timeline but not change anything. They can still save their own copy.
- CollaborateFull edit access. Search for people by name to invite them; they appear in your collaborators list and can add and change events alongside you.
- Public linkAnyone with the link can view it, no login required — ideal for showing your timeline to the world.
Once you turn on a mode, a link appears — click Share to activate it, then copy the link to send. The Read only and Public link cards each give a link; Collaborate adds the invite search and collaborators list.
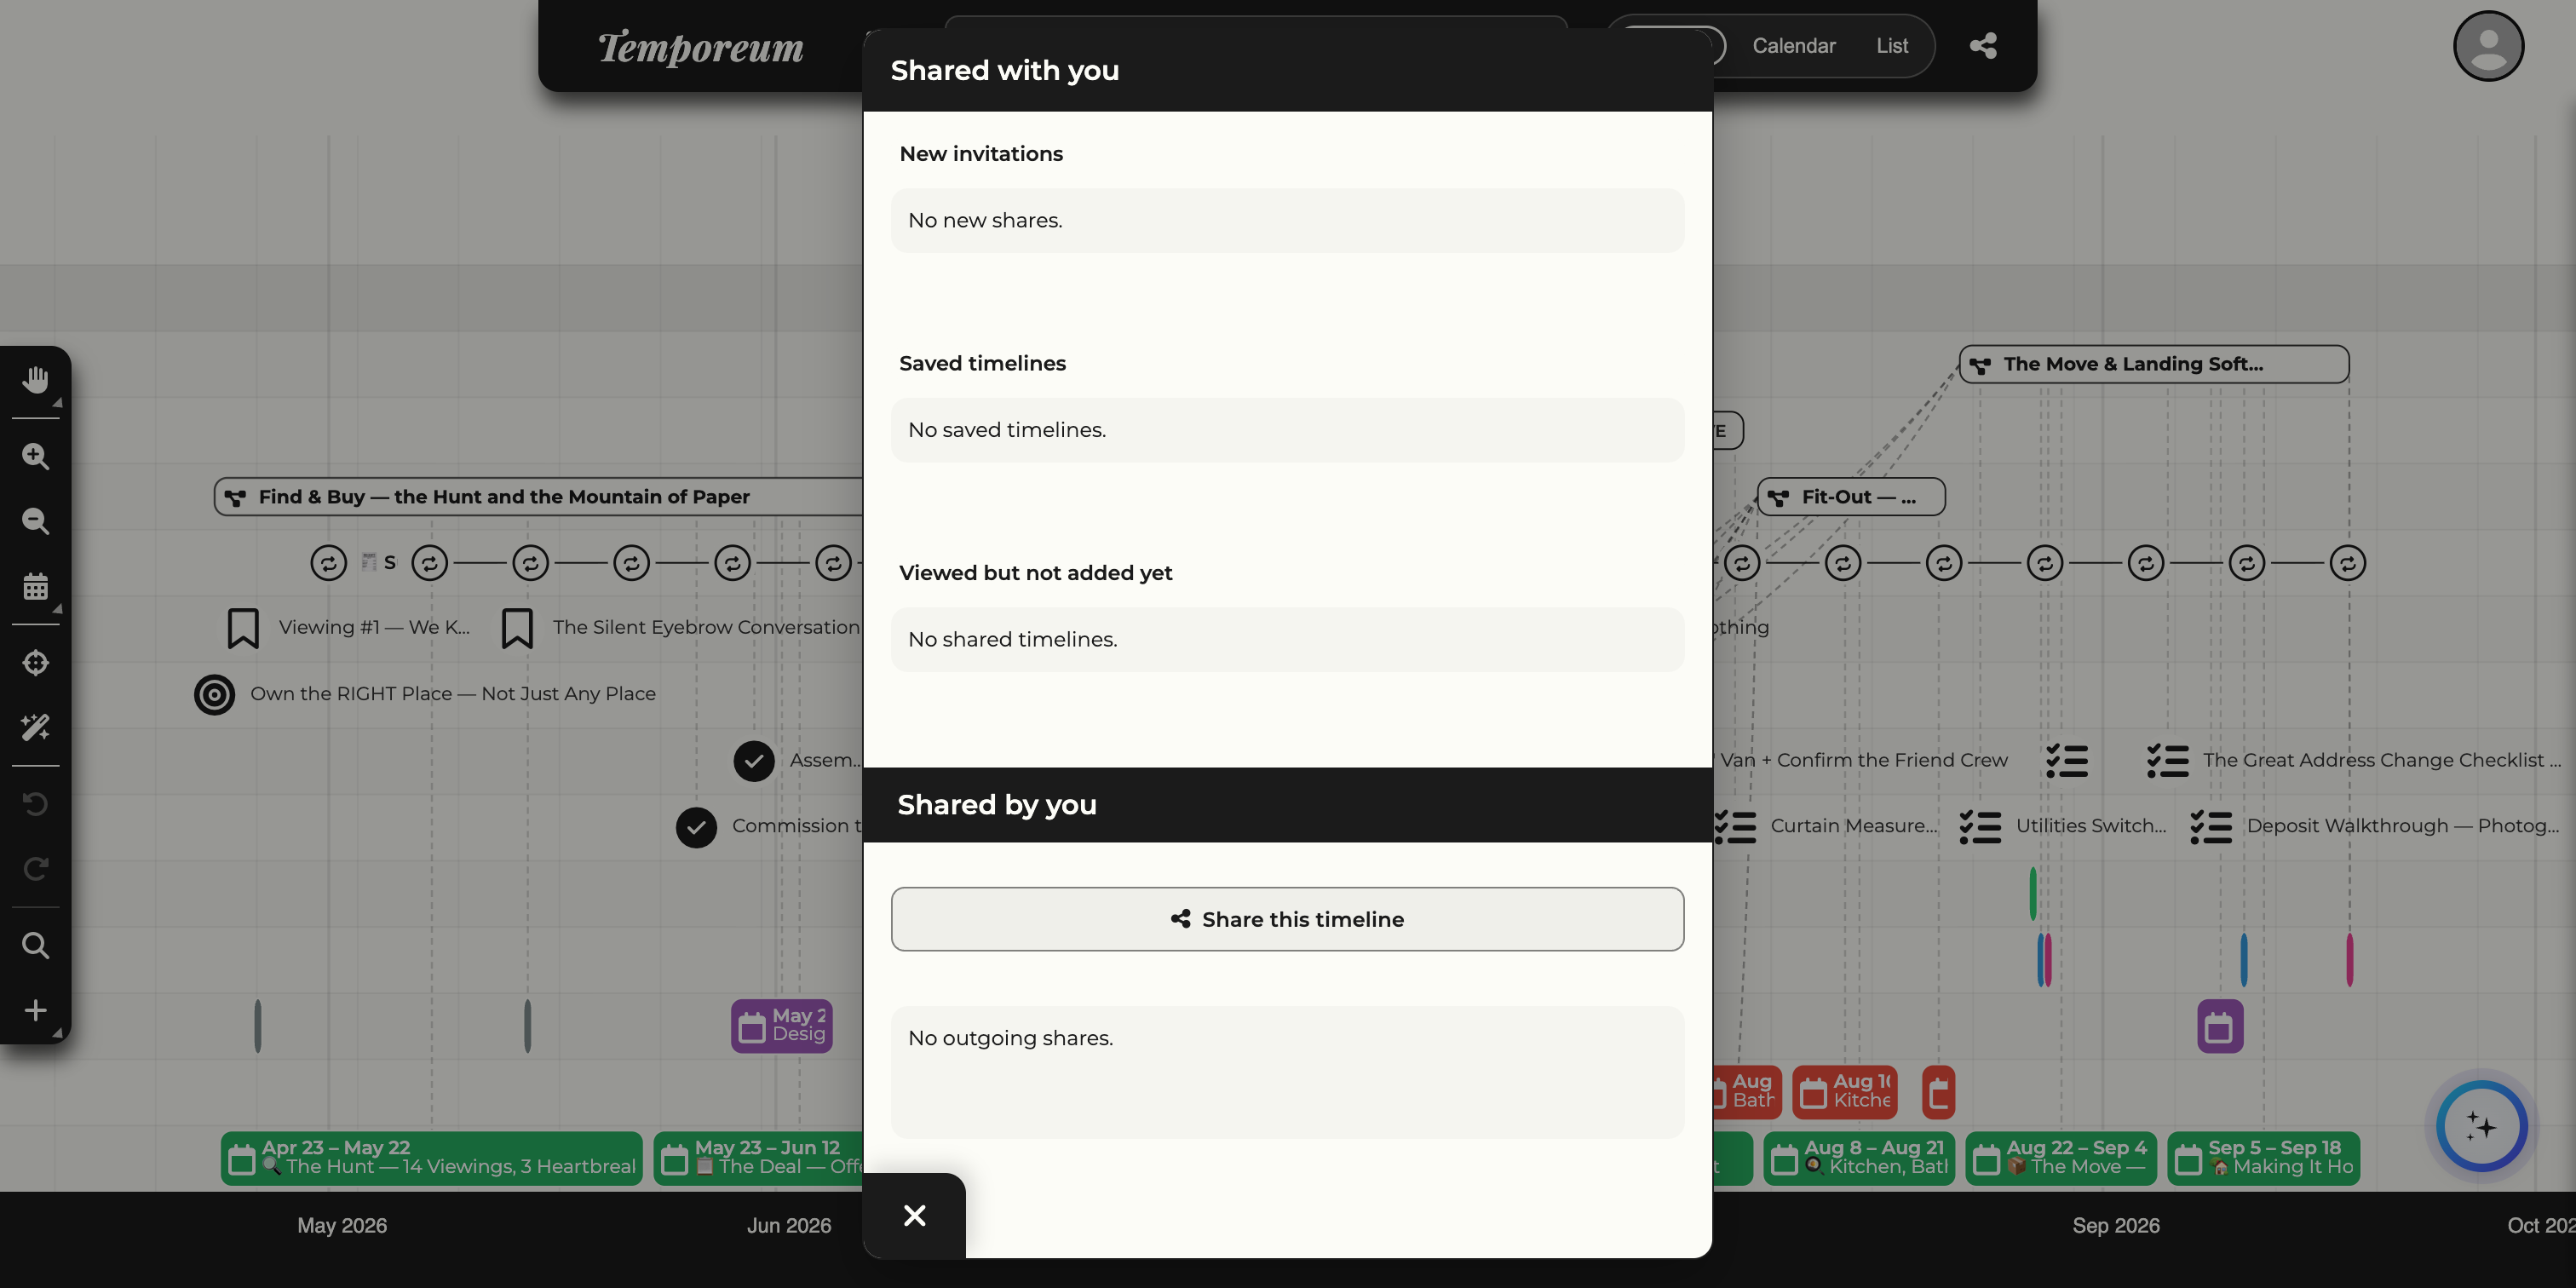
Shares you receive and send are managed from the Shared button — the share icon in the top bar, next to your avatar, with a badge for new invitations. It opens the Shared panel in two halves: Shared with you — new invitations, timelines you have saved, and ones you have opened but not added yet — and Shared by you, listing everything you have shared out, with a Share this timeline shortcut.
 1
2
3
4
5
1
2
3
4
5
- New invitationsTimelines someone has just shared with you, waiting to be opened. The count here is the badge on the Shared button.
- Saved timelinesShared timelines you have added to your own list to keep working with.
- Viewed but not added yetShared links you have opened but not yet saved — pick them back up here.
- Shared by youThe timelines you have shared out, and who can see them.
- Share this timelineOpens the Share dialog above for the timeline you are currently viewing.
Comments — talk about it in place
On a shared timeline, every item carries a Comments section at the bottom of its panel — events, but also projects, goals, habits and journals. Open one, write a comment (up to 2000 characters) or reply to one, and everyone the timeline is shared with sees the thread under their own name. The discussion stays attached to the item it is about — no separate chat to dig through.
Sharing & your data · 23
Import & export
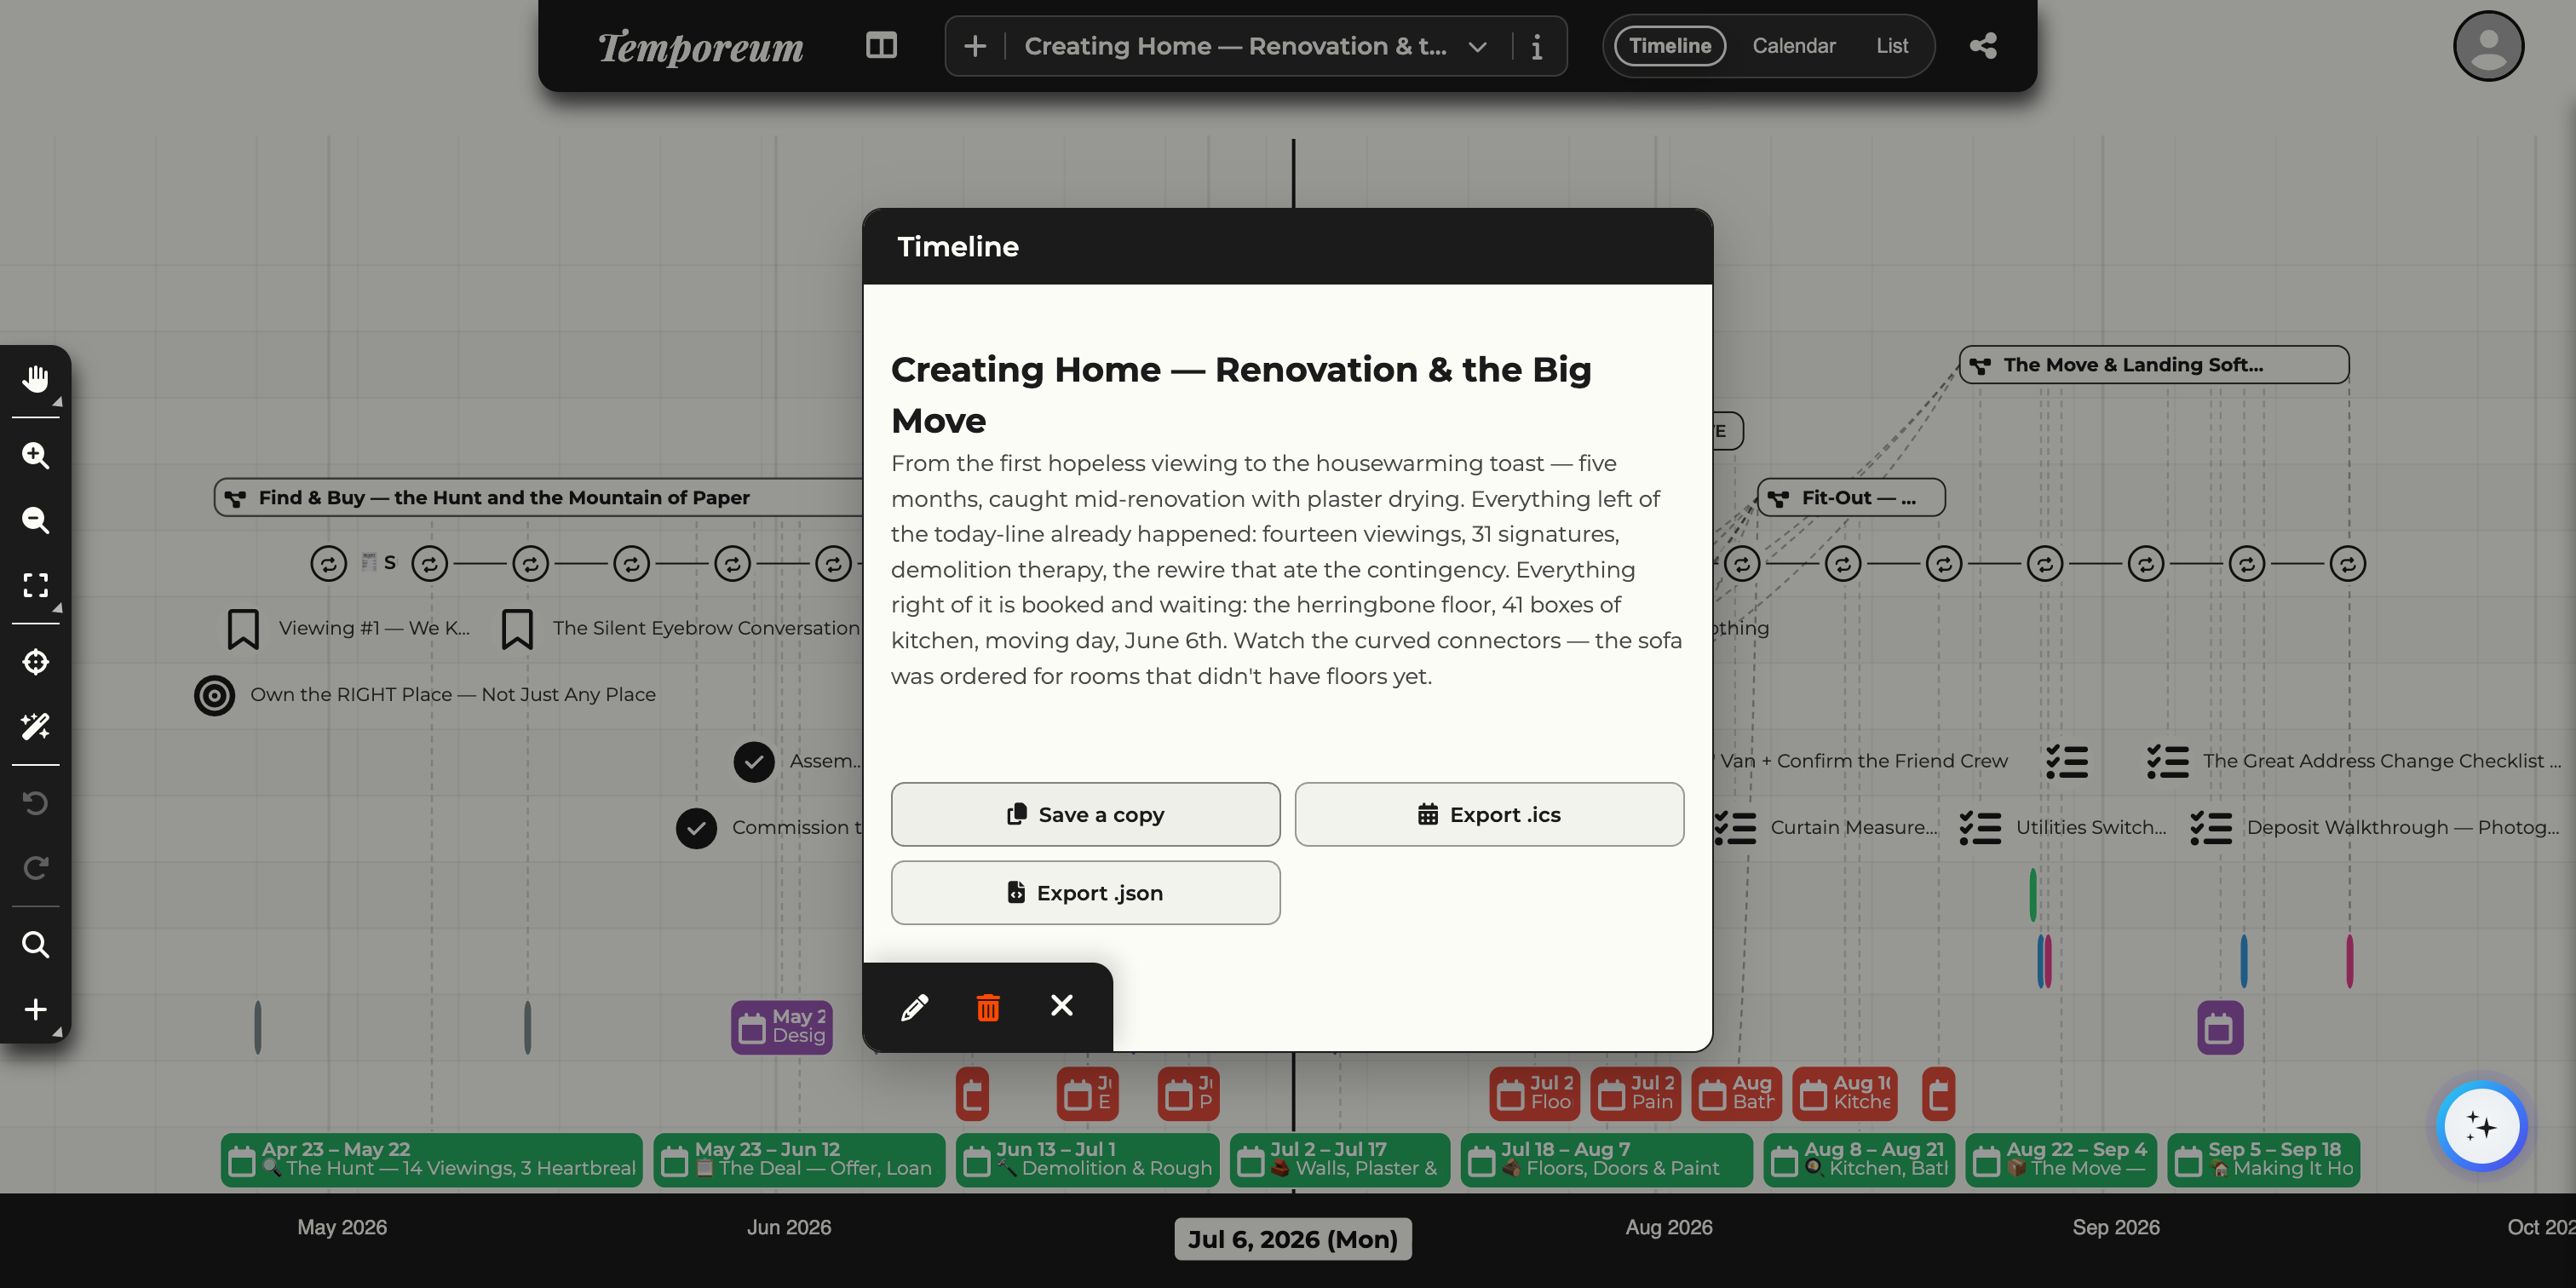
Your timelines are yours to take with you. From Timeline info (i) you can duplicate a timeline or export it — and when creating a new timeline you can import an existing calendar. (Sharing lives on its own — see Section 22.)
 1
2
3
1
2
3
- Save a copyDuplicate the whole timeline — handy before a big reorganization.
- Export .icsDownload a calendar file you can import into Google, Apple or Outlook calendars.
- Export .jsonA full, portable backup of the timeline’s data.
.ics file and its events land on a fresh timeline.Account
Make Temporeum yours.
Account · 24
Account & settings
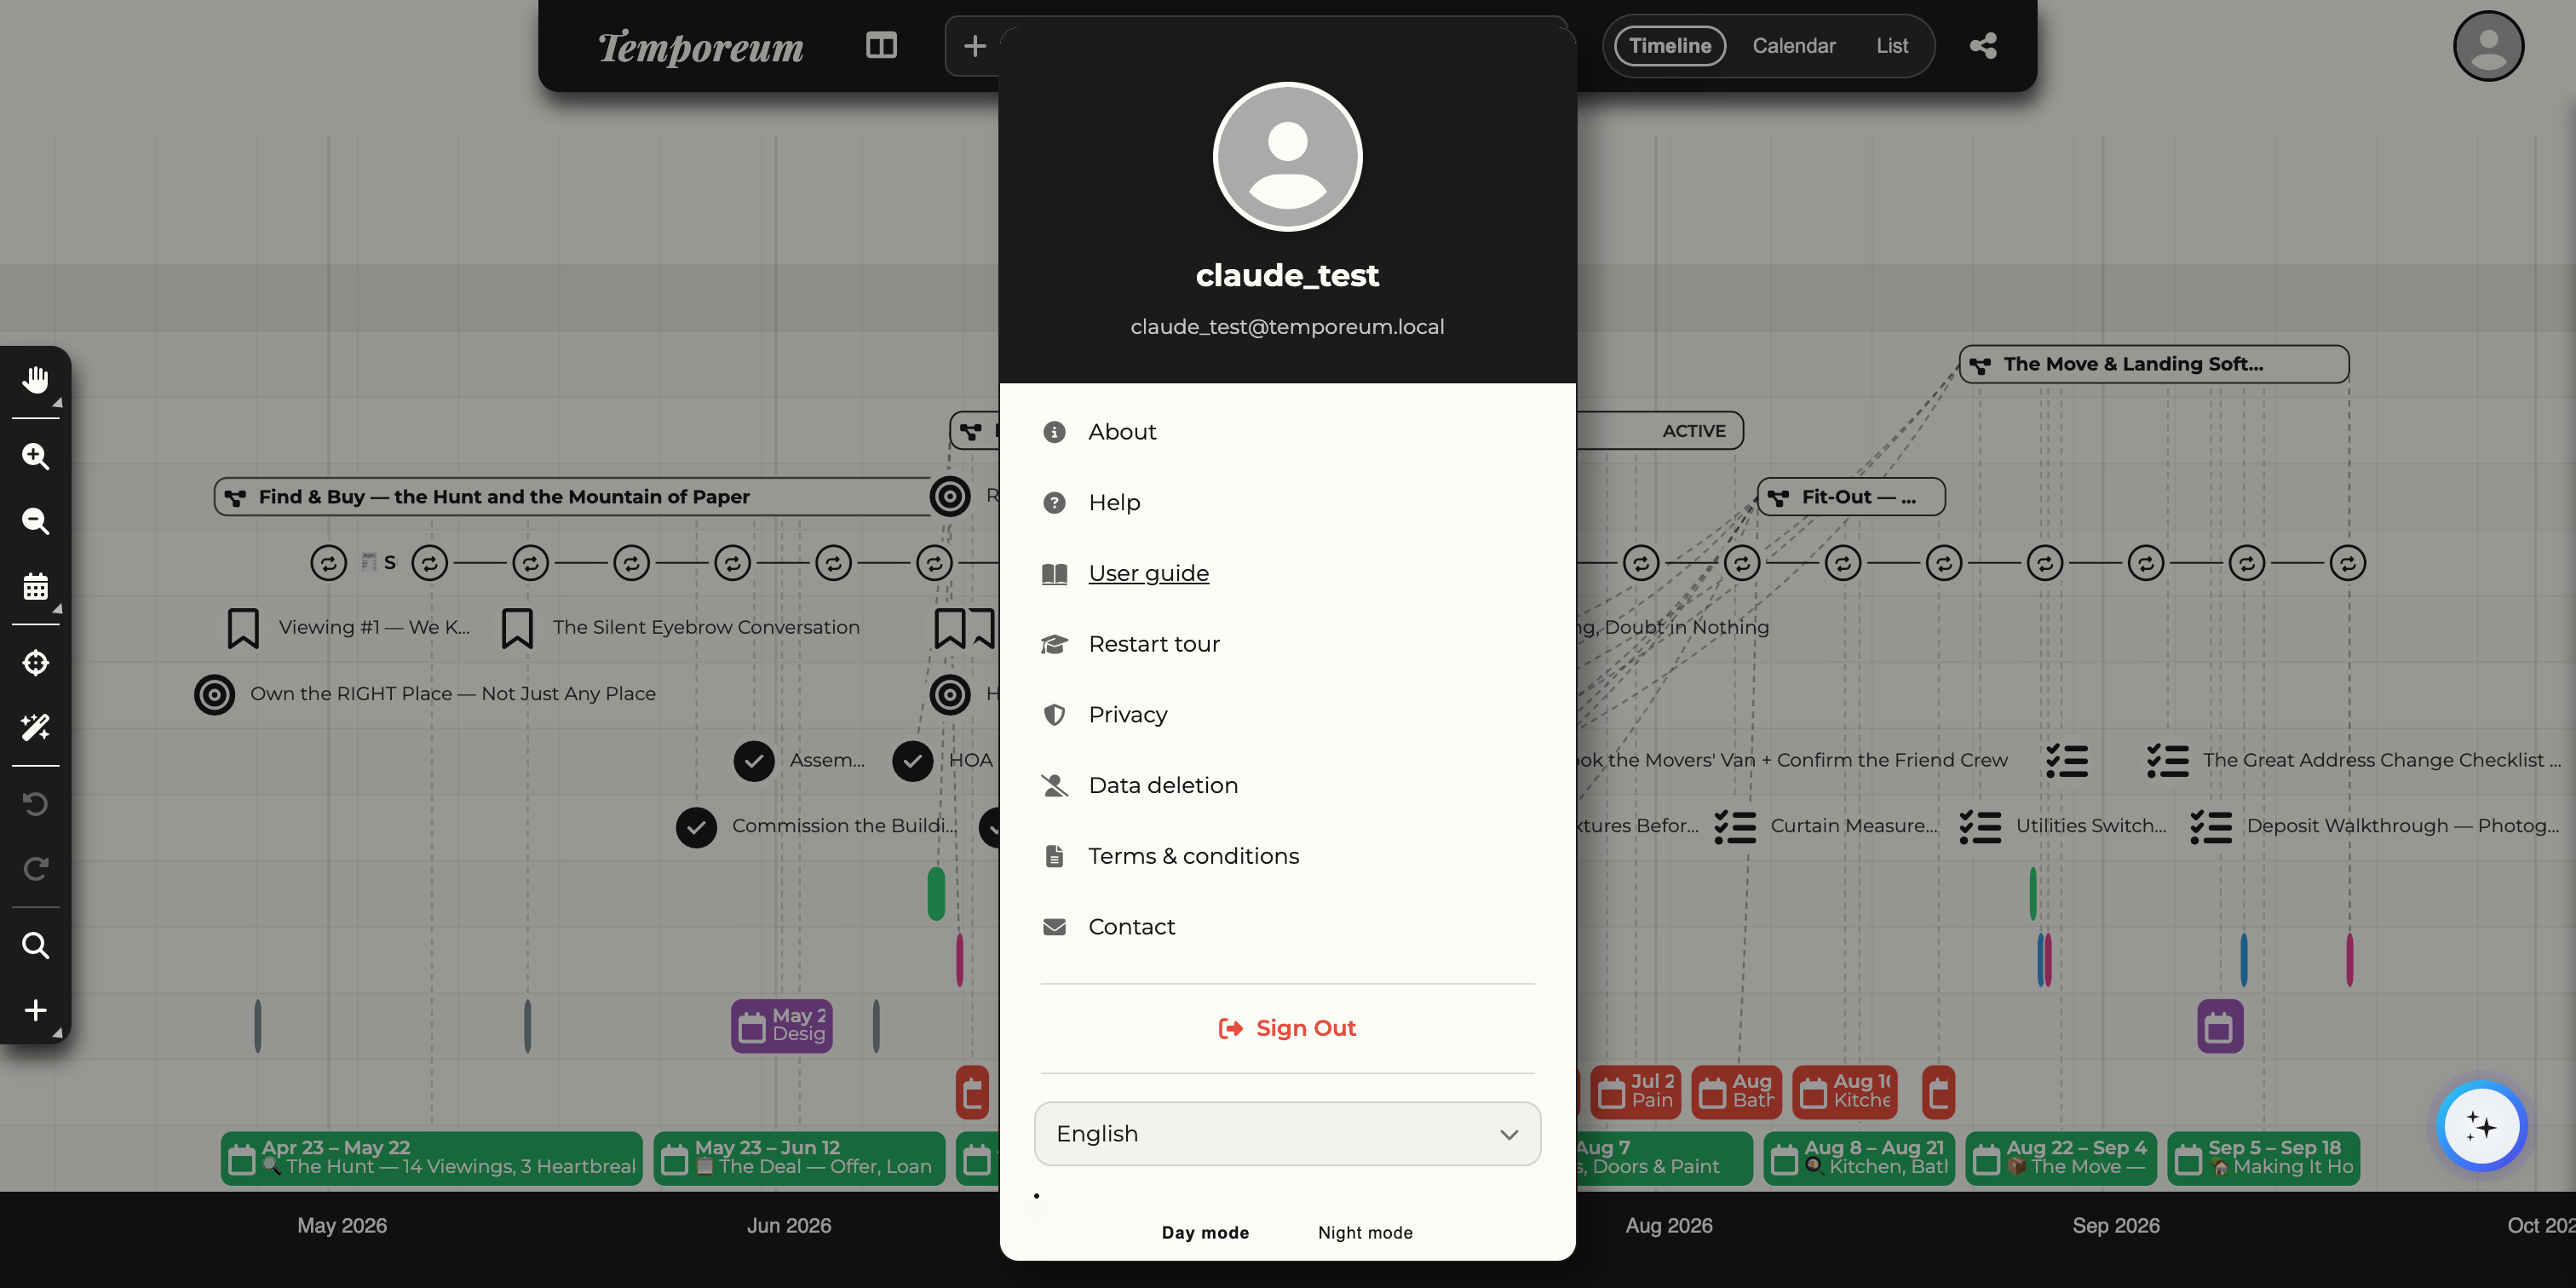
Click your avatar in the top-right corner to open your account. From here you manage who you are, what language you see, how the app looks, and where to get help. One thing that is not here: passwords. To change or recover yours, sign out and use Forgot password? on the login screen — Temporeum emails you a reset link.
 1
2
3
4
5
1
2
3
4
5
- ProfileYour picture, name and email. Click the picture to change it.
- Quick linksAbout, Help, User guide, Privacy, Data deletion, Terms and Contact — plus Restart tour when a demo tour is available.
- Sign outLog out of Temporeum.
- LanguageSwitch the interface language — Temporeum speaks several.
- Day / Night modeFlip between the light and dark themes to suit your eyes and your room.
Quick reference
Shortcuts and quick answers.
Quick reference · 25
Keyboard shortcuts
Everything on this list also exists as a button, so nothing here is required — but once a timeline gets busy, the keyboard is faster. On a Mac use ⌘ where the table says Ctrl.
| Shortcut | What it does | When it works |
|---|---|---|
| Ctrl + Z | Undo the last change | Anywhere on the canvas |
| Ctrl + Shift + Z or Ctrl + Y | Redo what you undid | Anywhere on the canvas |
| Ctrl + C | Copy the selected events | With events selected (Section 20) |
| Ctrl + X | Cut the selected events | With events selected, on a timeline you can edit |
| Ctrl + V | Paste the copied or cut events | On a timeline you can edit |
| Delete or Backspace | Delete the selected events (asks first) | With events selected, on a timeline you can edit |
Quick reference · 26
Troubleshooting & FAQ
The short answers to the questions that come up most often.
- “Some of my events have disappeared.”Almost always a filter. Check the magnifier in the toolbar — a badge on it means the canvas is showing a filtered subset. Open Search & Filters and clear them (Section 19).
- “I moved or deleted something by mistake.”Press Ctrl + Z (or the Undo button) — every canvas change can be stepped back and forward (Sections 20 and 25).
- “The canvas looks crowded and events overlap.”Use Optimize timeline — it restacks overlapping events cleanly without changing any dates (Section 20).
- “Temporeum asked to ‘extend the project’ — what is that?”You filed something dated outside its project’s span. Choose Extend to widen the band to include it, or continue without changing the project’s dates (Section 10).
- “Where do I change my password?”Not in settings — sign out and use Forgot password? on the login screen; Temporeum emails you a reset link (Section 24).
- “How do I get the welcome demos or the tour back?”Open your avatar menu and choose Restart tour — demos are always added alongside your own timelines, never over them (Section 2).